🧢 Beautiful ✨ Detailed πŸ’ Adorable

Basic Knots & Techniques Pattern

Basic Knots & Techniques Pattern
4.0β˜… Rating
1-2 Hours Time Needed
3.6K Made This
βœ‚οΈ

Beginner Friendly Level

Perfect for those just starting their crochet journey, with clear instructions and simple techniques

⏱️

Quick Make

Complete in under 2 hoursβ€”lightning fast fun for instant gratification and quick gifts.

🏑

Cozy Accent

A warm touch for your space that transforms ordinary corners into inviting nooks filled with handmade charm.

About This Basic Knots & Techniques Pattern

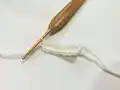
This pattern is a visual, step-by-step guide to basic macrame knots and mounting techniques. It covers the Lark's Head, Square Knot, Double Half Hitch, Overhand and Gathering Knot with photographic examples. Ideal for crafters who want to build a strong foundation in cordwork and small macrame projects.

Basic Knots & Techniques Pattern crochet pattern - detailed view of completed project

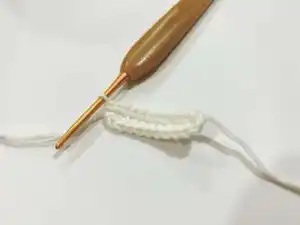
You will gain confidence mounting cords to a dowel and forming standard knots used in wall hangings and accessories. Each knot includes clear numbered steps and picture references for easy learning.

Why You'll Love This Basic Knots & Techniques Pattern

I absolutely love this pattern because it breaks down complex-looking macrame techniques into simple, approachable steps that anyone can follow. I love how each knot immediately makes basic cordwork feel purposeful and decorative. I enjoy the tactile satisfaction of creating neat, consistent knots and the way a few stitches transform loose cords into structured designs. I also appreciate that the pattern is photo-driven, making it easy to check your progress and correct mistakes as you go.

Basic Knots & Techniques Pattern step 1 - construction progress Basic Knots & Techniques Pattern step 2 - assembly progress Basic Knots & Techniques Pattern step 3 - details and accessories Basic Knots & Techniques Pattern step 4 - final assembly and finishing

Switch Things Up

I love showing how small tweaks can change the whole look of a knot sequence, so try using thicker cord for a chunkier effect or thinner cord for a delicate aesthetic.

I often alternate cord colors to create striped knot rows β€” use contrasting shades on filler and working cords for visual interest.

Want a braided look? Combine square knots and alternating double half hitch rows to form chevrons and diagonal patterns.

I sometimes add beads onto filler cords before knotting to lock them in place and add ornamentation to a panel.

For softer drape, switch to a natural-fiber cord like jute or hemp; for a polished look, use mercerized cotton or synthetic cord with sheen.

I recommend experimenting with spacing: closer spaced Lark's Head knots give a dense field, while wider spacing creates airy designs.

Try varying knot tension within a row to create dimensional ridges and texture β€” tighten selectively to sculpt the piece.

To make a mini version for keychains, shorten cord lengths and use fine cord; for large wall hangings, plan for much longer filler cords and more repeats.

I often finish a gathering knot with a decorative wrap using a metallic cord or ribbon to add a focal point and secure the ends neatly.

Remember I like to mix knots: start with a row of Lark's Head mounts, then alternate square knots and double half hitches for a balanced, handcrafted composition.

Common Mistakes & How to Fix Them

βœ— Trying to hurry through mounting cords leads to uneven spacing and misaligned knots; take time to measure and space cords evenly before knotting. βœ— Pulling wraps too tight when making gathering knots can distort the core strands; keep wraps snug but not overlapping and adjust tension gradually as you work. βœ— Skipping the step of forming clear loops for the Lark's Head can create weak mounts; fold the working cord neatly in half and seat the loop on the dowel before tightening. βœ— Not keeping filler and working cords organized causes tangled patterns and mistakes; separate filler (core) cords and working (knotting) cords before starting and work one knot at a time. βœ— Forgetting to leave enough tail when finishing the gathering knot will make hiding ends difficult; leave a generous tail for threading and trimming during finishing.

Basic Knots & Techniques Pattern

This concise guide teaches you essential macrame knots with clear step-by-step instructions and photos. You will learn mounting, decorative and securing knots that form the foundation of many macrame projects. Perfect for makers who want to gain confidence with cord handling and knot sequences.

Beginner Friendly 1-2 Hours

Materials Needed for Basic Knots & Techniques Pattern

β€” Main Fabric

  • 01
    Cotton macrame cord 3-5mm (working cord) - length as required per project
  • 02
    Filler cords (core) - matching cotton cord, lengths depend on desired project size
  • 03
    Single strand wrapping cord for Gathering Knot - contrasting or same fiber, long enough to wrap several times
  • 04
    Wooden dowel rod or mounting rod - length depends on project width
  • 05
    Optional: accessory cords for decorative ends or tassels

β€” Tools Required

  • 01
    Dowel rod or wooden rod for mounting cords
  • 02
    Scissors for cutting cord ends
  • 03
    Measuring tape or ruler to measure cord lengths
  • 04
    Pins or clips to hold cords while spacing (optional)
  • 05
    Comb or brush for finishing fringes (optional)

Progress Tracker

0% Complete

β€” Terms :

Info :

Sinnet: A series of knots usually consisting of one specific type. Filler cords (Core): The unknotted cords over which the working cords are tied. Working cords (Tying cords, Knotters): The cords used to form the knots.

β€” The Lark's Head Knot :

Info :

The most common method of mounting cords is done with the Lark's head knot. To make this knot, we need 1 cord. Pictures A, B, C, D illustrate the sequence.

Step No.1 :

Fold working cord in half, place loops on top of the dowel (Picture A).

Step No.2 :

Pull the loop down behind and over the dowel (Picture B).

Step No.3 :

Pull the cord ends through the loop (Picture C).

Step No.4 :

Tighten it (Picture D).

β€” Reverse Lark's Head Knot :

Info :

A Reverse Lark's Head Knot is done in reverse so the bump is hidden in the back of the knot. This creates a cleaner front appearance.

Step 1 :

Fold the cord in half and place the loop under the dowel rod.

Step 2 :

Bring the loop round to the front and pull your two cords through the loop to tighten.

β€” The Square Knot :

Info :

To make a Square Knot, you will need four cords. The ones on the left and right will be your working cords and the two in the center will be your filler cords (Picture A).

Step No.1 :

Make the β€œnumber 4” shape with the left cord over 2 middle filler cords and behind the right (Picture B).

Step No.2 :

Then, bring the right cord behind the filler cords and up through the loop you made in with the left cord and tighten (Picture C, D).

Step No.3 :

Make the reserved β€œnumber 4” with the right cord over 2 middles and under the left. Bring the left cord behind 2 middles and up through the right loop. Tighten it (E, F, G).

β€” The Double Half Hitch Knot :

Info :

To make a Double Half Hitch Knot you'll have a filler cord and a working cord. This knot can be worked straight across or diagonally to create lines and patterns.

Step No.1 :

Take the cord on the right, the filler cord, and hold it diagonally across the other cords (Picture A).

Step No.2 :

Take the next cord (your first working cord) and bring it forward, up, and around the filler cord towards the right to form a counter-clockwise loop (Picture B).

Step No.3 :

Take the same working cord and to the left of the first knot, take it up, over, and through the loop (Picture C).

Step No.4 :

Repeat steps 2 through 3 of the double half hitch, moving down diagonally instead of straight across. Repeat until you have the look you want (Picture D, E).

β€” Overhand Knot :

Info :

The Overhand Knot is a basic knot that ties multiple cords together. It can be done with multiple cords or just one cord and is often used as a simple stopper or to secure ends.

Step No.1 :

Fold the cord into a loop (Picture A).

Step No.2 :

Pass the ends of the cords through the loop to tighten (Picture B, C).

β€” Gathering Knot :

Info :

Gathering Knot: To tie this knot, we need 1 strand as the wrapping strand, and the rope strand is the filler strand. It is used to neatly bind multiple cords together.

Step No.1 :

Place the wrapping strand in front of the rope strand and create the U shape by one end of it (Picture A).

Step No.2 :

Use the long part of wrapping strand wrapping around the rope strand. Each wrap will be under the previous wrap and be sure to keep them all snug together but not overlapping. Don't wrap it until the end of β€œU shape”. Pull the remaining strand through the loop which created by the end of the β€œU shape” (Picture B).

Step No.3 :

Pull the other ends of wrapping strand until the loop underneath the wrapping strand. Cut off the left-over strands on both sides (Picture C).

Assembly Instructions

  • Mount cords to the dowel using Lark's Head knots, spacing cords evenly across the rod before tightening each knot.
  • Form square knots using groups of four cords, alternating left and right sequences to create even knot rows.
  • Use double half hitch knots to create diagonal or straight lines by selecting a filler cord and wrapping working cords around it consistently.
  • Finish grouped cords with a gathering knot: form a U, wrap snugly with the wrapping strand, pull the tail through the loop, then trim excess ends for a clean finish.

Important Notes

  • πŸ’‘Keep filler (core) cords and working (tying) cords organized before knotting to avoid tangles and ensure even patterns.
  • πŸ’‘Maintain consistent tension while knotting; too tight knots distort the design and too loose knots look sloppy.
  • πŸ’‘Measure and cut cords with a margin before starting; it is better to have extra length than to run short mid-project.
  • πŸ’‘Practice each knot a few times on scrap cords to become familiar with hand movements before working on your final piece.

This compact guide to essential macrame knots will jumpstart your cordwork projects and wall hangings. It includes clear photo steps for each knot and practical finishing tips. Whether you are making a simple plant hanger or a decorative panel, these techniques will serve you well. πŸͺ’🧢

You ask,

we answer.

FAQs

What size cord should I use for these knots?

A 3-5mm cotton macrame cord works well for most of these knots; choose thicker cord for bold texture or thinner for delicate designs.

How long should I cut my cords before starting a project?

Cut lengths depend on the project, but allow generous extra length (at least 30-50% more) for knots and finishing; practice on scraps to estimate accurately.

Can I use synthetic cords instead of cotton?

Yes, synthetic cords work but behave differently; cotton holds knots nicely and combs out fringes well, while synthetics may be slipperier and less fluffy.

Is prior macrame experience required to follow this guide?

No, this guide is beginner friendly and photo-driven, but practicing each knot on scrap cords will speed your learning and improve results.