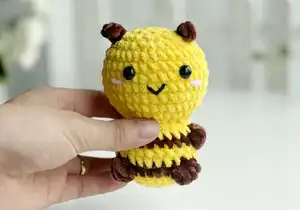
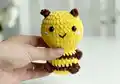
This charming no-sew bee amigurumi pattern teaches you how to crochet a tiny, gift-ready bee with clear step-by-step rounds and helpful photos. You will work from the body up to the head, switching colors for stripes and adding simple details like a beard, eyes, and embroidered cheeks. The pattern uses super bulky yarn for a quick, squishy finish perfect for gifting or decorating.
Progress Tracker
0% Complete
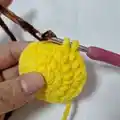
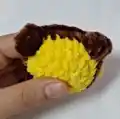
— Bee: Body and Head :
Round 1 :
6 SC in an MR (6)
Round 3 :
(SC, INC) 6 times (18)
Round 4 :
(2 SC, INC) 6 times (24)
Info :
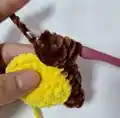
Change to Brown yarn
Round 5 :
8 SC, BO, 6 SC, BO, 8 SC (24)
Info :
Change to Yellow yarn
Round 6 :
8 SC, SC into the stitch's BO, 6 SC, SC into the stitch's BO, 8 SC (24)
Info :
Change to Brown yarn
Round 8 :
6 SC, BO, 10 SC, BO, 6 SC (24)
Info :
Change to Yellow yarn
Round 9 :
6 SC, SC into the stitch's BO, 10 SC, SC into the stitch's BO, 6 SC (24)
Round 10 :
(SC, DEC) 8 times (16)
Round 11 :
FLO, (SC, INC) 8 times (24)
Round 12 :
(SC, INC) 12 times (36)
Round 19 :
(2 SC, DEC) 9 times (27)
Round 20 :
(SC, DEC) 9 times (18)
Round 21 :
(SC, DEC) 6 times (12)
Info :
Weave in the yarn end and cut
— Bee: Beard and Finishing :
Info :
Pick up the yarn from row 19: 4CH, turn: 3SC
Info :
Attach the eyes between rows 16 and 17.
Info :
Use black yarn to embroider the mouth and pink yarn to embroider the cheeks.
— Mouse: Body and Head :
Info :
Begin with Grey yarn. Join the new round with a slip stitch and chain 1.
Round 1 :
6 SC in an MR (6)
Round 3 :
(SC, INC) 6 times (18)
Round 4 :
(2 SC, INC) 6 times (24)
Round 5 :
8 SC, BO, 6 SC, BO, 8 SC (24)
Round 8 :
6 SC, BO, 10 SC, BO, 6 SC (24)
Round 10 :
(SC, DEC) 8 times (16)
Round 11 :
FLO, 6SC, (3SC in one st) 4 times, 6SC (24)
Round 12 :
(SC, INC) 12 times (36)
Round 13 :
16SC, (BLO: 4SC), 16SC (36)
Round 14-15 :
15SC, (BLO: SC), 4SC, (BLO: SC), 15SC (36)
Round 16 :
(2SC, DEC) 4 times, (BLO: 2SC, DEC), (2SC, DEC) 4 times (30)
Round 20 :
(SC, DEC) 9 times (18)
Round 21 :
(SC, DEC) 6 times (12)
Info :
Weave in the yarn end and cut
— Mouse: Ears (Make 2) :
Info :
Begin with Pink yarn. Join the new round with a slip stitch and chain 1.
Round 1 :
6SC in an MR (6)
Round 2 :
(SC, INC) 3 times (9)
Round 3 :
(2SC, INC) 3 times (12)
Info :
Change to Grey yarn
Round 4 :
(SC, INC) 6 times (18)
Info :
Attach the ear point straight from the arm going up with 3 SLST at R18-20
— Mouse: Nose :
Info :
Begin with Black yarn. Join the new round with a slip stitch and chain 1.
Round 1 :
4SC in an MR (4)
Info :
Change to Grey yarn
Round 2 :
(SC, INC) 2 times (6)
Round 3 :
(2SC, INC) 2 times (8)
Round 4 :
(SC, INC) 4 times (12)
Info :
Attach the nose to the head with 12 SLST at BLO of R13-16. Attach the eyes at R15-16, 6st apart. Sew the line like this.
— Puppy Dog: Ear (Make 2) :
Round 1 :
6 SC in an MR (6)
Round 5 :
(2 SC, DEC) 3 times (9)
Round 8 :
(SC, DEC) 3 times (6)
— Puppy Dog: Body and Head :
Info :
Begin with Brown yarn
Round 1 :
6 SC in an MR (6)
Round 3 :
(SC, INC) 6 times (18)
Round 4 :
(2 SC, INC) 6 times (24)
Round 5 :
8 SC, BO, 6 SC, BO, 8 SC (24)
Round 6 :
8 SC, SC into the stitch's BO, 6 SC, SC into the stitch's BO, 8 SC (24)
Round 8 :
6 SC, BO, 10 SC, BO, 6 SC (24)
Round 9 :
6 SC, SC into the stitch's BO, 10 SC, SC into the stitch's BO, 6 SC (24)
Round 10 :
(SC, DEC) 8 times (16)
Round 11 :
FLO, (SC, INC) 8 times (24)
Round 12 :
(SC, INC) 12 times (36)
Round 16 :
(2 SC, DEC) 9 times (27)
Round 20 :
2SC, DEC, fold the ears in half and crochet them together at the head 3SC, (DEC, 2SC) 2 times, DEC, SC, DEC, fold the ears in half and crochet them together at the head 3SC, DEC, 2 SC (21)
Round 21 :
(SC, DEC) 7 times (14)
Info :
Weave in the yarn end and cut
— Puppy Dog: Nose :
Round 1 :
Crochet 12 SLst from rows 14-16 in a circular shape as the photo
Round 2 :
Crochet 12 SC crochet into the 12 slip
Round 3 :
(SC, DEC) 4 times (8)
Info :
Cut the yarn. Attach the eyes at row 16
Info :
Attach any facial features and embroider details as shown in photos for each toy.
This adorable Bee No Sew amigurumi pattern is designed to be quick, cute, and easy to gift or display. The no-sew construction and super bulky yarn make it a fast win for any maker looking for a satisfying afternoon project. Enjoy making this tiny treasure and customizing it with your favorite little details. 🧶🐝✨