🧢 Beautiful ✨ Detailed πŸ’ Adorable

Colourful Mini Dino Amigurumi Pattern

Colourful Mini Dino Amigurumi Pattern
4.3β˜… Rating
2-4 Hours Time Needed
2.6K Made This
βœ‚οΈ

Intermediate Level

Ideal for those with basic crochet experience, featuring slightly more advanced stitches and techniques to expand your skills.

⏱️

Bite-Sized Project

Finishes in 2-4 hoursβ€”perfect for an afternoon of creative relaxation.

🧸

Cute Companion

An adorable friend to cherish, handcrafted with love to bring comfort and joy for years to come.

About This Colourful Mini Dino Amigurumi Pattern

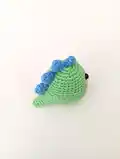
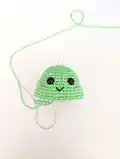
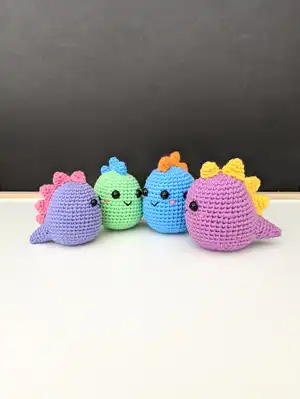
This pattern teaches you how to crochet a tiny Colourful Mini Dino amigurumi with a single-piece head and body, a crocheted tail and cute spikes. It uses 8 ply (DK) cotton and a 3mm hook to create a compact 7.5cm high toy with safety eyes and embroidered features. The pattern includes step-by-step rounds, optional spike sizes and clear assembly instructions so you can finish a neat little dino.

Colourful Mini Dino Amigurumi Pattern crochet pattern - detailed view of completed project

Perfect as a quick make or a small handmade gift, this pattern is easy to customise with different yarn colours. Full materials, abbreviations and helpful notes are included to guide you through every step.

Why You'll Love This Colourful Mini Dino Amigurumi Pattern

I absolutely love this pattern because it lets me play with colour and texture in a tiny, satisfying project. I enjoy how quickly the dino comes together β€” it is perfect for when I want a fast, rewarding crochet session. The design balances simple shaping with a few fun techniques like re-joining yarn and sewing spikes, which keeps the process interesting. I also adore the finished look: the little spikes and embroidered cheeks give each dino so much personality. Sharing this pattern made me smile because it is an accessible way for others to create a small, joy-filled handmade companion.

Colourful Mini Dino Amigurumi Pattern step 1 - construction progress Colourful Mini Dino Amigurumi Pattern step 2 - assembly progress Colourful Mini Dino Amigurumi Pattern step 3 - details and accessories Colourful Mini Dino Amigurumi Pattern step 4 - final assembly and finishing

Switch Things Up

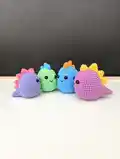
I love experimenting with colours on this mini dino β€” try pastel shades for a soft, nursery-friendly look or neon brights for a playful modern set.

I sometimes change spike colours for each spike to create a rainbow row of spikes, which looks amazing when you make a set of dinos.

If you want a larger dino, I recommend using a thicker yarn and a larger hook; this will give you a chunkier, cuddlier toy.

For a tiny keychain version, use a finer yarn and a smaller hook and replace safety eyes with embroidered eyes for safety.

I often add tiny accessories like a crocheted bow, scarf or a little felt heart to personalise each dino for gifting.

Try embroidering different facial expressions β€” a small smile, a surprised mouth, or closed eyes β€” to give each dino its own personality.

I sometimes use metallic thread for the cheeks or mouth to add a subtle shimmer that catches the light.

To make the dino poseable, you can add a small wire inside the tail or body, but be careful if the toy is for children as wire is not child-safe.

I like to mix yarn textures too β€” a boucle or soft wool for the body with smooth cotton for spikes creates an interesting tactile contrast.

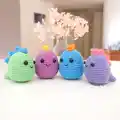
For gifting, consider making a trio of dinos in coordinating colours and present them in a small box with a handwritten tag; it makes a charming handmade present.

I also recommend trying different eye sizes; swapping 8mm safety eyes for smaller or larger eyes will change the toy's expression dramatically.

Common Mistakes & How to Fix Them

βœ— Skipping the stitch marker during continuous rounds causes you to lose track of the start of the round; place a stitch marker or scrap yarn at the first stitch of every round and move it each round. βœ— Placing safety eyes too low or too high makes the face look unbalanced; place the safety eyes between rounds 9 and 10 (st 12 and st 18) as instructed and check placement before securing. βœ— Not stuffing as you go results in awkwardly shaped toys; begin stuffing when instructed (after R22 for the head) and add stuffing gradually, shaping as you work to maintain smooth curves. βœ— Failing to re-join yarn securely for the tail means it can come loose; re-join to the first skipped stitch of R16 using a standing dc or your preferred secure join so the tail stitches count correctly. βœ— Leaving very long or very short tails for sewing makes assembly fiddly; leave a long thread where requested (small spike and tail) to sew parts comfortably and weave in ends neatly afterwards.

Colourful Mini Dino Amigurumi Pattern

Make a tiny, colourful mini dino amigurumi with bright or pastel colours. This friendly little dino is quick to crochet and great for gifting or decorating. The pattern includes full round-by-round instructions, spike pieces and assembly details to help you finish a neat, professional little toy. Enjoy stitching and personalising your mini dinosaur!

Intermediate 2-4 Hours

Materials Needed for Colourful Mini Dino Amigurumi Pattern

β€” Main Fabric

  • 01
    Head and body: 8 ply (DK) cotton in green (small amount for one mini dino)
  • 02
    Spikes: 8 ply (DK) cotton in blue (small amount for spikes)
  • 03
    Black embroidery thread for mouth details
  • 04
    Pink embroidery thread for cheek details
  • 05
    Polyester fibrefill stuffing for filling body and tail
  • 06
    8mm safety eyes (2 pieces)

β€” Tools Required

  • 01
    3mm crochet hook
  • 02
    Yarn needle for sewing and weaving in ends
  • 03
    Scissors
  • 04
    Stitch markers or piece of scrap yarn to mark rounds
  • 05
    Polyester fibrefill stuffing
  • 06
    8mm safety eyes (2 pieces)
  • 07
    Small embroidery needle for mouth and cheeks

Progress Tracker

0% Complete

β€” Notes :

Infos :

This pattern uses UK terminology. This pattern is worked in continuous rounds unless otherwise specified. Rounded brackets () indicate the pattern and the number of times it is repeated e.g. (dc 1, inc) x 6 means double crochet one stitch, increase in the next stitch. Repeat 6 times. Square brackets [] indicate the number of stitches you should have after each round/row. Use a stitch marker or piece of scrap yarn to mark the start of each round/row.

β€” Materials :

Infos :

Head and body: 8 ply (DK) cotton in green. Spikes: 8 ply (DK) cotton in blue. Black embroidery thread to embroider mouth. Pink embroidery thread to embroider cheeks. 3mm crochet hook. Yarn needle. Polyester fibrefill stuffing. 8mm safety eyes. Colourful Mini Dino will be approximately 7.5cm tall when using the suggested yarn weight and hook size.

β€” Abbreviations - UK Terminology :

Infos :

dc: double crochet. inc: double crochet increase. dec: double crochet invisible decrease. R: round. st(s): stitch(es). ch: chain.

β€” Head and Body :

Round 1 :

6 dc in magic circle [6 sts]

Round 2 :

(inc) x 6 [12 sts]

Round 3 :

(dc 1, inc) x 6 [18 sts]

Round 4 :

(dc 1, inc, dc 1) x 6 [24 sts]

Round 5 :

(dc 3, inc) x 6 [30 sts]

Round 6 :

dc in each st [30 sts]

Round 7 :

(dc 7, inc, dc 7) x 2 [32 sts]

Round 8 :

(dc 15, inc) x 2 [34 sts]

Round 9 :

(dc 8, inc, dc 8) x 2 [36 sts]

Round 10 :

dc in each st [36 sts]

Round 11 :

(dc 5, inc) x 6 [42 sts]

Round 12 - 15 :

dc in each st i.e. 4 rounds [42 sts]

Info :

Place safety eyes between rounds 9 and 10 (st 12 and st 18). This placing is important as we will be crocheting the tail to the body.

Info :

Embroider a mouth between the eyes and some cheeks next to the eyes.

Round 16 :

dc 34, ch 8, skip 8 sts [42 sts]

Info :

We will be crocheting the tail using this chain and the skipped 8 stitches later on

Round 17 - 18 :

dc in each st i.e. 2 rounds [42 sts]

Round 19 :

(dc 5, dec) x 6 [36 sts]

Round 20 :

(dc 2, dec, dc 2) x 6 [30 sts]

Round 21 :

(dc 3, dec) x 6 [24 sts]

Round 22 :

(dc 1, dec, dc 1) x 6 [18 sts]

Info :

Begin stuffing

Round 23 :

(dec) x 9 [9 sts]

Info :

Finish stuffing

Info :

Fasten off and leave a long thread. Thread the yarn through the front loops of the 9 sts and pull to close. Weave in the end.

β€” Tail :

Infos :

Re-join yarn to first skipped stitch of R16 using a standing dc (or your preferred method). The standing dc will count as the first st of the round. Note: refer to video links on page 3 which show how to re-join yarn using a standing dc as well as how to crochet the tail into the skipped stitches and chain from R16 of the body.

Round 1 :

dc in each st [16 sts]

Round 2 :

(dc 3, dec, dc 3) x 2 [14 sts]

Round 3 :

(dc 5, dec) x 2 [12 sts]

Round 4 :

(dc 2, dec, dc 2) x 2 [10 sts]

Info :

Begin stuffing

Round 5 :

(dc 3, dec) x 2 [8 sts]

Round 6 :

(dc 1, dec, dc 1) x 2 [6 sts]

Round 7 :

(dc 1, dec) x 2 [4 sts]

Info :

Finish stuffing

Info :

Fasten off and leave a long thread. Thread the yarn through the front loops of the 4 sts and pull to close. Weave in the end.

β€” Small Spike (make 1) :

Round 1 :

4 dc in magic circle [4 sts]

Round 2 :

(dc 1, inc) x 2 [6 sts]

Round 3 :

(dc 1, inc, dc 1) x 2 [8 sts]

Info :

Fasten off and leave a long thread for sewing - we will be using the thread from the small spike to sew all the spikes to the body

β€” Medium Spike (make 3) :

Round 1 :

4 dc in magic circle [4 sts]

Round 2 :

(dc 1, inc) x 2 [6 sts]

Round 3 :

(dc 1, inc, dc 1) x 2 [8 sts]

Round 4 :

(dc 3, inc) x 2 [10 sts]

Info :

Fasten off - no need to leave a long thread as we will be using the thread from the small spike to sew these spikes to the body

β€” X-Small Spike (make 1) - optional :

Round 1 :

4 dc in magic circle [4 sts]

Round 2 :

(dc 1, inc) x 2 [6 sts]

Info :

Fasten off - no need to leave a long thread as we will be using the thread from the small spike to sew this spike to the body

β€” Putting It All Together :

Info :

Sew small spike over rounds 1 and 3 of the head and body. Sew the 3 medium spikes in a line using the thread from small spike. (Optional) Sew x-small spike last.

Assembly Instructions

  • Place safety eyes between rounds 9 and 10 (st 12 and st 18) before continuing with R16 so the eyes are secured in the correct position.
  • Embroider the mouth between the eyes and embroider pink cheeks next to the eyes using black and pink embroidery thread before attaching spikes.
  • Sew the small spike over rounds 1 and 3 of the head and body using the long thread from the small spike; use this thread to sew the 3 medium spikes in a line and optionally attach the x-small spike last.
  • Re-join yarn to the first skipped stitch of R16 using a standing dc and crochet the tail into the skipped stitches and chain from R16 of the body so the tail is integrated securely.
  • After closing the head and body (after R23), weave in ends and use a yarn needle to tidy any visible seams for a neat finish.

Important Notes

  • πŸ’‘Use a stitch marker or a piece of scrap yarn to mark the start of each round to avoid losing track during continuous rounds.
  • πŸ’‘Place safety eyes before closing the head and body as instructed so the eyes are positioned correctly and securely.
  • πŸ’‘Stuff the head and tail gradually as you go, beginning when indicated, to maintain a smooth shape and avoid lumps.
  • πŸ’‘Fasten off and leave long threads where requested for sewing spikes and closing openings to make assembly easier.
  • πŸ’‘Refer to the useful video links provided for techniques like magic circle, invisible decrease and re-joining yarn using a standing stitch.

Thanks for making this little Colourful Mini Dino β€” I hope it brings a smile to your day and brightens up your space! πŸ§ΆπŸ¦– This pattern was designed to be a quick, satisfying make that you can personalise with your favourite colours. Share your makes with #handmadebyani and #colourfulminidino so I can see your adorable creations! 🌈🧡

You ask,

we answer.

FAQs

What size will the finished piece be?

The Colourful Mini Dino will be approximately 7.5cm tall when using the recommended 8 ply (DK) cotton and a 3mm crochet hook.

Can I use different yarn weights for this pattern?

Yes, you can change yarn weight, but it will affect the final size; use an appropriate hook size for your chosen yarn and expect a larger or smaller finished dino.

Do I need prior crochet experience for this pattern?

This pattern is rated Intermediate, so basic knowledge of crochet in rounds, increases, decreases and sewing pieces together is recommended for best results.

How long does this project typically take to complete?

Most crocheters complete this mini dino in about 2-4 hours, depending on experience and how much time you spend on assembly and finishing details.