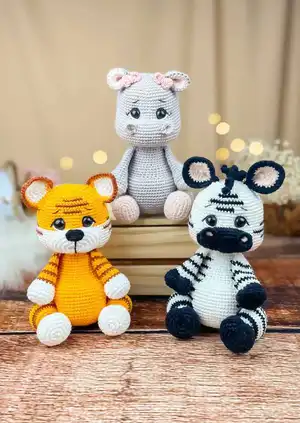
Create an adorable Benjamin Tiger amigurumi with this complete crochet pattern. You will find step-by-step rounds, clear color-change instructions, and helpful assembly notes so you can make a charming plush tiger. Perfect for gifting or adding to your handmade toy collection, this pattern guides you through shaping, facial details, and clothing.
Progress Tracker
0% Complete
— Head :
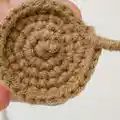
Round 1 :
Start with color EGG YOLK (2mm needle) 1- AM of 8 sc (8)
Round 2 :
2- Inc in each sc (16)
Round 3 :
3- [1 sc and 1 inc] 8x (24)
Round 4 :
4- [2 sc and 1 inc] 8x (32)
Round 5 :
5- [3 sc and 1 inc] 8x (40)
Round 6 :
6- sc over sc (40)
Round 7 :
7- [4 sc and 1 inc] 8x (48)
Round 8 :
8- 21 sc, change to color DATE
Round 9 :
9- [5 sc and 1 inc] 8x (56) (note: color changes in this area - follow photo guide)
Round 10 :
10- [6 sc and 1 inc] 3x, 1 sc, change to color DATE for 5 sc, 1 inc, 5 sc, change to color EGG YOLK, 1 sc, 1 inc, [6 sc and 1 inc] 3x (64)
Round 11 :
11- sc over sc (64)
Round 12 :
12- 28 sc, change to color DATE 30, 6 sc, change to color EGG YOLK, sc (64)
Round 13-17 :
13-17: sc over sc (64) - [5 rows]
Round 18-19 :
Change to color DATE 18-19 sc, change to color EGG YOLK, 25 sc, change to color DATE, 20 bp (64)
Round 19 :
Change to color WHITE 19- [3 sc and 1 inc] 16x (80)
Round 20-27 :
20-27 sc, change to color WHITE sc 24 sc, change to color DATE 29 (80)
Round 21 :
21- sc over sc (80)
Round 22-23 :
22-23 sc, change to color WHITE 25, 32 sc, change to color DATE, sc (80)
Round 23-27 :
23-27: sc over sc - [5 rows] (80)
Round 28 :
28- [3 sc and 1 dec] 16x (64)
Round 29 :
29- [1 dec and 2 sc] 16x (48)
Round 30 :
30- [1 sc and 1 dec] 16x (32)
Round 31 :
31- sc over sc all the way around (32). Close with sl st and cut a longer thread so you can sew the head to the body. Place the eyes between rows 16 and 17, separated by 6 sc visible between them.
— Whites of the Eyes :
Infos :
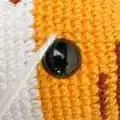
Use double Amigurumi yarn in color WHITE to make the whites of the eyes. 1- Insert the needle into the open part of the head (leave a piece of thread so you can tie some knots at the end), exit with it right at the corner of the eye (tip: try to put the needle in the middle of the corner of your eye). 2- Insert the needle right into the corner of the lower part of the eye and exit with it into the open part of the head. (Look at images 2 and 3). 3- Now go out with the needle in the corner of the second eye (tip: try to put the needle in the middle of the corner of your eye). 4- Insert the needle right into the corner of the lower part of the eye and exit with it into the open part of the head and then pull the two threads a little and tie 2 knots.
— Black Embroidery of Eyes :
Infos :
Use double Cléa yarn in the color BLACK to do black eye embroidery. 1- Insert the needle into the open part of the head (leave a piece of thread so you can tie some knots at the end), exit with it right in the corner of the eye (tip: try to put the needle in the middle of the corner of your eye). 2- Insert the needle right into the corner of the upper part of the eye and exit with it into the open part of the head. 3- Now go out with the needle in the corner of the second eye (tip: try to use the needle in the middle of the corner of the eye). 4- Insert the needle right into the corner of the upper part of the eye and exit with it into the open part of the head and then pull the threads a little and tie 2 knots.
— Eyebrows :
Infos :
Use Cléa yarn in the color BLACK to do eyebrows (Do not use double wire). 1- Insert the needle into the open part of the head (leave a piece of thread so you can tie some knots at the end), leave it on the second row above the eyes, skip 3 sc and insert the needle in a row above. (Look at images 1 and 2). 2- Now do the same process on the other side of the eyes (Look at images 4, 5, 6 and 7). Join the two ends of the thread and tie a few knots.
— Snout :
Round 1 :
Use color WHITE (2mm needle) 1- AM of 8 sc (8)
Round 2 :
2- Inc all around (16)
Round 3 :
3- 4 sc, 4 inc, 4 sc, 4 inc (24)
Round 4 :
4- 6 sc, 4 inc, 8 sc, 4 inc, 2 sc (32)
Round 5 :
5- 8 sc, 4 inc, 12 sc, 4 inc, 4 sc (40)
Round 6 :
6- 10 sc, 4 inc, 16 sc, 4 inc, 6 sc (48)
Info :
Close with sl st and cut a large thread, then sew the snout between rows 17 to 29 of the head (do not add stuffing), sew the snout, taking only the front straps of the sc. After sewing the snout, sink in the eyes, watch the video where I teach you how to do this.
— Muzzle Embroidery :
Infos :
Use thread in color BLACK (needle 2mm). 1- Make 5 ch, from the second ch, do 3 sc, in the last ch do 3 sc in the same place, at the bottom of the ch do 2 sc, in the last ch 2 sc in the same place (10). Close with sl st and cut a longer thread. Sew the black snout on top of the white snout and, if possible, then make the black detail to give the muzzle shape. Finish and hide threads.
— Ears :
Round 1 :
Start with the line in color WHITE (2mm needle) 1- AM of 11 sc (11)
Round 2 :
2- 3 sc in the same sc, 2 sc, 3 sc in the same sc, 2 sc, 3 sc in the same sc, 4 sc (17)
Round 3 :
3- 1 sc, 3 sc in the same sc, 4 sc, 3 sc in the same sc, 4 sc, 3 sc in the same sc, 5 sc (23)
Instruction :
Change to color EGG YOLK
Round 4 :
4- 2 sc, 3 sc in the same sc, 6 sc, 3 sc in the same sc, 6 sc, 3 sc in the same sc, 6 sc (29)
Round 5 :
5- 2 sc, change to color DATE 21 sc, change to color EGG YOLK, 6 sc, finish with 2 sl sts, cut a longer thread for sewing.
Info :
Sew the ears between rows 5 to 12 of the head, with 5 sc separating the eyes.
— Body :
Round 1 :
Use thread in color EGG YOLK (2mm needle) 1- AM of 8 sc (8)
Round 2 :
2- Inc all around (16)
Round 3 :
3- [1 sc and 1 inc] 8x (24)
Round 4 :
4- [2 sc and 1 inc] 8x (32)
Round 5 :
5- [3 sc and 1 inc] 8x (40)
Round 6 :
6- [4 sc and 1 inc] 8x (48)
Round 7 :
7- [5 sc and 1 inc] 8x (56)
Round 8 :
8- [6 sc and 1 inc] 8x (64)
Round 9-20 :
9-20: sc over sc (64) - [12 rows]
Round 21 :
21- 16 sc, 16 dec, 16 sc (48)
Round 22-25 :
22-25: sc over sc (48) - [4 rows]
Round 26 :
26- [4 sc and 1 dec] 8x (40)
Round 27-30 :
27-30: sc over sc (40) - [4 rows]
Round 31 :
31- [3 sc and 1 dec] 8x (32)
Round 32-33 :
32-33: sc over sc all the way around (32) - [2 rows]. Close with sl st and finish.
— Legs :
Round 1 :
Start with the line in color WHITE (2mm needle) 1- AM of 6 sc (6)
Round 2 :
2- Inc all around (12)
Round 3 :
3- [1 sc and 1 inc] 6x (18)
Round 4 :
4- [2 sc and 1 inc] 6x (24)
Round 5 :
5- [3 sc and 1 inc] 6x (30)
Round 6-8 :
6-8: sc over sc (30) - [3 rows]
Round 9 :
9- 6 sc, [1 dec and 1 sc] 6x, 6 sc (24)
Round 10 :
10- [2 sc and 1 dec] 6x (18)
Round 11 :
Change to color DATE 11- sc over sc (18)
Round 12 :
Change to color EGG YOLK 12- 6 sc, [1 inc] 6x, 6 sc (24)
Round 13 :
13- [1 sc and 1 inc] 6x, 6 sc, [1 sc and 1 inc] 6x, 6 sc (30) Change to color DATE
Round 14 :
14- [1 inc] 2x, 24 sc, [1 inc] 4x (36)
Round 15-16 :
15-16: sc over sc (36)
Round 17 :
17- sc over sc (36)
Round 18 :
Change to color EGG YOLK 18- 8 sc, [1 sc and 1 dec] 6x, 10 sc (30)
Round 19 :
19- sc over sc (30)
Round 20 :
Change to color DATE 20- sc over sc (30)
Round 21 :
Change to color EGG YOLK 21- 8 sc, [1 dec] 6x, 10 sc (24)
Round 22 :
22- [1 dec] 2x, 12 sc, [1 dec] 4x (18)
Info :
Add filling. But don't add too much padding to the thigh part, this part needs to be flatter.
Round 23 :
Change to color DATE 23- [1 sc and 1 dec] 6x (12)
Round 24 :
Change to color EGG YOLK 24- [1 dim] 6x (6). Close the leg with the magic ring inverted. Pass the thread from the outside to the inside only in the front loops of the 6 sc, then pull, tie a couple of knots and hide the thread.
— Leg Sewing :
Info :
Attach the legs to the body, before attaching, position the legs in the place you want to attach them. I like to leave them a little further forward, so there isn't a huge space between one leg and the other. Watch the video where I teach you how to attach the legs; the video explains and shows the rows where you will attach the legs.
— Arms :
Round 1 :
Start with the line in color WHITE (2mm needle) 1- AM of 6 sc (6)
Round 2 :
2- Inc all around (12)
Round 3 :
3- [1 sc and 1 inc] 6x (18)
Round 4 :
4- [2 sc and 1 inc] 6x (24)
Round 5-7 :
5-7: sc over sc (24) - [3 rows]
Round 8 :
8- 3 sc, [1 dec and 1 sc] 6x, 3 sc (18) Change to color DATE
Round 9 :
9- sc over sc (18) Change to color EGG YOLK
Round 10-11 :
10-11: sc over sc (18) - [2 rows]
Round 12-18 :
12-18: change between colors as instructed in the pattern photos, sc over sc (18)
Info :
Only put padding on the lower part of the arm.
Round 19 :
Change to color EGG YOLK 19- [4 sc and 1 dec] 3x (15)
Round 20 :
20- [3 sc and 1 dec] 3x (12)
Round 21 :
Change to color DATE 21- Fold the arm in half and close it with 6 sc (6). Make 1 ch and cut a larger thread to sew the arms to the body.
— Arm Sewing :
Info :
Sew the arms on row 31 of the body, usually leave a space of 7 or 8 sc between them. Watch the video where I teach how to sew the arms.
— Tie - Boy Version :
Infos :
Use thread in color EUCALYPTUS (needle 2mm). 1- Make 16 ch, skip the first ch and from the second make 1 sc for each ch (15). 2-12: Turn the work, make 1 ch, then sc over sc (15) - [11 rows]. Make 1 ch and fasten the thread. Fold the sachet tie, take a piece of thread in the same color as the tie, attach the thread to the middle of the tie, then make about 6 turns with the thread right in the middle, take the thread to the back of the tie, make a few knots and finish off the thread. Then make 1 cord with 51 ch, pass this cord to the back of the tie, then place it on the animal.
— Flores 2x - Girl Version :
Infos :
Start with color CREAM (2mm needle). Let's start with the core. 1- AM of 5 bp (5). Close with sl st in the front loop of the first sc. Go up 3 ch, in the next loop make 1 sl st. Follow this sequence until you complete 5 petals. 2- In the second row, work on the straps behind the stitches in the first row. Make 1 increase all the way around (10). Close with sl st in sc. Change to color WHITE. Now let's make the back petals: make 3 dc in the same place, 1 ch, 1 sl st in the next dc to complete 5 petals. Close with sl st and cut a longer thread on each side of the ears.
— Dress - Girl's Version :
Round 1 :
Use thread in color CREAM (needle 3mm) 1- Make 42 ch, close with sl st in the first ch (it will form a ch ring). Go up 3 ch and in the same place 1 hdc, continue doing 1 hdc increase for each ch (84). Close with sl st in the first ch counting from top to bottom.
Round 2 :
2- Go up 2 ch and do 1 hdc, 1 inc of hdc, follow this sequence until the end [2 hdc and 1 inc]. Close with sl st in the first ch counting from top to bottom.
Round 3-5 :
3-5: Go up 2 ch and do hdc over hdc all the way around. Close with sl st in the first ch - [3 rows]. In the last row, close with sl st and fasten the thread.
Infos :
Now attach the thread to the color CREAM in any loop of the coil so that the seam does not stick to the front, try leaving it behind 1-2. After securing the thread, make sc all around. Close with 3-7 sc, 24 ch, skip 6 ch and make 1 sc for each ch, 30 sc. Do 1 sc for each ch, 6 sc. Then make 2 buttons with the sc stitch. Place the dress on the animal and position the buttons on the lug and sew it on.
This Benjamin Tiger amigurumi pattern is designed to be fun and satisfying for makers of intermediate skill. Follow the step-by-step rounds and color-change notes to recreate the exact stripes and sweet facial details. Make a trio or personalize colors for a unique handmade gift. 🧶🐯✨