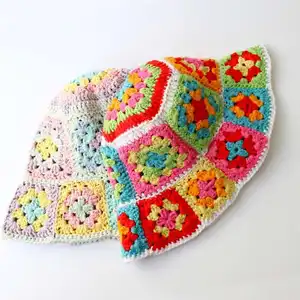
Make a bright, granny-square inspired bucket hat using simple crochet motifs joined together for a cheerful summer accessory. You will work a hexagonal top, six granny squares and eleven trapezoids, then sew them together to form a structured brim. The pattern uses basic double crochet clusters and joining techniques so you can create a playful, handmade hat that stands out.
Progress Tracker
0% Complete
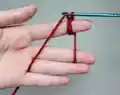
— Magic Ring :
Infos :
The magic ring (magic loop) is used for beginning a crochet project worked in rounds and produces a small neatly closed hole in the center of the first round. This method can be used for beginning hats, doilies and other projects worked in rounds.
Info :
Wrap yarn around the index finger of your left hand. Holding crochet hook in your right hand, insert hook under the two yarn loops and hook the yarn coming from the skein or ball, pull loop through. Yarn over hook and pull loop through loop on hook. Now you have a Chain-1.
Info :
From now, your pattern will tell you the number of stitches ( SC, HDC, DC) crochets to make (by insert hook in ring, yarn over and pull up loop,etc..). End by making a Slip stitch in the first Stitch and by pulling the yarn end (yarn tail) to close the ring.
Info :
So, let's get started!
— The Hexagonal Base (make 1) :
Info :
I made each round with a different colour. Then, after each round, cut the yarn and start the next row with a different color. The starting Ch 3 is considered a DC.
Round 1 :
make a Magic ring, into ring crochet Ch3(note: consider Ch3 as first DC), 2 DC, ch2, *3 DC, Ch2*, repeat from *-* for 5 times, Join with a Sl St to the top of first Ch3. Cut the yarn. < 6 groups of 3 DC, 6 Ch2>
Round 2 :
Add the yarn in the last ch 2 space - where you finished the previous row and you made the sl. st., Ch3 and 2 DC into the same Ch 2 space, * in next ch2 space make (3 DC, Ch2, 3 DC) * repeat from *-* for 5times, in the beginning Ch2 space make 3 DC, Ch2, and join with a Sl St to the top of first Ch3. Cut the yarn. < 12 groups of 3 DC, 6 Ch2>
Round 3 :
Add the yarn in the last ch 2 space - where you finished the previous round, Ch3 and 2 DC into the same Ch 2 space, make 3 DC in the space Between the DC groups, *in next ch2 space make (3 DC, Ch2, 3 DC), make 3 DC in between the DC groups*, repeat *-* x 5 times in the beginning Ch2 space make 3 DC, Ch2 and join with a Sl St to the top of first Ch3. Cut the yarn. < 18 groups of 3 DC>
Round 4 :
( no more Ch 2 space): Add the yarn in the last ch 2 space - where you finished the previous round, Ch3 and 2 DC into the same Ch 2 space, make 3 DC in the space Between the DC groups x 2 times *in next ch2 space make 6 DC, (make 3 DC in the space between the DC groups)x 2 times* repeat from *-* x 5 times, in the beginning Ch2 space make 3 DC and join with a Sl St to the top of first Ch3. Cut the yarn. < 72 DC>
Info :
On the back side, all yarn ends are in the same corner (the Starting Corner). In next round, you will increase 2 sts on each side of the hexagon so you have 2 x 6=12 more sts, to obtain a total of 72+12=84 stitches.
Round 5 :
Add the yarn in first DC of the Starting corner, Ch3 and DC in each of next 5 DC, (DC in next st, 2DC in next st = increase made , DC in next st) x 2 times, * DC in each of 6 DC from the corner, (DC in next st, 2DC in next st = increase made , DC in next st) x 2 times * repeat from *-* until the end of the round, join with a Sl St to the top of first Ch3. Cut the yarn. < 84 DC>
Info :
It is important to have 84 sts, because the number of sts needs to equal the number of sts you have in the top edge of your 6 granny squares. When you count the st across the top edge of one of the 6 squares, it has 14 st = 12DC + 2 chains (see picture), therefore if you count the top row of all 6 squares you get a total of 6 x14= 84sts. One chain on each corner is counted as 1 stitch.
Round 6 :
Add the yarn in the Starting corner, Ch3 and make DC in each DC from previous round < 84 DC> Trim your thread and fasten off leaving a 50 inch tail to sew the base and the squares together. < 84 DC>
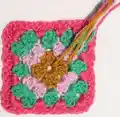
— Granny Square - make 6 (the middle of the hat) :
Round 1 :
make a Magic ring, into ring crochet Ch3(note: consider Ch3 as first DC), 2 DC, ch2, *3 DC, Ch2*, repeat from *-* for 3 times, Join with a Sl St to the top of first Ch3. Cut the yarn. < 4 groups of 3 DC, 4 Ch2 >
Round 2 :
Add the yarn in the last ch 2 space, Ch3 and 2 DC into the same Ch 2 space, * in next ch2 space make (3 DC, Ch2, 3 DC) * repeat from *-* for 3times, in the beginning Ch2 space make 3 DC, Ch2, and join with a Sl St to the top of first Ch3. Cut the yarn. < 8 groups of 3 DC, 4 Ch2>
Round 3 :
Add the yarn into the last Ch 2 space, Ch3 and 2 DC into the same Ch 2 space, make 3 DC in the space Between the DC groups, *in next ch2 space make (3 DC, Ch2, 3 DC), make 3 DC in space Between the DC groups *, repeat from *-* x 3 times, in the beginning Ch2 space make 3 DC, Ch2 join with a Sl St to the Ch3. Cut the yarn. < 12 groups of 3 DC, 4 Ch2>
Round 4 :
Add the yarn into the last Ch 2 space, Ch3 and 2 DC into the same Ch 2 space, -(make 3 DC in the space Between the DC groups) 2 times, * in next ch2 space make (3 DC, Ch2, 3 DC), (make 3 DC in the space Between the DC groups) 2 times *, repeat from *-* x 3 times, in the beginning Ch2 space make 3 DC, Ch2 and join with a Sl St to the top of first Ch3. Trim your thread and fasten off leaving a 12 inch tail to sew the squares together. < 16 groups of 3 DC >
— Granny Trapezoid - make 11 (the Bottom of the hat) :
Info :
The first 2 rounds- same way as you did the square (see on previous page). In next round (Round 3), on one side you will work only 2 DC instead of 3DC, so that this side will be smaller and you obtain a trapezoidal shape.
Round 3 :
Add the yarn into the last Ch 2 space, Ch3 and 1 DC into the same Ch 2 space, make 2 DC in Between the DC groups, in next Ch2 space make (2 DC, Ch2, 3 DC), *make 3 DC in the space between the DC groups, in next Ch2 space make (3 DC, Ch2, 3 DC)* repeat from *-* one more time, make 3 DC in the space between the DC groups, in the beginning Ch2 space make 3 DC, Ch2 and join with a Sl St to the top of first Ch3. Trim your thread and fasten off leaving at least a 12-inch tail, to sew the trapezoids together. < 3 groups of 2 DC, 9 groups of 3 DC>
— Sew the parts :
Item Name (P1) :
Step 1 - Sew the 6 squares to the hexagonal top of the hat. Orient the squares so that you have the starting corner - the one with many threads ends - towards the hexagon, for a beautiful finish. - sew with the wrong side facing you. - use the 50" yarn thread from row 6 of the hexagon. - see pictures below:
Item Name (P2) :
Step 2 - Sew the sides of the squares - sew with the wrong side facing you. - use the 12" yarn thread from row 4 of each square -see picture below:
Item Name (P3) :
Step 3 - Work a round of SC around the squares You have 6 granny squares a 14 sts each ( the chain count as 1 st) Add the yarn and make *SC in each st, for a total of 20 SC, then in next st you\'ll make 2 SC* , repeat from *-* until the end of the round. Trim your thread and fasten off leaving a 50 inch tail to sew the middle of the hat and the trapezoids together. You will obtain 88 SC.
Item Name (P4) :
Step 4 - Sew the 11 trapezoids to the SC round - sew with the wrong side facing you. - use the 50" yarn thread from the previous SC round. - see picture below:
Item Name (P5) :
Step 5 - Sew the sides of the trapezoids - sew with the wrong side facing you, - use the 12" yarn thread from the round 3 of each trapezoids - sew from the middle of the hat, to the bottom edge- see pictures below:
Item Name (P6) :
Step 6 - Finish with a round of HDC around the bottom edge of the 11 trapezoids.
Info :
FINISHING: Fasten off and weave in all ends. *If you want to block this hat, to stiffen it, I suggest you spray both sides with Spray Starch, and allow it to dry completely. Instead of Spray Starch, you can use Mod podge and water.
This colorful granny-square bucket hat pattern brings playful vintage vibes to your wardrobe with bright, changeable color rounds. Make it in cotton for a beach-ready summer hat or in a soft blend for everyday wear. It\'s modular, customizable, and a joyful crochet project to gift or keep. 🧶🌞🧵