🧢 Beautiful ✨ Detailed πŸ’ Adorable

Bernat Pipsqueak Star Blanket Pattern

Bernat Pipsqueak Star Blanket Pattern
4.0β˜… Rating
5-7 Hours Time Needed
1.2K Made This
βœ‚οΈ

Intermediate Level

Ideal for those with basic knitting experience, featuring slightly more advanced stitches and techniques to expand your skills.

⏱️

Weekend Treat

Takes 5-7 hours, making it an enjoyable project to finish over a couple of days.

🏑

Cozy Accent

A warm touch for your space that transforms ordinary corners into inviting nooks filled with handmade charm.

About This Bernat Pipsqueak Star Blanket Pattern

This Bernat Pipsqueak Star Blanket pattern teaches you how to crochet a plush star-shaped blanket with textured points and alternating color rounds. The pattern uses Bernat Pipsqueak for a super-soft finish and is written in rounds from the center out, with clear instructions for color changes and special stitch techniques. Great for gifting or snuggling up at home.

Bernat Pipsqueak Star Blanket Pattern crochet pattern - detailed view of completed project

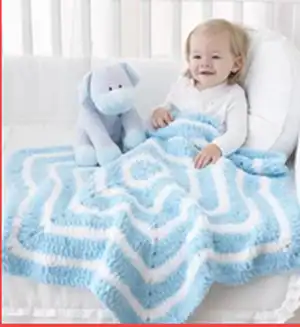
Worked in the round with defined ch-2 corners, this pattern creates a striking star motif that measures approx 40 in from point to point. The pattern alternates two contrast colors to emphasize the star points.

Why You'll Love This Bernat Pipsqueak Star Blanket Pattern

You'll love how quickly the star shape grows and how plush and cozy the Pipsqueak yarn feels. I love the playful texture and the simple color changes that make a big visual impact β€” it's satisfying to stitch and delightful to give or keep.

Bernat Pipsqueak Star Blanket Pattern step 1 - construction progress Bernat Pipsqueak Star Blanket Pattern step 2 - assembly progress Bernat Pipsqueak Star Blanket Pattern step 3 - details and accessories Bernat Pipsqueak Star Blanket Pattern step 4 - final assembly and finishing

Switch Things Up

I often like to substitute color A for a warmer pastel or even a variegated plush yarn to change the look while keeping the same instructions.

I also experiment with slightly larger hooks for a drapier blanket, remembering this will change the final size and gauge.

I recommend making a small gauge swatch first to ensure the fabric feels the way you want it to.

I sometimes add a single-round border in a contrasting color to frame the star and give it a finished look.

I enjoy using this pattern to practice consistent tension because the star points make any irregularities easy to spot and correct.

I find weaving in the ends as I go during color changes keeps the finish neat and saves time at the end.

I like to block the finished blanket lightly to even out stitches and emphasize the star points.

I sometimes use a soft yarn for baby gifts and a sturdier plush for decorative throws depending on intended use.

I recommend washing a swatch of your chosen yarn to see how it behaves before committing to the whole blanket.

I love how quickly the star grows and how satisfying it is to see the points form with each set of rounds.

Common Mistakes & How to Fix Them

βœ— Skipping the initial join to form the ring can make your center loose; always join with a sl st to form a neat ring. βœ— Not counting chains at the beginning of rounds correctly can shift your stitch count; remember which ch counts as a stitch. βœ— Missing the ch-2 corner groups causes point distortion; ensure you place the full (2 dc, ch 2, 2 dc) in each corner space. βœ— Failing to fasten off and weave in ends after color changes can lead to unraveling; securely fasten off and weave ends neatly.

Bernat Pipsqueak Star Blanket Pattern

A soft, squishy star-shaped baby blanket worked in plush Bernat Pipsqueak yarn. This pattern creates a cuddly, cheery star blanket that measures approximately 40 inches point-to-point and is perfect for nurseries or as a special handmade gift. Follow the clear round-by-round instructions and color changes to create the textured points and stripes.

Intermediate 5-7 Hours

Materials Needed for Bernat Pipsqueak Star Blanket Pattern

β€” Main Fabric

  • 01
    Bernat Pipsqueak (100 g/3.5 oz; 109 m/120 yds): 3 balls of A and 2 balls of B
  • 02
    OR Bernat Pipsqueak (250 g/8.8 oz; 274 m/300 yds): 1 ball each of A and B
  • 03
    Contrast A: (58730 or 59730 Silly Sea) 259 m / 283 yds
  • 04
    Contrast B: (58005 or 59005 Whitey White) 208 m / 227 yds

β€” Tools Required

  • 01
    Size 6.5 mm (U.S. K or 10Β½) crochet hook or size needed to obtain gauge

Progress Tracker

0% Complete

β€” Instructions :

Note :

Ch 3 at beg of rnd counts as dc throughout.

Beg :

Beg at center, with A, ch 5. Join with sl st to form ring.

1st rnd :

Ch 2 (does not count as st). 12 hdc in ring. Join with sl st to first hdc. 12 hdc.

2nd rnd :

Ch 1. 1 sc in same sp as last sl st. *3 dc in next hdc. 1 sc in next hdc. Rep from * around to last hdc. 3 hdc in last hdc. Join B with sl st to first sc.

3rd rnd :

With B, sl st in next dc. Ch 3. (2 dc. Ch 2. 2 dc) in next dc. 1 dc in next dc. *Miss next sc. 1 dc in next dc. (2 dc. Ch 2. 2 dc) in next dc. 1 dc in next dc. Rep from * 4 times more. Join A with sl st to top of ch 3.

4th rnd :

With A, sl st in next dc. Ch 3. 1 dc in next dc. *(2 dc. Ch 2. 2 dc) in next ch-2 sp. 1 dc in each of next 2 dc.** Draw up a loop in each of next 2 dc. Yoh and draw through all loops on hook - sc2tog made. 1 dc in each of next 2 dc. Rep from * 4 times more, then from * to ** once. Sc2tog over last 2 sts. Join with sl st to top of ch 3.

5th rnd :

Ch 3. 1 dc in each of next 3 dc. *(2 dc. Ch 2. 2 dc) in next ch-2 sp. 1 dc in each of next 4 dc.** Miss next st. 1 dc in each of next 4 dc. Rep from * 4 times more, then from * to ** once. Miss last st. Join B with sl st to top of ch 3.

6th rnd :

With B, sl st in next dc. Ch 3. 1 dc in each of next 4 dc. *(2 dc. Ch 2. 2 dc) in next ch-2 sp. 1 dc in each of next 5 dc. Sc2tog over next 2 dc. 1 dc in each of next 5 dc. Rep from * 4 times more, then from * to ** once. Sc2tog over last 2 dc. Join A with sl st to top of ch 3.

7th rnd :

With A, ch 3. 1 dc in each of next 6 dc. *(2 dc. Ch 2. 2 dc) in next ch-2 sp. 1 dc in each of next 7 dc.** Miss next st. 1 dc in each of next 7 dc. Rep from * 4 times more, then from * to ** once. Miss last st. Join with sl st to top of ch 3.

8th rnd :

Sl st in next dc. Ch 3. 1 dc in each of next 7 dc. *(2 dc. Ch 2. 2 dc) in next ch-2 sp. 1 dc in each of next 8 dc.** Sc2tog over next 2 dc. 1 dc in each of next 8 dc. Rep from * 4 times more, then from * to ** once. Sc2tog over last 2 dc. Join B with sl st to top of ch 3.

9th rnd :

With B, ch 3. 1 dc in each of next 9 dc. *(2 dc. Ch 2. 2 dc) in next ch-2 sp. 1 dc in each of next 10 dc.** Miss next st. 1 dc in each of next 10 dc. Rep from * 4 times more, then from * to ** once. Miss last st. Join A with sl st to top of ch 3.

10th rnd :

With A, sl st in next dc. Ch 3. 1 dc in each of next 10 dc. *(2 dc. Ch 2. 2 dc) in next ch-2 sp. 1 dc in each of next 11 dc.** Sc2tog over next 2 dc. 1 dc in each of next 11 dc. Rep from * 4 times more, then from * to ** once. Sc2tog over last 2 dc. Join with sl st to top of ch 3.

11th rnd :

Ch 3. 1 dc in each of next 12 dc. *(2 dc. Ch 2. 2 dc) in next ch-2 sp. 1 dc in each of next 13 dc.** Miss next st. 1 dc in each of next 13 dc. Rep from * 4 times more, then from * to ** once. Miss last st. Join B with sl st to top of ch 3.

Info :

Cont as established, (working 1 rnd B; 2 rnds A throughout) until work from center to outer point measures approx 20 ins [51 cm] ending with 2 rnds A. Fasten off.

Assembly Instructions

  • Weave in all yarn ends securely with a tapestry needle after finishing; hide ends along the back of stitches.
  • Block the blanket lightly if desired to even out stitches and to open up the star points; stretch gently to shape.
  • When changing colors, leave a tail of several inches and weave it in on the wrong side to secure color joins neatly.
  • Lay the blanket flat and check all ch-2 corners (points) for evenness; if any point looks lopsided, adjust by re-weaving nearby ends or steam-block lightly.

Important Notes

  • πŸ’‘Use the specified hook size 6.5 mm (U.S. K or 10Β½) or adjust to obtain the gauge of 10 dc and 6 rows = 4 ins [10 cm].
  • πŸ’‘Ch 3 at beginning of round counts as a dc throughout; follow this consistently to maintain stitch count.
  • πŸ’‘Join each round with a slip stitch to the top of the beginning ch-3 unless otherwise indicated.
  • πŸ’‘Follow the established color sequence (working 1 rnd B; 2 rnds A throughout) to achieve the pictured striping.
  • πŸ’‘When instructions indicate 'Miss next st' or 'Sc2tog' follow those decreases exactly to shape the outer edges.

This cozy Bernat Pipsqueak Star Blanket combines plush texture with a sweet star motif to make the perfect baby blanket. Soft, squishy yarn and simple color changes create an eye-catching handmade gift. 🧢✨ Perfect for snuggling and nursery decor! πŸ’™

You ask,

we answer.

FAQs

What is the final size of the finished blanket?

The finished star blanket measures approximately 40 inches [101.5 cm] from point to point.

What gauge do I need to match the pattern sizing?

Gauge is 10 dc and 6 rows = 4 inches [10 cm]; use a 6.5 mm (U.S. K or 10Β½) hook or adjust hook size to achieve gauge.

How are color changes worked for the stripe effect?

The pattern alternates color rounds as established: work 1 round in Contrast B, then 2 rounds in Contrast A throughout to create the striped points.

Can I make the blanket larger or smaller?

Yes β€” you can continue the established sequence of rounds to make the blanket larger. For a smaller blanket stop when the center-to-point measurement reaches your desired size.