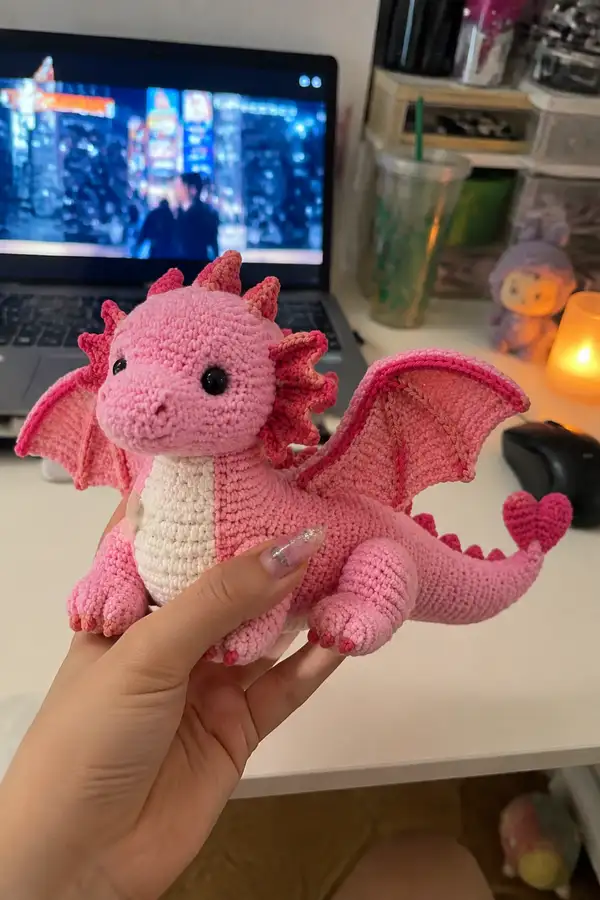
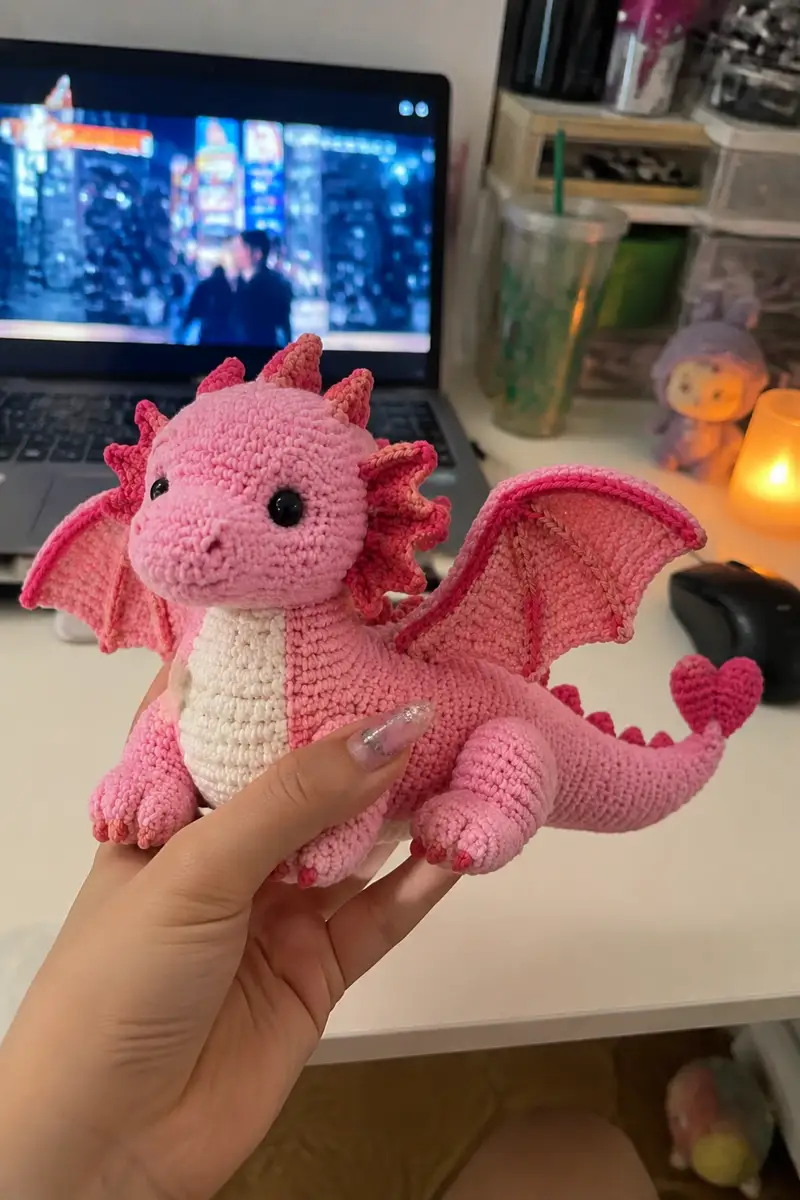
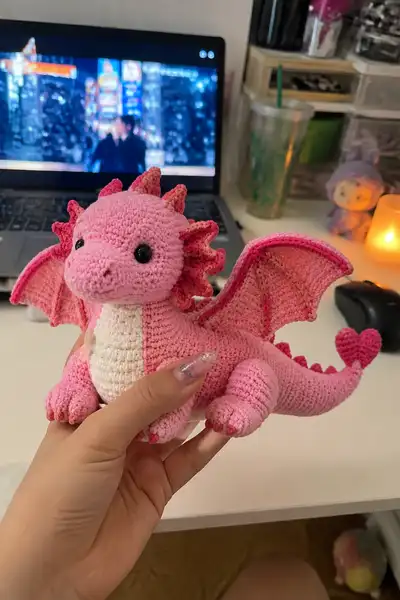
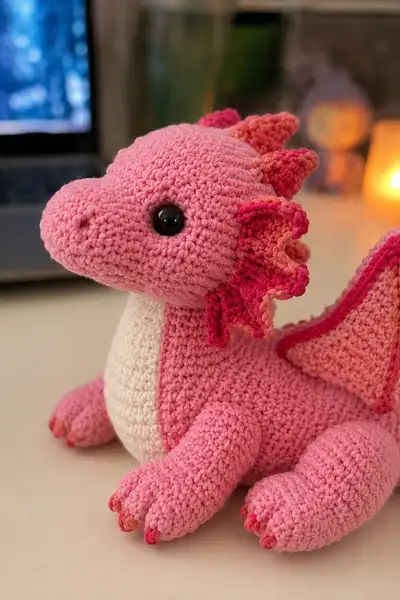
Create a cuddly, rosy pink dragon with scalloped frill, heart-shaped tail tip, articulated wings and a cream belly. This charming amigurumi features multiple pink tones, tiny claws, glossy safety eyes and a sweet rounded snout — perfect as a Valentine or gift. Detailed step-by-step instructions guide you through every round, stitch counts and assembly tips to produce a sturdy, huggable toy.
Progress Tracker
0% Complete
— Head (includes muzzle) :
Round 1 :
6 sc in magic ring (6)
Round 3 :
(1 sc, inc) x 6 (18)
Round 4 :
(2 sc, inc) x 6 (24)
Round 5 :
(3 sc, inc) x 6 (30)
Round 6 :
(4 sc, inc) x 6 (36)
Round 7 :
(5 sc, inc) x 6 (42)
Round 8 :
(6 sc, inc) x 6 (48)
Round 9-14 :
1 sc in each st (48) (6 rounds even to build dome of head)
Info :
Place safety eyes between rounds 12-13 approximately 10-12 sts apart depending on expression. Mark beginning of round with stitch marker and keep counts visible. Work in continuous spiral without joining for smooth shape.
Round 15 :
(6 sc, dec) x 6 (42) — begin slight shaping toward back of skull
Round 16 :
1 sc in each st (42)
Round 17 :
(5 sc, dec) x 6 (36)
Info :
Begin stuffing head lightly to keep dome even. Add fiberfill gradually ensuring there are no hard lumps; aim for firm-but-squeezable. Stop stuffing before muzzle rounds so the snout will sit properly against head.
Round 18 :
1 sc in each st (36)
Round 19 :
1 sc in next 3 sts, place marker at center-front for muzzle placement, continue 1 sc around (36)
Round 20 :
1 sc in each st (36)
Info :
We will create a separate muzzle piece and sew it to the marked center-front. Placing the muzzle after making the head gives better control of snout orientation and avoids distortion of the head sphere.
Round 21 (Muzzle round 1) :
6 sc in magic ring (6)
Round 22 :
6 inc (12) — expand snout base
Round 23 :
(1 sc, inc) x 6 (18)
Round 24 :
(2 sc, inc) x 6 (24)
Round 25 :
1 sc in each st (24)
Info :
To create the rounded muzzle, work a few rounds increasing along the front-most stitches only; this pattern keeps the muzzle proportional to the head. Keep last round of muzzle slightly looser to ease turning and sewing edge.
Round 26 :
(3 sc, dec) x 6 (18) — begin tapering muzzle tip slightly
Round 27 :
(2 sc, dec) x 6 (12)
Round 28 :
(1 sc, dec) x 6 (6)
Info :
Finish stuffing the muzzle firmly to keep its rounded shape. Flatten magic-ring center slightly as you close so the snout looks smooth. Fasten off leaving a long tail for sewing to head.
Round 29 :
Sew muzzle to the marked front of head using long tail and mattress stitch. Use evenly spaced stitches around muzzle base so there are no gaps. Secure and weave in tail.
Round 30 :
After sewing muzzle, add more stuffing behind the muzzle if needed and continue with 1 sc in each st around head where required to even out joints (work 2-4 rounds as needed) (approx 36)
Round 31 :
(4 sc, dec) x 6 (30) — begin neck shaping at base of head
Round 32 :
(3 sc, dec) x 6 (24)
Info :
Start stuffing tightly in area above neck where head meets body so head keeps shape when attached. Leave a long tail to sew neck to body later; do not close fully here so you have ease for upholstery-style attachment.
Round 33 :
(2 sc, dec) x 6 (18)
Round 34 :
(1 sc, dec) x 6 (12) — leave opening for joining to body
Round 35 :
Fasten off leaving ~35-40cm tail for sewing. Finish stuffing to desired firmness and shape nose bridge and brow with small amounts of fill if necessary.
Info :
Embroider nostrils with a few tight sc or backstitches on muzzle tip if desired. Insert safety eyes (if not already set) and position small stitches for eyelids to create expression. Weave in all tails securely.
— Body :
Round 1 :
6 sc in magic ring (6)
Round 3 :
(1 sc, inc) x 6 (18)
Round 4 :
(2 sc, inc) x 6 (24)
Round 5 :
(3 sc, inc) x 6 (30)
Round 6 :
(4 sc, inc) x 6 (36)
Round 7 :
1 sc in each st (36)
Round 8 :
(5 sc, inc) x 6 (42) — widen chest area to match head base
Round 9-12 :
1 sc in each st (42) (4 rounds even to create length)
Info :
If adding a belly panel (recommended) create it separately now and leave for later sewing. Continue the body in main color and keep top rows even to later attach neck and wings symmetrically.
Round 13 :
(6 sc, dec) x 6 (36)
Round 14 :
1 sc in each st (36)
Round 15 :
(4 sc, dec) x 6 (30)
Round 16-18 :
1 sc in each st (30)
Info :
Begin stuffing the bottom two-thirds of the body moderately; do not overstuff the neck area as you will sew the head in. Shape the torso to have a slightly flattened base for sitting stability.
Round 19 :
(3 sc, dec) x 6 (24)
Round 20 :
(2 sc, dec) x 6 (18)
Round 21 :
(1 sc, dec) x 6 (12)
Info :
Leave a long tail for sewing head to body. Stuff body firmly but leave opening large enough to insert head and sew around neck. If you plan to add weighted base (poly pellets), insert them now in the lower body before closing.
Round 22 :
Fasten off leaving long tail for sewing. Close remaining opening using yarn needle and seam carefully to create a neat underside. Tuck and weave in tail.
— Belly Panel (Make 1) :
Round 1 :
6 sc in magic ring with cream yarn (6)
Round 3 :
(1 sc, inc) x 6 (18)
Round 4 :
(2 sc, inc) x 6 (24)
Round 5-7 :
1 sc in each st (24) (3 rounds to make oval panel)
Info :
Make the oval slightly longer than wide: after round 7 you can add 1-2 extra rounds in BLO to create a subtle ridge and give the belly a sewn-on look. Fasten off leaving long tail for sewing to front of body, center under the neck region, stitch around snugly.
— Arms (Make 2) :
Round 1 :
6 sc in magic ring (6)
Round 3 :
(1 sc, inc) x 6 (18)
Round 4 :
(2 sc, inc) x 6 (24)
Round 5-7 :
1 sc in each st (24) — palm shaping
Info :
Stuff palm area firmly to create a rounded paw base. For slightly flatter feet, stuff less in center and more around edges. Use the darker accent color to embroider claws later or crochet small tips.
Round 8 :
(4 sc, dec) x 4, 4 sc (20) — begin wrist taper
Round 9-12 :
1 sc in each st (20) — forearm length
Round 13 :
(3 sc, dec) x 4, 2 sc (16)
Round 14-16 :
1 sc in each st (16) — upper arm
Round 17 :
(2 sc, dec) x 4 (12) — shoulder shaping
Round 18 :
Fasten off leaving long tail for sewing. Insert a small amount of stuffing into arm tip and continue sewing after mounting into body. Repeat for second arm.
Info :
For posable arms you may insert a slim piece of floral wire extending from shoulder to palm before closing. Fold wire end back on itself to avoid poking and wrap with a little fiberfill to bulk and protect the fabric.
— Legs (Make 2) :
Round 1 :
6 sc in magic ring (6)
Round 3 :
(1 sc, inc) x 6 (18)
Round 4 :
(2 sc, inc) x 6 (24)
Round 5 :
(3 sc, inc) x 6 (30)
Round 6-8 :
1 sc in each st (30) — foot pad shaping
Info :
Add extra stuffing to the foot so the finished dragon can sit upright. Flatten the bottom slightly to increase contact surface and sew base stitches tighter if needed.
Round 9 :
(4 sc, dec) x 5 (25)
Round 10-13 :
1 sc in each st (25) — lower leg
Round 14 :
(3 sc, dec) x 5 (20)
Round 15-18 :
1 sc in each st (20) — thigh shaping
Round 19 :
(2 sc, dec) x 5 (15)
Round 20-22 :
1 sc in each st (15)
Info :
Leave a long tail for sewing legs to body. Position legs about 8-10 stitches from the front underside edge and 10-12 stitches apart (center to center) so dragon sits balanced.
Round 23 :
Fasten off and close opening leaving tail for sewing. Ensure feet are stuffed firmly and toes are defined by pulling slightly when sewing claws.
— Wing (Make 2) :
Round 1 :
Ch 15, sc in 2nd ch from hook and across (14) — base chain for wing membrane
Round 2 :
Turn, ch1, 2 sc in first st, 1 sc in next 10 sts, 2 sc in last st (16) — create rounded edge
Round 3 :
Ch1, turn, 1 sc in each st (16)
Round 4 :
Ch1, turn, (1 sc, inc) x 8 (24) — widen wing toward frame
Round 5-6 :
1 sc in each st (24)
Info :
Create a scalloped outer edge by working 3 sc in one st then skipping one in the outermost row later; we will add a contrasting edge in a darker pink to define the wing frame.
Round 7 :
Join dark pink, ch1, 1 sc in each st around working 3 sc in corner stitches to keep shape (24+ extra) — creates frame edge
Round 8 :
Fasten off leaving long tail for sewing. Create internal ribs by surface slip-stitching from wing base to outer edge creating 3 ribs: one central and two diagonal. Alternatively, crochet narrow strips (ch10, sc back) and sew as ribs for more structure.
Info :
For slightly stiff wings insert thin plastic or wire along the inner rib under the fabric, then topstitch ribs to hide the support. This keeps wings upright when posed.
— Frill / Mane Spikes (Make 8 - 10 small spikes) :
Spike Round 1 :
6 sc in magic ring with darker pink (6)
Spike Round 2 :
6 inc (12)
Spike Round 3 :
1 sc in each st (12)
Spike Round 4 :
(2 sc, dec) x 3 (9)
Spike Round 5 :
(1 sc, dec) x 3 (6)
Spike Round 6 :
Fasten off leaving long tail for sewing. Make 8-10 spikes of varying sizes (for variety make 2 slightly larger by adding an extra 1-2 rounds before tapering) and arrange along head centerline and back down to tail base.
Info :
Sew largest spikes on center-top of head starting between ears, smaller ones along the back spaced about 8-10 stitches apart. For a faded look, change to peach/ coral yarns for an inner row before finishing spike edge in dark pink.
— Tail (Base) :
Round 1 :
6 sc in magic ring (6)
Round 3 :
(1 sc, inc) x 6 (18)
Round 4 :
(2 sc, inc) x 6 (24)
Round 5-8 :
1 sc in each st (24) — tail base length
Info :
Start tapering the tail gradually after round 8. Add spikes along the top by sewing small spike pieces in a row; space them on top centerline roughly 6-8 stitches apart depending on final tail length.
Round 9 :
(3 sc, dec) x 6 (18)
Round 10 :
1 sc in each st (18)
Round 11 :
(2 sc, dec) x 6 (12)
Round 12 :
1 sc in each st (12)
Round 13 :
(1 sc, dec) x 6 (6) — tail narrows ready for heart tip
Info :
Leave long tail for attaching heart tip. Do not fasten off; you can use tail to stitch the heart in place from inside for a cleaner join. Stuff tail lightly; heart tip will add weight so adjust stuffing to balance shape.
— Heart Tail Tip (Make 1) :
Round 1 :
6 sc in magic ring with dark pink (6)
Round 3 :
(1 sc, inc) x 6 (18)
Round 4 :
1 sc in each st (18)
Round 5 :
(2 sc, dec) x 6 (12)
Round 6 :
Work 6 sc across to make flat heart lobes then leave a length to seam as two lobes and shape into heart by stitching center seam; stuff and shape heart before final close
Info :
Sew the heart securely to the tail tip by stitching through tail stitches and heart base with the long tail. Use multiple passes for security and tuck knots inside tail. Trim and weave in all ends.
— Claws (Make 10 small tips) :
Round 1 :
4 sc in magic ring with dark pink (4)
Round 4 :
Fasten off leaving long tail for sewing. Make 3 claws per foot and 2 claws per hand if desired then sew tips to front of each paw. Stagger claws slightly and pull slightly toward center to define toes.
Info :
For painted/stitched effect, you can embroider thin lines into claws before attaching. Use a darker yarn for definition and make sure claws are secured with a few extra passes of yarn.
— Wing Edging & Internal Ribs (Detail) :
Round 1 :
Using dark pink, join at wing base and sc evenly around edge working (sc, ch2, sc) in corners to form scallop points (work to taste)
Round 2 :
Surface slip-stitch 3 ribs from base to edge: central rib and two diagonals. For each rib: insert hook into base row, pull yarn along surface and sl st every 2-3 sts to the edge to create visible ribbing.
Info :
If inserting wire for poseable wings, sew a small pocket at wing base, insert wire down the first rib, then sew the rib down to secure the wire in place so it does not slide.
— Assembly & Finishing Touches :
Info :
Before assembly, block parts slightly with steam if your yarn tolerates it to remove crocheting distortions. Lay out all pieces on a flat surface to visualize placements: head, body, belly, arms, legs, wings and spikes.
Step 1 :
Attach head to body by sewing the neck rounds of head to the opening of the body. Use the long tail from head and mattress stitch; sew through corresponding stitches on the body opening, working evenly around so the head sits centered. Use pins to hold in place first.
Step 2 :
Sew belly panel to the front torso: align the top of the belly under the neck seam and stitch around the belly edge with small slip stitches or whip stitches for a neat appearance. Pull slightly when stitching to make the belly snug.
Step 3 :
Position and sew legs to the underside of body using the tail from legs. Space evenly so the dragon sits comfortably. Add extra secure stitches where legs meet body for stability. For added reinforcement, sew through a few body rounds into leg base several times.
Step 4 :
Sew arms to the sides just below neck seam. Position arms so they look slightly forward and natural. Use ladder stitch or invisible seam to hide join. Add stitches at shoulder seam for durability.
Step 5 :
Sew wings to the upper sides of body by aligning wing base with back seam about 3-4 rounds behind neck. Secure with pins then sew with small, even stitches along base keeping wing frame outward and symmetrical on both sides.
Step 6 :
Sew frill spikes along the centerline from the back of the head down to the tail base. Start at the largest spike on head and smaller spikes on the back. Space them evenly (approx 6-8 sts apart) and ensure they are upright and evenly angled.
Step 7 :
Sew claws to paw tips; shape toes by stitching between claws to create small indentations. Embroider nostrils and mouth if desired using a few tight stitches of dark pink or brown yarn for expression.
Step 8 :
Securely weave in all tails, trim close to fabric, and optionally add a dab of fabric glue to knots for extra security. Check seams again for gaps and reinforce where necessary.
Info :
Final shaping: use your fingers to pinch and shape cheeks, brow ridges and muzzle to achieve the cute rounded look. Add a touch of blush with fabric-safe pigment on cheeks if desired.
This rosy dragon pattern combines sculpted shaping, delicate frill detailing and a heart-shaped tail tip to create a truly adorable keepsake. Each round is designed to build structure while allowing room for creative color accents and finishing touches. Enjoy the thoughtful process of assembling the pieces — the result is a lovable companion that is perfect as a handmade gift or a whimsical decoration. 🧶💕🐉