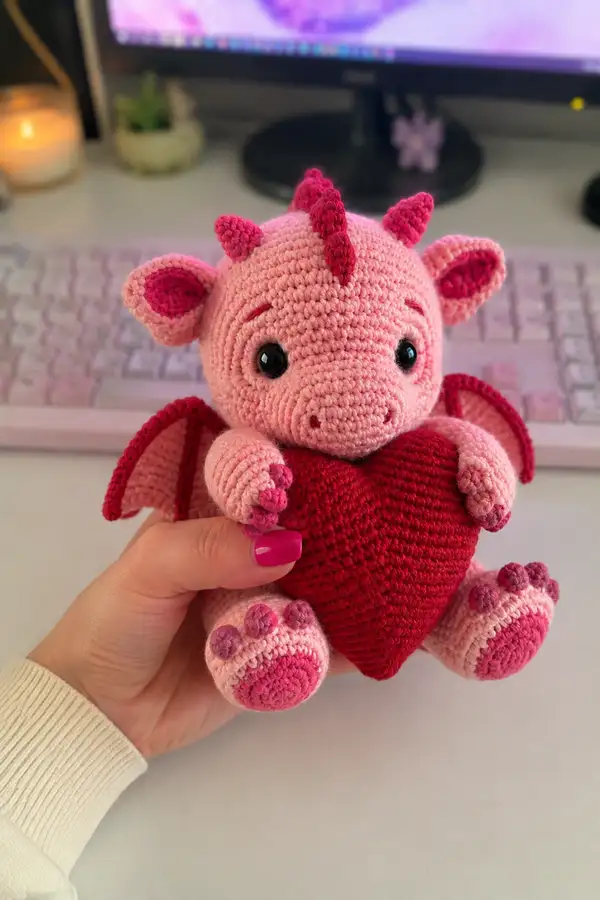
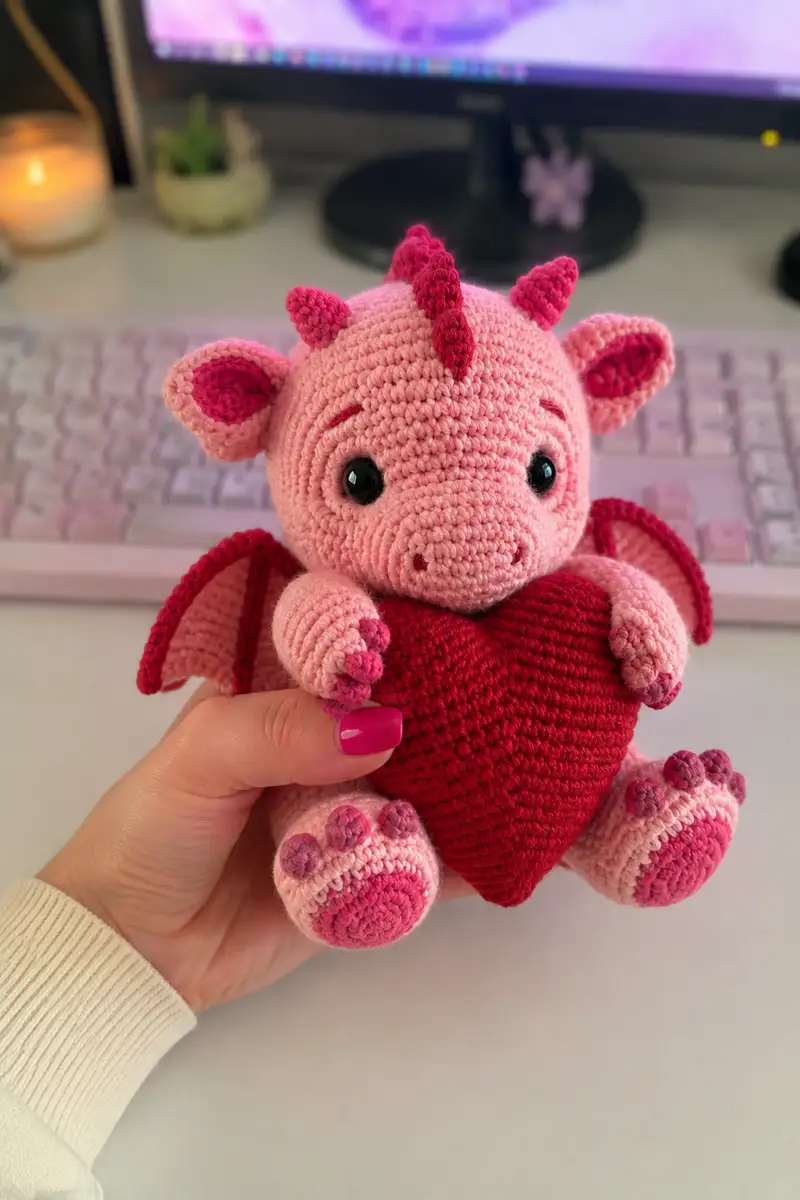
Create a cuddly rosy dragon clutching a big red heart with this detailed amigurumi pattern. This plush features soft light-pink bodywork, deep-rose accents on wings, horns and paw pads, shiny black safety eyes and an oversized heart perfect for hugs. Includes step-by-step round-by-round shaping, assembly tips, and full color-change guidance for a polished finish.
Progress Tracker
0% Complete
— Head :
Round 1 :
6 sc in magic ring (6)
Round 3 :
(1 sc, 1 inc) x 6 (18)
Round 4 :
(2 sc, 1 inc) x 6 (24)
Round 5 :
(3 sc, 1 inc) x 6 (30)
Round 6 :
(4 sc, 1 inc) x 6 (36)
Info :
Use light pink yarn. Keep hook tension firm so stuffing will not show. Place a stitch marker at beginning of round and move it each round.
Round 7 :
(5 sc, 1 inc) x 6 (42)
Round 8 :
(6 sc, 1 inc) x 6 (48)
Round 9-12 :
1 sc in each st (48)
Info :
Place safety eyes between rounds 12 and 13 for best proportion. Mark center by counting stitches: position eyes approx 10-12 sts apart depending on expression. For 10mm eyes place center of eye at round 13 and 8 stitches apart.
Round 13 :
1 sc in each st (48)
Round 14 :
1 sc in each st (48)
Info :
After securing eyes, use a long tail to embroider simple brows two rounds above the eyes with darker pink for expression if desired.
Round 15 :
1 sc in each st (48)
Round 16 :
1 sc in each st (48)
Round 17 :
1 sc in each st (48)
Round 18 :
1 sc in each st (48)
Info :
Begin shaping the lower face and neck by slow decreases. Start stuffing head firmly but leave neck opening slightly less stuffed to allow joining to body later. Stuff evenly around the eyes to keep smooth surface.
Round 19 :
(6 sc, 1 dec) x 6 (42)
Round 20 :
(5 sc, 1 dec) x 6 (36)
Round 21 :
(4 sc, 1 dec) x 6 (30)
Info :
Continue stuffing. If you are attaching a separate snout, do not overstuff center area so the snout base sits flush. If embroidering nostrils later, leave a tail or plan placement at rounds 18-21.
Round 22 :
(3 sc, 1 dec) x 6 (24)
Round 23 :
(2 sc, 1 dec) x 6 (18)
Round 24 :
(1 sc, 1 dec) x 6 (12)
Info :
Fasten off leaving a long tail if you will sew neck opening directly onto body. Alternatively leave the 6-st opening to be sewn closed after attaching snout. Finish stuffing head firmly; the head should be slightly heavier at the front for a forward-leaning snout.
— Snout (Make 1) :
Round 1 :
6 sc in magic ring (6)
Round 3 :
(1 sc, 1 inc) x 6 (18)
Round 4 :
(2 sc, 1 inc) x 6 (24)
Round 5 :
1 sc in each st (24)
Info :
Work 1 round extra of even stitch to lengthen snout slightly so it sits proud of the face. Use same light pink yarn to match the head.
Round 6 :
(3 sc, 1 dec) x 6 (18)
Round 7 :
(2 sc, 1 dec) x 6 (12)
Round 8 :
(1 sc, 1 dec) x 6 (6)
Info :
Stuff snout firmly but keep base slightly flat where it will attach to head. Leave a long tail. Sew snout to head centered between the eyes, approx aligning the bottom of snout to round 18 of the head. Secure with ladder stitch and weave tail inside.
— Body :
Round 1 :
6 sc in magic ring (6)
Round 3 :
(1 sc, 1 inc) x 6 (18)
Round 4 :
(2 sc, 1 inc) x 6 (24)
Round 5 :
(3 sc, 1 inc) x 6 (30)
Round 6 :
(4 sc, 1 inc) x 6 (36)
Round 7 :
(5 sc, 1 inc) x 6 (42)
Round 8 :
(6 sc, 1 inc) x 6 (48)
Info :
Work body in same light pink as head for a unified look. This body builds a rounded torso to tuck the heart into. Keep the base wide as this will support the seated posture.
Round 9-12 :
1 sc in each st (48)
Round 13 :
(6 sc, 1 dec) x 6 (42)
Round 14-16 :
1 sc in each st (42)
Info :
At this stage add extra stuffing to form a broad chest to support arms and heart. Stuff steadily in small quantities until desired roundness is achieved.
Round 17 :
(5 sc, 1 dec) x 6 (36)
Round 18 :
1 sc in each st (36)
Round 19 :
(4 sc, 1 dec) x 6 (30)
Round 20 :
(3 sc, 1 dec) x 6 (24)
Round 21 :
(2 sc, 1 dec) x 6 (18)
Info :
Stop stuffing when the body is fairly firm but still a little squishy; the heart will sit packed into the front. Leave the top opening ready for sewing the head. Fasten off leaving long tail for sewing neck to body.
Round 22 :
1 sc in each st (18)
Round 23 :
(1 sc, 1 inc) x 6 (24)
Round 24 :
1 sc in each st (24)
Info :
Use the round 23 increase to create a slight collar where the head will attach. Sew head to body by aligning head opening (approx 6 sts) to this collar, distributing stitches evenly around the neck area. Use strong mattress or whip stitch to join securely.
— Arms (Make 2) :
Round 1 :
6 sc in magic ring (6)
Round 3 :
(1 sc, 1 inc) x 6 (18)
Round 4 :
1 sc in each st (18)
Info :
Form a short rounded hand. For a better grip on the heart, shape the last 3 rounds slightly tapering; stuff hand firmly for definition.
Round 5 :
(2 sc, 1 inc) x 6 (24)
Round 6-7 :
1 sc in each st (24)
Round 8 :
(3 sc, 1 dec) x 6 (18)
Round 9 :
1 sc in each st (18)
Info :
At round 9 use a contrasting deeper pink to crochet the claws/tips. Join color and work the claw cluster in small bumps to replicate three rounded digits.
Round 10 :
Change to deep rose. 1 sc in each st (18)
Round 11 :
(1 sc, 1 dec) x 6 (12)
Round 12 :
1 sc in each st (12)
Round 13 :
(1 sc, 1 dec) x 4, 4 sc (8)
Info :
Stuff hands firmly. Insert a small amount of fiberfill into the wrist area, but keep the arm slightly flexible so it can be sewn around the heart later. Fasten off leaving long tail for sewing.
Round 14 :
Fasten off leaving long tail for sewing to body at chest level. Attach each arm to body sides around body rounds 10-14, slightly angled inward to hold the heart.
— Legs (Make 2) :
Round 1 :
6 sc in magic ring (6)
Round 3 :
(1 sc, 1 inc) x 6 (18)
Round 4 :
(2 sc, 1 inc) x 6 (24)
Round 5 :
1 sc in each st (24)
Round 6 :
Change to deep rose for paw pad base. 1 sc in each st (24)
Info :
Create a flat round paw pad by working contrasting color for two rounds on the outer foot before continuing leg tube. This ensures a visible circular pad at the front.
Round 7 :
(3 sc, 1 inc) x 6 (30)
Round 8-10 :
1 sc in each st (30)
Round 11 :
(4 sc, 1 inc) x 6 (36)
Round 12-15 :
1 sc in each st (36)
Info :
Stuff foot firmly from the toe side to create a flat sitting surface. Continue stuffing as you shape the ankle and upper leg to ensure balanced weight for seated posture.
Round 16 :
(4 sc, 1 dec) x 6 (30)
Round 17 :
(3 sc, 1 dec) x 6 (24)
Round 18 :
1 sc in each st (24)
Round 19 :
(2 sc, 1 dec) x 6 (18)
Round 20 :
Fasten off leaving long tail for sewing to body at bottom rounds. Sew legs to body at bottom so the dragon can sit with knees pointing slightly upward.
— Ears (Make 2) :
Round 1 :
5 sc in magic ring (5)
Round 3 :
(1 sc, 1 inc) x 5 (15)
Round 4 :
1 sc in each st (15)
Info :
Inner ear contrast: make a second smaller disc in deep rose that nests inside the light pink ear. Sew inner disc to ear round 2-3 before folding rim.
Round 5 :
Fold ear slightly and work 1 sc in each st around the edge to create rim and firmness (15)
Round 6 :
Fasten off leaving tail for sewing. Attach ears symmetrically to sides of head around head rounds 6-8, angled slightly forward for a curious expression.
— Horn Spikes / Crests (Make 7 small spikes) :
Round 1 :
4 sc in magic ring (4)
Round 3 :
1 sc in each st (8)
Round 4 :
(1 sc, 1 dec) x 2 (6)
Round 5 :
1 sc in each st (6)
Round 6 :
2 dec, sl st into next, fasten off leaving tail (2)
Info :
Make 7 small spikes in deep rose: place a long central crest of 3-4 spikes along top of head and the rest down the neck. Sew firmly; small spikes can be placed every 4-6 stitches for even spacing and charming silhouette.
— Wing Membrane (Make 2) :
Round 1 :
6 sc in magic ring (6)
Round 3 :
(1 sc, 1 inc) x 6 (18)
Round 4 :
(2 sc, 1 inc) x 6 (24)
Round 5-7 :
1 sc in each st (24)
Info :
These rounds create a rounded triangular wing membrane. After round 7 stop increasing and work even rows to create a slightly arched triangular shape. Work flat in rounds but keep stitch orientation consistent to shape triangular membrane.
Round 8 :
(3 sc, 1 inc) x 6 (30)
Round 9-12 :
1 sc in each st (30)
Round 13 :
(4 sc, 1 dec) x 5 (25)
Round 14 :
1 sc in each st (25)
Info :
Fasten off leaving long tail for attaching to wing bone. Block wing flat if necessary by pinning to shape on a towel and lightly steaming or using fabric-safe blocking spray.
— Wing Bones / Ridges (Make 4 per wing: main outer ridge plus 3 ribs) :
Round 1 :
8 ch, 1 sc in 2nd ch from hook, 6 sc along chain, sl st back to base to form a narrow ridge (7)
Round 2 :
Turn, 1 sc in each st (7)
Round 3 :
1 sc in each st (7)
Round 4 :
Fold slightly and work 1 sc around to thicken leading edge (7)
Info :
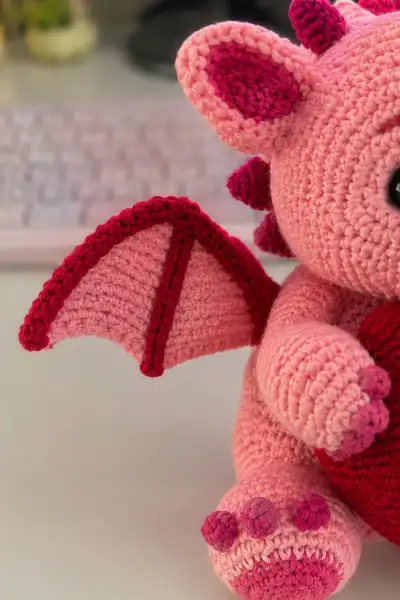
Use deep rose yarn for contrast. Sew the longest ridge along the outer edge of the membrane and the shorter ridges radiating toward the wing base to create the bat-like wing structure. Securely sew each ridge along its edge with small invisible stitches.
— Paw Pads and Toes (Make 2 sets per foot) :
Round 1 :
6 sc in magic ring (6)
Round 3 :
(1 sc, 1 inc) x 6 (18)
Info :
Make one large circular pad in deep rose and three small toe bumps in a darker pink. Attach the large pad to front of foot (rounds 1-3) and place toe bumps at front edge: sew three small bumps evenly across top of pad.
Toe bump (Make 3 per foot) Round 1 :
4 sc in magic ring (4)
Toe bump Round 2 :
1 sc in each st (4)
Toe bump Round 3 :
Fasten off leaving tail. Sew onto top of pad. Repeat for each toe.
— Heart (Make 1) :
Round 1 :
6 sc in magic ring (6) with bright red yarn
Round 3 :
(1 sc, 1 inc) x 6 (18)
Round 4 :
(2 sc, 1 inc) x 6 (24)
Round 5 :
(3 sc, 1 inc) x 6 (30)
Round 6-8 :
1 sc in each st (30)
Info :
Work two identical halves for the heart, reversing at the center seam, then join and crochet around to shape the point and cleft. Keep rounds even to ensure heart lies flat against dragon chest.
Round 9 :
(3 sc, 1 dec) x 6 (24)
Round 10 :
(2 sc, 1 dec) x 6 (18)
Round 11 :
(1 sc, 1 dec) x 6 (12)
Info :
Make a second matching half in the same manner. Stuff the halves firmly, especially at the top lobes so they keep a rounded shape. Join the two halves by placing them together and working single crochet around the outside, increasing in the lobes to hold the classic heart shape. Continue to stuff as you join so heart is full.
Round 13 :
Place two halves together and join by sl st through both fabrics around, then sc around the whole heart adding 6 sc across the cleft to round out shape where necessary (approx 36 sts after joining)
Round 14-18 :
1 sc in each st (36) — work even to build thickness (36)
Round 19 :
(4 sc, 1 dec) x 6 (30)
Round 20 :
(3 sc, 1 dec) x 6 (24)
Round 21 :
(2 sc, 1 dec) x 6 (18)
Round 22 :
Fasten off leaving long tail for stitching to arms. Stuff heart firmly to create a plush, squeezable center that will be comfortably nestable in the arms.
— Assembly & Detailing :
Info :
Before assembly, block and shape wings and dampen them if needed for a flat finish. Pin every piece into position on the body to verify placement and symmetry before sewing.
Step :
Sew legs to bottom of body aligning toes forward so the dragon sits steadily. Use matching pink yarn and ladder stitch or whip stitch, making stitches small and tight. Reinforce by going around twice if the dragon will be gifted to a child.
Step :
Attach arms slightly above the heart position so when sewn the arms wrap naturally around the heart. Position arms so claws are visible and level with chest rounds 9-13.
Step :
Sew the heart between the arms and chest using a long tail and whip stitch. Make a few hidden stitches through the arm bases to anchor the heart; the heart should be snug but removable if desired by looping ends inside rather than making permanent knots.
Step :
Sew head to body aligning the head collar round to body round 23. Use a strong yarn needle and sew through head opening and body collar evenly to avoid gaps. Add a few reinforcing stitches at the back of the neck for durability.
Step :
Attach wings symmetrically at back, slightly angled outward. Sew the wing bones first to the membrane, then attach the combined wing to the body at upper back rounds 9-11. Tuck a few stitches through body and wing to anchor securely.
Step :
Sew small horn spikes in a row from forehead to upper neck. Place central larger crest along top center of head and smaller spikes down the neck for a balanced look. Secure each spike with several stitches and weave tails inside stuffing.
Step :
Sew ears to head sides between rounds 6-8. Slightly fold the ear rim forward so inner ear color shows and sew at base with a few small stitches to maintain the fold shape.
Info :
Add final facial embroidery: simple nostrils on the snout with a few vertical stitches, short curved brows above the eyes for expression, and a small mouth line between snout base and head round 18 using long tail of deep pink. Use padded stitches for a soft result.
Step :
Weave in all ends by threading tails through the yarn needle and pulling them several rows deep into stuffing before trimming. This prevents tails from working loose.
Info :
Optional final touches: lightly brush with a soft toothbrush (if yarn allows) to soften stitches, or apply a touch of blush with fabric-safe dye to cheeks for rosy look. Use fabric-safe colorants and test on a scrap first.
This rosy dragon brings extra warmth and charm to any shelf or cuddle session! The oversized red heart and friendly expression make it an ideal gift or keepsake. Follow the rounds carefully and enjoy watching each piece come together into a lovable whole. 🧶💗 Every stitch adds personality — happy crocheting and enjoy the big hug this dragon shares! ✨