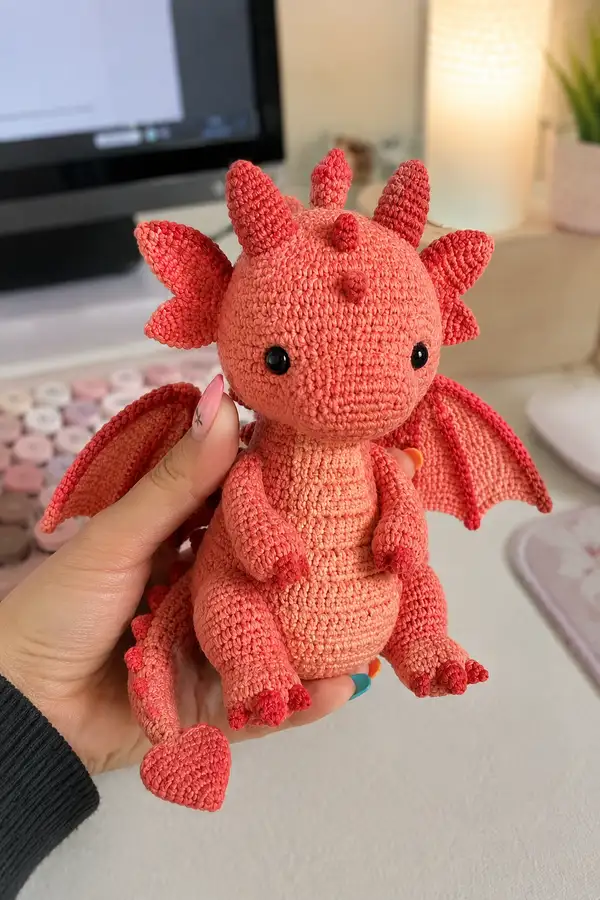
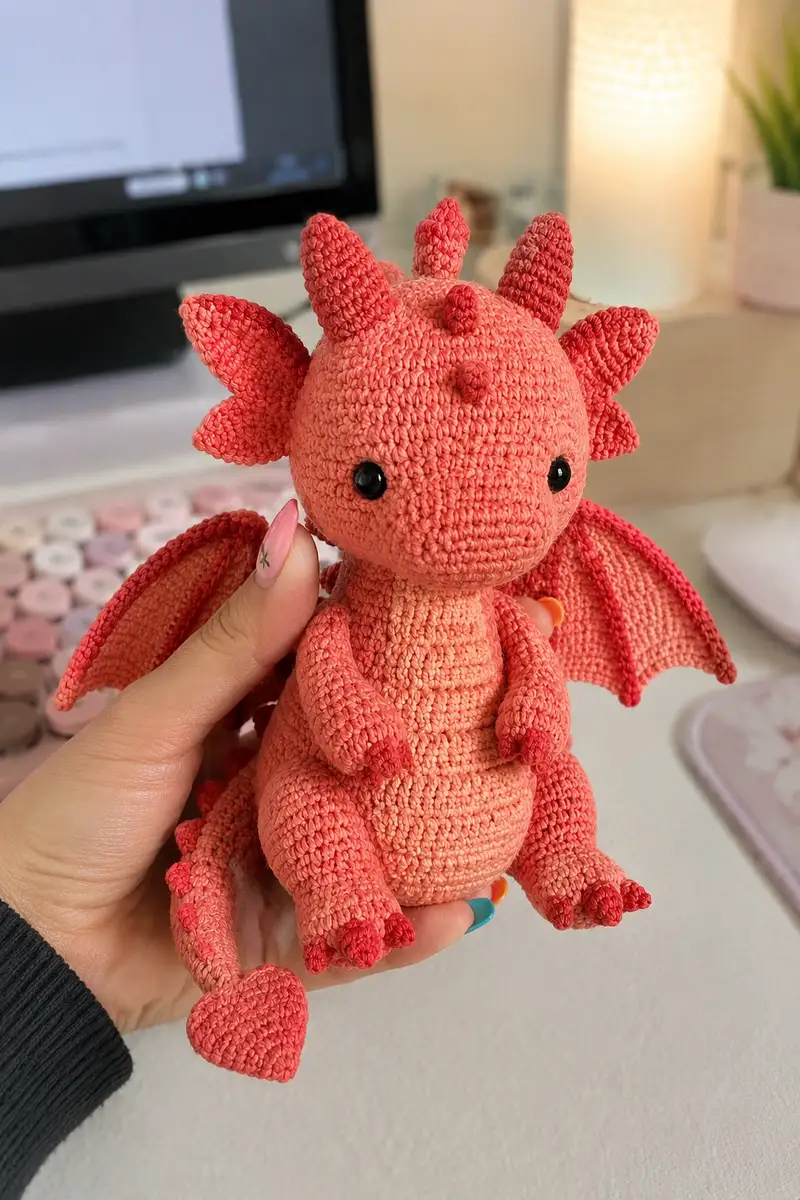
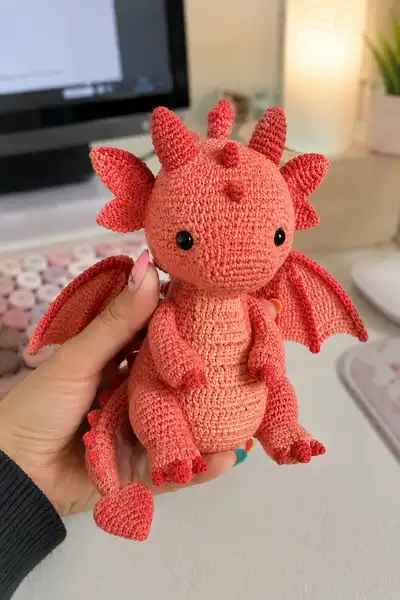
Make this cuddly coral dragon amigurumi with a sweet heart-shaped tail tip, expressive black eyes, scalloped wing bones and little rounded spikes down the back. The pattern uses simple amigurumi shaping, a separate belly panel and flat wings with raised ribs for structure. A charming project for intermediate crocheters who love detailed finishing and textured accents.
Progress Tracker
0% Complete
— Head :
Round 1 :
6 sc in magic ring (6)
Round 3 :
(1 sc, inc) x 6 (18)
Round 4 :
(2 sc, inc) x 6 (24)
Round 5 :
(3 sc, inc) x 6 (30)
Round 6 :
(4 sc, inc) x 6 (36)
Round 7 :
(5 sc, inc) x 6 (42)
Round 8 :
(6 sc, inc) x 6 (48)
Round 9-12 :
1 sc in each st (48)
Info :
Place safety eyes between Rounds 12 and 13 (approximately). For this doll-eyed look position eyes about 10-12 stitches apart (count along the round) depending on desired expression. Use pins to test placement while the head is open. If using 10mm safety eyes, this gives the slightly large, expressive look shown.
Round 13-16 :
1 sc in each st (48)
Round 17 :
(6 sc, dec) x 6 (42)
Round 18 :
(5 sc, dec) x 6 (36)
Info :
Start very light stuffing now so you can shape the cheeks and face before the head becomes tight. Use small amounts of fiberfill and press evenly toward the top of the head to create a rounded crown.
Round 19 :
(4 sc, dec) x 6 (30)
Round 20 :
(3 sc, dec) x 6 (24)
Round 21 :
(2 sc, dec) x 6 (18)
Round 22 :
(1 sc, dec) x 6 (12)
Round 23-28 :
1 sc in each st (12) (work 6 rounds to create neck tube height) (12)
Info :
The neck is intentionally narrow and tall to give the head a gentle bobble. Continue stuffing lightly as you work the neck rounds; do not overstuff so the head retains a softly flexible join with the body. Leave head open for sewing to body; do not fasten off.
Round 29 :
Work 2 sc in each st around (24) — optional flare where head meets body if you prefer a slightly larger lower head circumference (24)
Round 30 :
1 sc in each st (24)
Info :
Fasten off leaving a long tail for sewing if you plan to close and sew the head directly. Alternatively, leave the head open and finish sewing after stuffing body to adjust the join position precisely.
— Horns and Ear Frills (Make 5 small cones and 2 ear frills):
Horn Round 1 :
6 sc in magic ring (6)
Horn Round 2 :
(1 sc, inc) x 3 (9)
Horn Round 3 :
1 sc in each st (9)
Horn Round 4 :
(2 sc, dec) x 3 (6)
Horn Round 5 :
1 sc in each st (6)
Horn Round 6 :
sl st in next st, FO leaving tail for sewing; lightly stuff just to give shape
Info :
Create 3 taller, slightly wider horns for the top center and 2 smaller ear-frill cones for sides. For ear frill pieces work a flat, leaf-like shape: ch 7, sc back along chain with slight increases and decreases to form a teardrop; or make a rounded petal by working 7 sc into a loop and shaping into a wider flat petal with 2 rows. Block and sew to sides of head as pictured.
— Face Details :
Info :
Sew safety eyes securely between Rounds 12-13 on the head before proceeding with heavy stuffing. If using embroidered nostrils or mouth, mark placement with pins: nostrils about 4-6 stitches apart centered between the eyes, and a small stitched smile 2-3 rounds below the eyes. Use black yarn or thread for tiny nostrils, and a slightly darker coral for mouth if desired.
— Body :
Round 1 :
6 sc in magic ring (6)
Round 3 :
(1 sc, inc) x 6 (18)
Round 4 :
(2 sc, inc) x 6 (24)
Round 5 :
(3 sc, inc) x 6 (30)
Round 6 :
(4 sc, inc) x 6 (36)
Round 7 :
(5 sc, inc) x 6 (42)
Round 8 :
(6 sc, inc) x 6 (48)
Round 9-14 :
1 sc in each st (48)
Info :
If you want a lighter belly panel, now is a good time to make and join it. The belly shown is a lighter peach tone worked separately as a flat oval and sewn onto the front of the body. Alternatively, change color now and carry the lighter color up the front for several rounds to create an integrated belly.
Round 15 :
(6 sc, dec) x 6 (42)
Round 16 :
(5 sc, dec) x 6 (36)
Round 17 :
(4 sc, dec) x 6 (30)
Info :
Begin stuffing the body from the bottom upwards now. The body should be firmly stuffed at the base so the dragon can sit upright but still slightly squishy. Add stuffing gradually in small amounts; this helps keep even shape and prevents lumps.
Round 18-22 :
1 sc in each st (30)
Round 23 :
(3 sc, inc) x 6 (36)
Round 24 :
(4 sc, inc) x 6 (42)
Round 25-28 :
1 sc in each st (42)
Round 29 :
(5 sc, dec) x 6 (36)
Round 30 :
(4 sc, dec) x 6 (30)
Round 31 :
(3 sc, dec) x 6 (24)
Info :
Leave a wide opening for inserting legs and tail later. Do not fasten off; use safety pin or marker to temporarily close if you plan to attach limbs from inside. If you prefer to sew legs later, fasten off leaving a long tail now and continue with body closing later.
Round 32-36 :
1 sc in each st (24)
Round 37 :
(2 sc, dec) x 6 (18)
Round 38 :
(1 sc, dec) x 6 (12)
Round 39 :
6 dec (6) — leave opening to attach head or sew closed after assembly
Info :
Stuff the body firmly now, pressing stuffing into the bottom and then shaping the belly region so it is rounded and stable for sitting. If attaching the head by sewing, leave enough stuffing room at the neck opening to stitch through both head neck and body neck for a strong join.
— Belly Panel (work separately, then sew on) :
Belly Round 1 :
Ch 8, Join to form loop, 8 sc into loop (8)
Belly Round 2 :
(1 sc, inc) x 4 along chain and both sides to form oval (16)
Belly Round 3 :
(2 sc, inc) x 4 (20)
Belly Round 4-6 :
1 sc in each st (20)
Info :
Shaping the belly as a flat-oval with a few rows will match the front curve of the body. Block flat if necessary and sew along the center front of the body starting at round 12 through round 28 area. Use mattress stitch for a smooth join.
— Arms (Make 2) :
Arm Round 1 :
6 sc in magic ring (6)
Arm Round 2 :
(1 sc, inc) x 3 (9)
Arm Round 3 :
1 sc in each st (9)
Arm Round 4 :
(2 sc, inc) x 3 (12)
Arm Round 5-8 :
1 sc in each st (12)
Info :
Work the hand/fingers by changing to the darker accent color for the tips if you want claws. To create a subtle paw, stitch a short color change for 2 rounds at the last rows of the hand then return to main color for the wrist.
Arm Round 9 :
(2 sc, dec) x 3 (9)
Arm Round 10-12 :
1 sc in each st (9) — stuff hand tip lightly
Arm Round 13 :
(1 sc, dec) x 3 (6)
Arm Round 14-18 :
1 sc in each st (6) — work 5 rounds to lengthen arm (6)
Info :
Stuff hands firmly, arms lightly. Leave a long tail to sew arms to body at the sides around body rounds 14-18 so they sit just below the head. You can insert a short length of wire here if you want the arms slightly poseable; wrap wire ends with tape to avoid sharp points, then stuff around it.
Arm Round 19 :
1 sc in each st, FO leaving long tail for sewing (6)
— Legs (Make 2) :
Leg Round 1 :
6 sc in magic ring (6)
Leg Round 3 :
(1 sc, inc) x 6 (18)
Leg Round 4 :
(2 sc, inc) x 6 (24)
Leg Round 5 :
(3 sc, inc) x 6 (30)
Leg Round 6-9 :
1 sc in each st (30)
Info :
For the rounded foot front, reduce a little to shape the toe area. The foot in the photo is fairly rounded with three small digits; we will create a rounded toe cap then shape the leg tube upward from the heel.
Leg Round 10 :
(4 sc, dec) x 5 (25)
Leg Round 11 :
(3 sc, dec) x 5 (20)
Leg Round 12 :
1 sc in each st (20)
Leg Round 13 :
(2 sc, inc) x 5 (25)
Leg Round 14-20 :
1 sc in each st (25) — work 7 rounds for upper leg length
Info :
Stuff the foot solidly and shape the toe area with tufts of stuffing where needed. The legs should be firm at base and softer higher up so the dragon can sit. Leave a long tail to sew to the body around body Rounds 32-36; make sure legs are spaced evenly and symmetrical.
Leg Round 21 :
(2 sc, dec) x 5 (20)
Leg Round 22 :
(1 sc, dec) x 5 (15)
Leg Round 23 :
1 sc in each st (15) — FO leaving long tail for sewing (15)
— Tail :
Tail Round 1 :
6 sc in magic ring (6)
Tail Round 3 :
(1 sc, inc) x 6 (18)
Tail Round 4-8 :
1 sc in each st (18) — work 5 rounds to form thicker base
Tail Round 9 :
(2 sc, dec) x 6 (12)
Tail Round 10-14 :
1 sc in each st (12) — work 5 rounds to elongate tail (12)
Tail Round 15 :
(1 sc, dec) x 4 then 4 sc (8) (8)
Tail Round 16-20 :
1 sc in each st (8) — tapering to heart attachment (8)
Info :
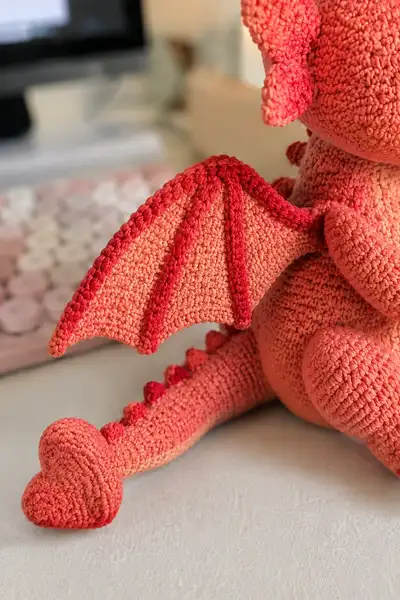
Sew small spike cones along tail top every 4-6 stitches from base toward end. Use darker accent color for little rounded bumps seen in the photo. Add stuffing sparingly so the tail remains bendable but not floppy.
— Tail Spikes (Make 8 small bumps) :
Spike Round 1 :
6 sc in magic ring (6)
Spike Round 2 :
(1 sc, inc) x 3 (9)
Spike Round 3 :
1 sc in each st (9) — FO leaving tail for sewing; lightly stuff
Info :
Sew spikes down the center of the tail spaced evenly as pictured. Use contrasting darker coral for a pop of texture and color. For a raised scallop effect you can sew them with a small overlap so they read like a ridge.
— Heart Tail Tip :
Heart Round 1 :
Ch 3, 3 sc in 3rd ch from hook (3) — make two identical halves
Heart Round 2 :
Join halves at base with sl st and sc around to form heart (6-8 depending on shaping)
Heart Round 3 :
Work a shallow spherical shaping by sc around the perimeter and FO leaving tail for sewing; stuff lightly and shape into a heart form as you sew it onto tail tip
Info :
The heart tip is crocheted in the darker accent color and sewn firmly to the tail end. Make sure the heart is stuffed evenly and that the seam to the tail is reinforced with several passes since this is a high-visibility focal point.
— Wing (Make 2 mirrored) :
Wing Row 1 :
Ch 20 (or adjust for desired wingspan). Turn and sc from 2nd ch from hook across (19)
Wing Row 2 :
Ch 1, sc in each st across (19)
Wing Row 3 :
Ch 1, sc in next 3, hdc2tog to create a gentle curve, sc across to last 4, hdc2tog, sc to end (19)
Wing Row 4-6 :
Ch 1, sc in each st (19) — work 3 rows to create a solid panel
Info :
The wings in the photo are slightly arched with ribs created by working raised slip-stitch ridges in darker accent color. After the panel is worked, create 3 ribs — one near the leading edge, one central and one near trailing edge — using surface slip stitches or working short vertical ridges by slip-stitching into both layers.
Wing Row 7 :
Ch 1, sc2tog at start to round the tip, sc across to last 2, sc2tog (17)
Wing Row 8 :
Ch 1, sc across (17)
Wing Row 9 :
Ch 1, dec at both ends to taper (15)
Wing Row 10-12 :
Ch 1, sc across (15) — shape until wing looks proportionate (work 3 rows)
Wing Row 13 :
Change to darker accent color. With RS facing, surface slip-stitch a raised ridge from base to tip at 4 evenly spaced columns (or stitch short vertical ridges: (ch 3, sl st into wing to pick up base) to create fingers)
Wing Row 14 :
Edge the wing with reverse sc or crab stitch in darker color for a defined rim. FO leaving long tail for sewing to body.
Info :
Wings are sewn to the back shoulders with their bases aligned at body Rounds 18-22. If you want the wings to hold a pose, insert very thin wire along the ribs before attaching and secure ends inside the wing and body with extra tight stitching.
— Wing Rib Detailing (Darker Accent) :
Rib Step 1 :
With darker yarn, attach at base of wing. Ch 1, sl st in next 2 sts, *ch 2, sl st into the wing fabric 4-5 rows forward to form a raised ridge for finger bone*; rep for 2-3 ribs across wing
Rib Step 2 :
Return across base with sl st trim to tidy edge and FO
Info :
The ribs in the example sit slightly raised and are spaced evenly; when you sew on the ribs, lightly stuff the wing center to hold the arch and prevent ribs from flattening.
— Back Spikes (Make 10 small bumps) :
Back Spike Round 1 :
6 sc in magic ring (6)
Back Spike Round 2 :
(1 sc, inc) x 3 (9)
Back Spike Round 3 :
1 sc in each st (9) — FO leaving tail for sewing
Info :
Sew these down the center of the back from neck to tail base spaced at about every 5-6 stitches depending on tail length. Use darker coral for a contrasting ridge of rounded bumps as pictured.
— Assembly Notes :
Info :
Before sewing pieces together, block any flat pieces (wings, belly) lightly with steam or damp shaping if using cotton yarn to keep them flat and smooth. Pin pieces in position and check symmetry from multiple angles before the final sewing passes.
— Extra Finishing Touches :
Info :
Use a slightly darker coral to add tiny embroidered nostrils and a subtle smile. Add blush to cheeks with a small dab of fabric paint or pastel chalk if desired. Secure all safety eyes with washers and check seams for security. Weave in ends well and trim close to work.
— Complete Stitch Summary and Tips :
Info :
This pattern favors tight stitches and small hook sizes to prevent stuffing from showing. Because many pieces are joined, leave long tails for sewing, pin before you sew, and stuff gradually. If you wish to make the dragon smaller or larger, change yarn weight and adjust hook accordingly, while keeping the same relative stitch counts.
This coral love dragon is a joy to stitch together — from the sweet heart tail tip to the scalloped wing ribs it feels like a little character you built by hand. Each section comes together to create a plush with so much personality and a sturdy, well-shaped body that sits perfectly. I hope you enjoy the gentle shaping and tiny finishing touches as much as I did. 🧶💕 When you finish, show off your creation — it makes a perfect gift or desk companion! 🎁