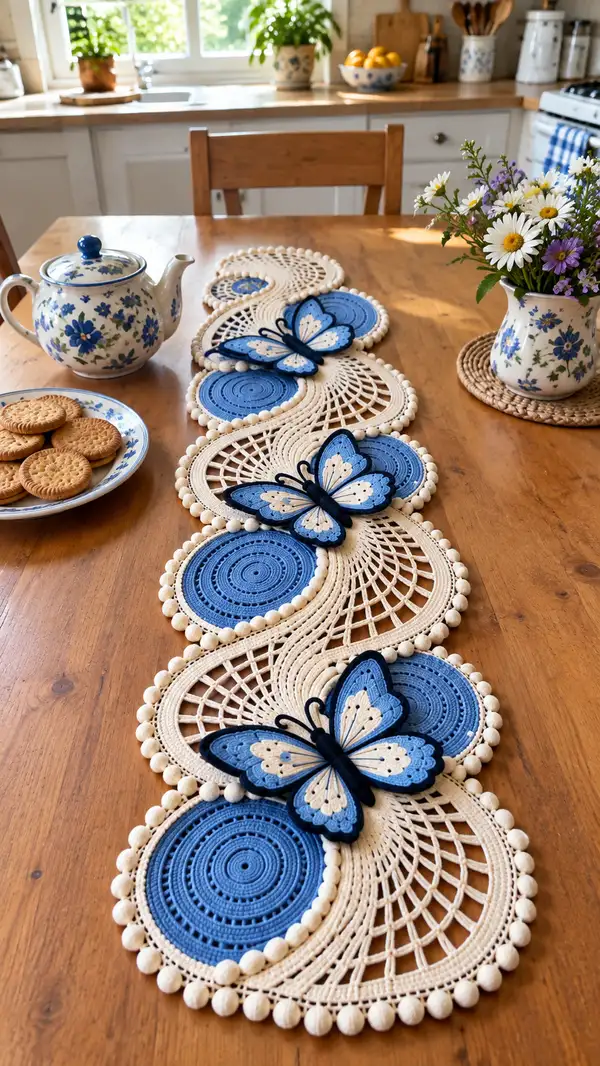
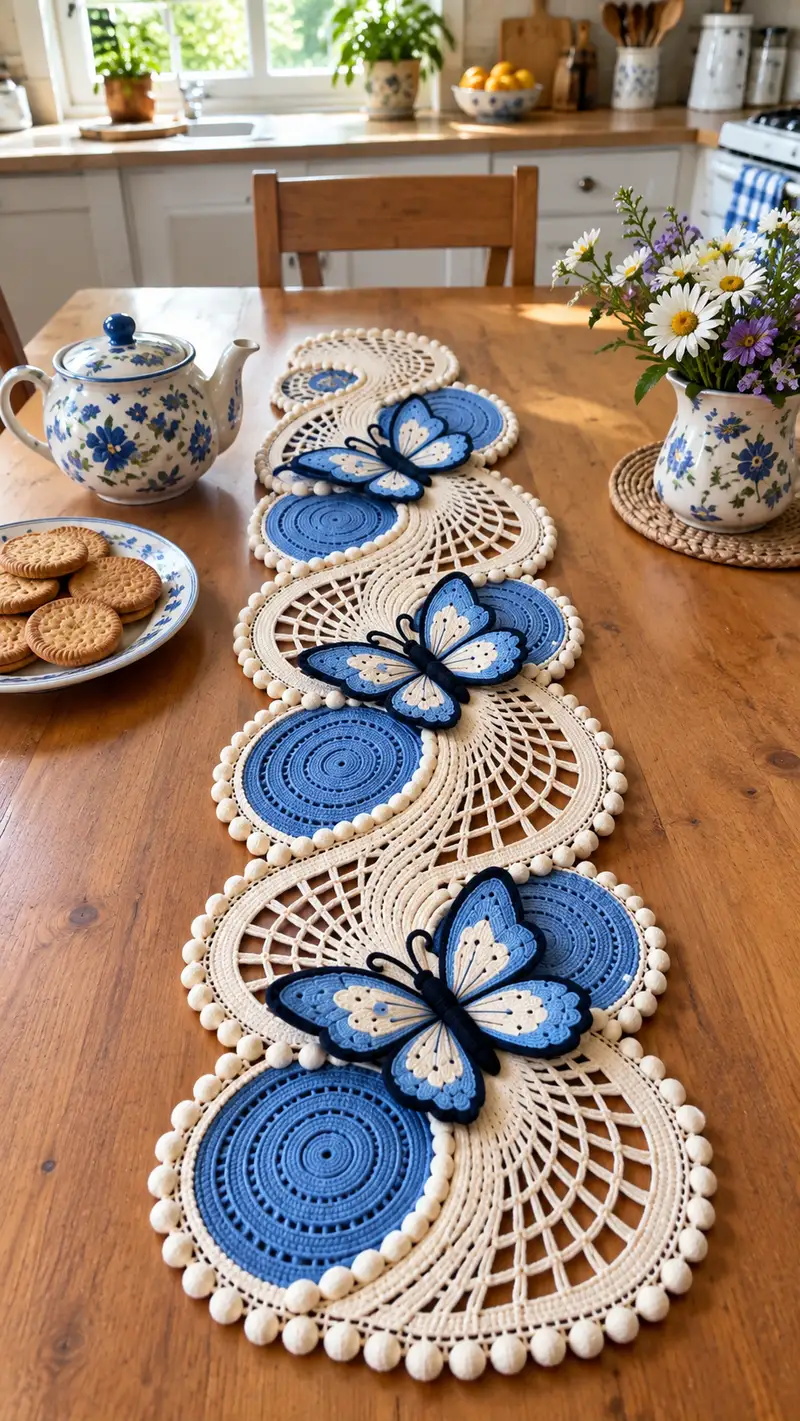
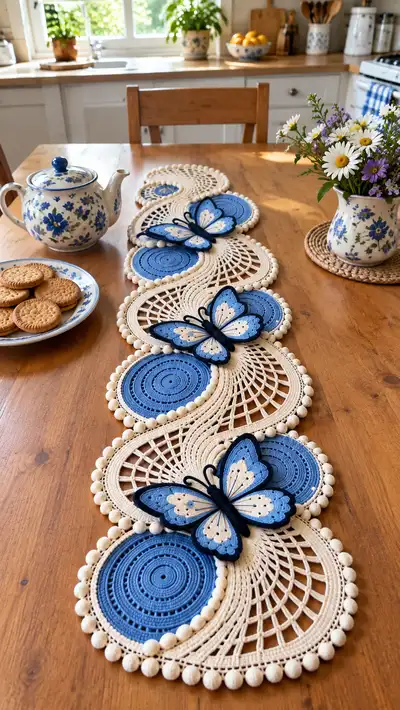
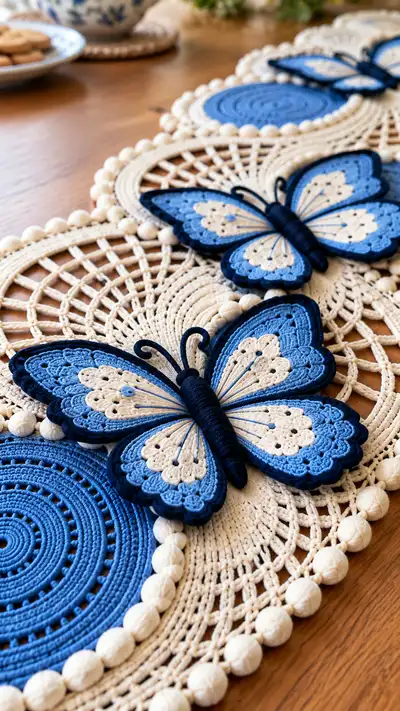
A delicate, sculptural table runner featuring layered blue circular medallions, airy cream lace connectors and three dimensional navy-and-cream butterflies. This pattern recreates the flowing S-shape composition, bobble edge detail and stacked layered butterfly appliques for an elegant dining table centerpiece. Worked in sturdy cotton cord for structure, it combines textured rounds, mesh fans and scalloped applique wings for a show-stopping handmade accent.
Progress Tracker
0% Complete
— Notes & Gauge :
Info :
Gauge is not critical for this decorative runner but consistency is. Using 5-6mm cotton cord and a 4.5mm hook should produce the proportions shown. Make a sample medallion to check proportion against table width and adjust hook size if needed.
Info :
Pattern is written for one medallion motif and one lace connector half; repeat and join motifs as shown. This document provides full round-by-round instructions for medallions, bobble edging, lace S-panels and layered butterflies. All stitch counts have been checked — please read Info sections between clusters for tips.
— Circular Blue Medallion (Make 4 identical discs) :
Round 3 :
(1 sc, inc) x6 (18)
Round 4 :
(2 sc, inc) x6 (24)
Round 5 :
(3 sc, inc) x6 (30)
Round 6 :
(4 sc, inc) x6 (36)
Round 7 :
(5 sc, inc) x6 (42)
Round 8 :
(6 sc, inc) x6 (48)
Info :
These first rounds create a flat, even disk. Keep tension even and use a stitch marker to track beginning of each round. If disc curls, increase tension or go up a hook size; if ruffles, reduce increases or use a slightly larger hook.
Round 9 :
(7 sc, inc) x6 (54)
Round 10 :
(8 sc, inc) x6 (60)
Round 11 :
(9 sc, inc) x6 (66)
Round 12 :
(10 sc, inc) x6 (72)
Round 13 :
(11 sc, inc) x6 (78)
Round 14 :
(12 sc, inc) x6 (84)
Info :
By round 14 your medallion should be a solid circle approx 15-18 cm across depending on yarn thickness. If you prefer a slightly smaller disc, stop at round 12 or 13; for larger keep increasing (add rounds following the pattern increment of 6 stitches).
Round 15 :
1 sc in each st around (84)
Round 16 :
1 sc in each st BLO (84)
Info :
Working one round BLO creates a defined ridge and helps the disc stack visually under the bobble border. Use the BLO round to slightly tighten the fabric edge so the bobbles sit neatly.
Round 17 :
1 sc in each st (84)
Round 18 :
*(3 sc, ch 1, sk 1) repeat around to create tiny eyelet texture - place marker at first ch-1 space for next round (84)
Round 19 :
In ch-1 spaces from previous round: (sc, hdc, dc, hdc, sc) in each ch-1 sp to create a decorative ring (84 clusters)
Round 20 :
1 sc evenly around over clusters, working 2 sc in any point where round increases are needed to maintain even edge (approx 84-88)
Info :
Round 20 evens out the cluster ring. Count your final stitches; if you have 88, subsequent bobble placement will adjust to that count. Note the final stitch count for bobble spacing.
Round 21 :
Change to Sky Blue (if working medallion center in lighter shade) — 1 sc in each st (84-88)
Round 22 :
Bobbles: *ch 1, bobble (yarn over 4 times, draw up loop, yo draw through two three times) in next st, sl st in next st; rep around to create popped bobble ring. Join with sl st (approx 42-44 bobbles depending on count).
Info :
Bobble technique: work rows of bobbles in every other stitch if your stitch count is even; if odd, work bobble in every 2nd stitch adjusting at the end to space bobbles evenly. Use a smaller hook if bobbles look loose.
Round 23 :
Fasten off and weave in ends. Block your medallion flat using pins to maintain circular shape. Repeat to make 4 medallions total.
— Cream Lace Half-Panel (Make 4 halves to connect medallions in S formation) :
Round 1 :
With Cream, ch 6, join to form a ring with sl st. Ch 3 (counts as dc), 11 dc in ring, join (12 dc)
Round 2 :
Ch 1, 1 sc in same st, ch 5, sk next dc, sc in next dc, *ch 5, sk next dc, sc in next dc; rep around (12 sc / 12 ch-5 loops)
Round 3 :
In each ch-5 sp: (sc, hdc, 3 dc, hdc, sc) to form fan shells (12 fans)
Info :
This small central ring establishes a repeating fan motif. The half-panel is built by increasing fan rows and turning the work into an elongated half circle. Keep a stitch marker at the central fan to maintain symmetry.
Round 4 :
Ch 3, turn work to begin working rows outward: in row edges, work 2 dc in turning chain base; along fan outer edges work 3 dc clusters into spaces to expand the panel sides evenly.
Round 5 :
Continue building semicircular rows: Row 5: *dc in next 3 sts, (dc, ch1, dc) in fan gap to create expansion; rep across edge. At turn chain work 3 dc to preserve outer curve
Round 6 :
Row 6: Dc in each st across, increasing at gap points by (dc, ch1, dc) to widen panel. End row with 3 dc in turning chain.
Round 7 :
Row 7: Create taller fan lobes with *ch 5, sk 3 dc, sl st into next dc to make long mesh arches along outer curve (this will become the netting shown in the pictures)
Info :
From Rounds 4-8 you're shaping a half-lace fan panel. Keep counts consistent by increasing the number of chain arches across each subsequent row by the same amount — e.g., add one additional chain-5 arch every two rows to keep curvature smooth.
Round 8 :
Row 8: In outer arches: ch 8, sl st to next arch base, repeat across outer edge to create long chain arcs (these will be worked into in later rounds to form the open lattice)
Round 9 :
Return round: sc across base row, working into arch joins with sc to anchor the long chains. Ensure outer edge now has evenly spaced chain arches; count should be even and divisible for later pairing with medallions.
Round 10 :
In long chain arcs: *(sc, ch 5, sc) anchored into arc center to form ladder mesh; rep along outer edge creating a net-like panel.
Round 11 :
1 sc in each anchor, then in alternating anchors work (sc, ch 7, sc) to slightly lengthen the mesh and build the S-curve depth.
Round 12 :
Work an edging row around the half-panel: 1 sc in each st and 3 sc in corner turning chains to prepare for joining with medallion edges (approx stitch count variable depending on number of arches, target ~120-160 sts along inner curve).
Info :
Make 4 half-panels: two will be mirrored to build the opposite side of the S-shape. Block each half-panel to hold shape and measure to align with medallion diameter. The inner edge of the half-panel will be matched to the medallion bobble ring for a neat join.
— Bobble Edge Join Around Medallion (Joining Medallion to Half-Panel) :
Round 1 :
With Cream, position medallion and half-panel: align half-panel inner edge with medallion bobble ring. Join with slip stitch into bobble base, working around the medallion in alternating pattern: sl st into bobble base, sl st into half-panel anchor, repeat around to secure (approx equal pairing points - typically 42-44 joins).
Info :
Use pins to hold medallion to panel before join. Join with small, neat slip stitches to keep the bobbles visible and not flattened. If bobbles are large, join into the space between bobble and disc body for stability.
Round 2 :
After joining, work 1 sc into each sl st join all around to tidy the seam and make a continuous cream edge (approx same stitch count as medallion outer edge).
Round 3 :
Work 1 sc BLO around the joined edge to add a ridge; this helps the S-curve maintain structure when motifs are linked.
Info :
Make 4 medallion+half-panel assemblies and lay them out in an S shape on a blocking board to plan final joining sequence. Block assemblies flat to set shape before final joining.
— Connecting Assemblies into Runner (Joining Sequence) :
Round 1 :
Arrange medallion+panel assemblies in alternating orientation (medallion, open lace, medallion, open lace) to form continuous S-shape. Use pins to mark connector points where half-panels overlap slightly.
Round 2 :
Join adjacent half-panels using sc whip stitch through both anchors along intended seams, using Cream and working through both layers to create an invisible seam. Work slowly ensuring curvature flows smoothly.
Round 3 :
Where medallions meet lace panels at inner curves, reinforce join with two rows of sl st then sc to avoid stretching. Maintain consistent tension to keep runner flat.
Info :
Permanent joins: when you are happy with layout, fuse with a row of tidy sc around each seam, then weave in ends and block entire runner again to even out curves and encourage flatness.
Round 4 :
Edge finishing: With Cream, sc evenly around entire outer edge of runner, placing 3 sc in any concave corner curves to keep the runner flat. Aim for even stitch spacing — total outer edge stitches will vary with your blocking and tension.
Round 5 :
Bobble outer border: *[bobble in next st, sl st into next st] repeat across outer edge to create a continuous bobble scallop. Join and fasten off neatly.
Info :
The outer bobble border unifies the runner visually. If you prefer smaller bobbles, reduce the bobble construction to three wraps instead of four. Block gently after bobble round to keep bobbles rounded but secure.
— Butterfly Appliques (Make 3 full butterflies; each butterfly uses layered parts: top wing, lower wing, small underlayer and body) :
Part A - Wing Base (Lower Layer - Sky Blue) :
Round 1 :
MR, 6 sc in MR (6)
Round 3 :
(1 sc, inc) x6 (18)
Round 4 :
(2 sc, inc) x6 (24)
Round 5 :
Ch 1, sc across to shape an elongated teardrop: sc in next 12 sts, hdc 6, sc 6 - this forms one half of a wing base. Turn and mirror to complete wing through symmetrical stitching (counts approximate, finish with total 48 incl shaping)
Info :
Wing bases are worked flat and slightly oval. Keep your tensions even so that layers stack neatly. Make two wing bases for each butterfly (left and right lower wings).
Round 6 :
Work scallop edging around wing base: *sc 3, (3 dc in next st), sc 3 along curved edge to create scallop repeats. Fasten off and weave ends.
Part B - Wing Middle Layer (Royal Blue) :
Round 3 :
(1 sc, inc) x6 (18)
Round 4 :
(2 sc, inc) x6 (24)
Round 5 :
Work 2 rounds even (24) to build a slightly smaller teardrop that nests on the base wing. Round 6: sc around and create small picot or scallop (sc, ch3, sl st) every 4 stitches to echo decorative edge.
Info :
Make two middle-layer wings per butterfly. These will be stacked on the base to give depth. Use a slightly smaller hook (3.5mm) if you want sharper, tighter micro-scallops.
Part C - Wing Top Layer (Navy Outline) :
Round 3 :
(1 sc, inc) x6 (18)
Round 4 :
Continue two rounds even (18) then form scalloped decorative edge by working (sc, ch2, sc) into every stitch along outer curve to produce lace-like top wing outline.
Info :
Top layer is slightly smaller and acts as the crisp outline. Make two top wings per butterfly. Stitch counts will be smaller and should sit neatly on the underlying layers so the navy edge frames the lighter blues.
Part D - Small Inner Panel (Cream highlights) :
Round 1 :
Ch 6, sl st to form ring. Ch1, 8 sc into ring, join (8)
Round 2 :
(1 sc, inc) x4 (12)
Round 3 :
Work cluster shell: in each st (sc, hdc, 3 dc, hdc, sc) to create small scalloped insert (12 shells). Fasten off.
Info :
This cream insert is placed on the wing interior for contrast. You will stitch it to the sky-blue base before stacking other layers on top.
Part E - Body & Antennae (Make 1 per butterfly) :
Round 1 :
With Navy, ch 11, sc in 2nd ch from hook across to make a tube foundation approximately 10 sc long; do not join. Turn, sc back across to create 2 rows of neat tubular body (approx 10x2)
Round 2 :
Fold tube and stitch sides to create rounded cylinder. Wrap additional yarn around body center 6-8 times to create wrapped thorax look. Fasten and weave ends under wraps for a polished finish.
Round 3 :
Antennae: With thin navy thread or cord, form two 6-8 cm loops, wrap outside with yarn and stitch securely to top of body. Optionally insert a short piece of floral wire inside and wrap with yarn for poseable antennae.
Info :
Lightly stuff the body with a touch of yarn scraps or polyfil before closing if you prefer a plump body; the wrapped segment hides joins and gives sculptural depth to the applique.
Assembly of Butterfly Layers :
Round 1 :
Position the Sky Blue base wing right side up, stitch the Cream inner insert onto the wing center using small whip stitches and matching cream thread. Make sure insert is centered and aligned with the wing curve.
Round 2 :
Layer the Royal Blue middle wing on top of the Sky Blue base aligning inner edges; tack in 4 spots along inner edge using matching thread to keep in place.
Round 3 :
Layer the Navy top wing as the final outline. Using navy thread, stitch only at the very inner wing edge so the scalloped outer edge remains free and 3D.
Round 4 :
Position two completed wing halves symmetrically left and right and sew them together at the wing base with small hidden stitches. Attach the wrapped body along the center seam using a ladder stitch to hide thread; sew through wing layers and body wraps for stability.
Info :
Attach a small button or tiny crocheted circle at wing base underside and stitch through runner to secure butterfly onto the runner in desired locations. You can sew butterflies down permanently or tack them so they are removable for cleaning.
— Decorative Embroidery on Wings :
Round 1 :
Using contrasting fine cream thread, stitch vein lines from wing base to scalloped tips using long straight stitches. Space evenly; add small French knots in a few scallop centers for the dotted accent visible in the images.
Info :
Embroider after the applique is fully attached to runner to ensure veins align with body. Use a thin needle and subtle tension to avoid puckering the cotton cord.
— Final Finishing & Blocking :
Round 1 :
Weave in all loose ends, then wet-block the entire runner to even out stitch density. Use rust-proof pins and a blocking mat; gently shape the S-curve and pin the bobbles to round shapes until dry.
Round 2 :
Check joins: if any seam has slight gaps, tack with small matching stitches from back to front and re-block that area. Steam pressing lightly (not directly on bobbles) can help set cotton cord shape.
Info :
Once fully dry, consider a light starch spray if you want a stiffer runner. If storing, fold loosely with acid-free tissue between layers to preserve bobbles and butterflies.
This runner is a lovely combination of bold medallion color and airy lacework, finished with sculptural butterflies for a truly special centerpiece. Every stitch adds texture, contrast and charm—perfect for gifting or keeping as a table heirloom. 🧶 The bobble edge and layered butterflies give tactile interest and elevate an ordinary dining experience. 🌸 Enjoy the slow, satisfying process of making something both decorative and durable. Happy stitching! ✨