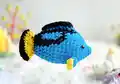
Make a charming Blue Tang (Dory) amigurumi with this clear, photo-supported crochet pattern. You will work from the body up to the tail with color changes for authentic markings. The pattern uses super bulky yarn for a plush, quick-to-make toy that makes a lovely handmade gift.
Progress Tracker
0% Complete
— Body & Tail :
Info :
Begin with Blue yarn. *When the text is bold and underlined, switch to BLACK yarn*
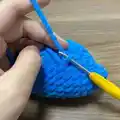
Round 1 :
5 SC in an MR (5)
Round 2 :
2SC, INC, 2SC (6)
Round 3 :
INC, SC, 2INC, SC, INC (10)
Round 4 :
SC, 7INC, 2SC (17)
Round 5 :
4SC, (INC, SC) 4 times, INC, 4SC (22)
Round 6 :
5SC, (INC, SC) 6 times, 5SC (28)
Round 7 :
8SC, INC, 10SC, INC, 8SC (30)
Round 8 :
14SC, 2SC, 14SC (30)
Round 9-10 :
13SC, 4SC, 13SC (30)
Round 11 :
10SC, 10SC, 10SC (30)
Round 12 :
9SC, 2SC, 2SC, 4SC, 2SC, 2SC, 9SC (30)
Round 13 :
9SC, SC, 3SC, 4SC, 3SC, SC, 9SC (30)
Round 14 :
3SC, DEC, 3SC, DEC, 3SC, DEC, 2SC, SC, DEC, SC, DEC, 2SC, DEC, 3SC, DEC (24)
Round 15-16 :
6SC, 2SC, 3SC, 3SC, 2SC, 2SC, 6SC (24)
Round 17 :
2SC, DEC, 2SC, (DEC, 2SC) 3 times, DEC, 2SC, DEC (18)
Round 18 :
5SC, 9SC, 4SC (18)
Round 19 :
(SC, DEC) 2 times, (SC, DEC) 3 times, SC, DEC
Info :
Cut the Black and Blue yarn
Info :
Change to Yellow yarn
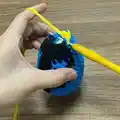
Round 20 :
Crochet 2 side together with 6SC
Round 21 :
Turn, 2CH, DC-INC 6 times (12)
Info :
Change to Black yarn
Round 22 :
Turn, CH, 12SC (12)
Info :
Weave in the yarn end and cut
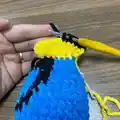
— Dorsal Fins :
Part 1 (P1) :
Begin with Blue yarn (Make 2). Pick up the yarn from row 7, apart 8 stitch. Row 1: (Chains 1, HDC, 3DC, HDC) in one stitch (5). Change to Yellow yarn. Row 2: Turn, CH, 5SC (5). Weave in the yarn end and cut.
Part 2 (P2) :
Begin with Blue yarn. Pick up the yarn from R8 to R16, in the vertical line from head to tail. Row 1: (Chains 1, SC, 7DC, SC) in one stitch (9). Change to Black yarn. Row 2: Turn, CH, 9SC (9). Weave in the yarn end and cut.
Info :
Attach the eyes at R5-R6, apart 8 stitch
This delightful Blue Tang (Dory-style) amigurumi brings the ocean to your hands with playful stripes and soft texture. Perfect as a gift or a cheerful desk buddy, it combines quick construction with bold colourwork for maximum charm. Happy crocheting and sea-bound smiles! 🐟🧶