🧢 Beautiful ✨ Detailed πŸ’ Adorable

Buzz Lightyear Amigurumi Pattern

Buzz Lightyear Amigurumi Pattern
4.3β˜… Rating
5-7 Hours Time Needed
3.5K Made This
βœ‚οΈ

Intermediate Level

Ideal for those with basic crochet experience, featuring slightly more advanced stitches and techniques to expand your skills.

⏱️

Weekend Treat

Takes 5-7 hours, making it an enjoyable project to finish over a couple of days.

🧸

Cute Companion

An adorable friend to cherish, handcrafted with love to bring comfort and joy for years to come.

About This Buzz Lightyear Amigurumi Pattern

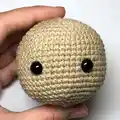
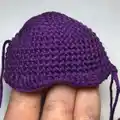
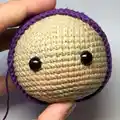
This pattern creates a detailed Buzz Lightyear amigurumi inspired by Toy Story, complete with color changes and embroidered emblem details. You will crochet head, detailed helmet trim, ears, body and legs, plus small embroidered badges for an authentic look. The step-by-step structure and photos make it easier to follow each stage.

Buzz Lightyear Amigurumi Pattern crochet pattern - detailed view of completed project

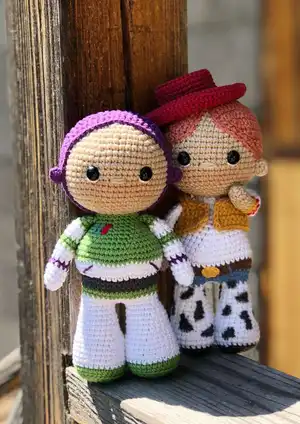
Perfect for crafters who enjoy character dolls and colorwork, this pattern includes rounds, assembly tips, and finishing ideas. The finished doll is a delightful handmade keepsake or gift.

Why You'll Love This Buzz Lightyear Amigurumi Pattern

I absolutely love this pattern because it captures Buzz Lightyear's charm with simple but effective colorwork and embroidered accents. I enjoy the way the helmet detail is crocheted separately and sewn on for a neat finish. I also love how the pattern balances shaping with easy stitch repeats, making it satisfying to see the character come to life. The embroidery steps add personality and let you practice small finishing techniques that really elevate the final piece.

Buzz Lightyear Amigurumi Pattern step 1 - construction progress Buzz Lightyear Amigurumi Pattern step 2 - assembly progress Buzz Lightyear Amigurumi Pattern step 3 - details and accessories Buzz Lightyear Amigurumi Pattern step 4 - final assembly and finishing

Switch Things Up

I love how easy it is to customize the colors in this pattern; you can switch the green and purple for pastel tones to create a softer look.

I sometimes use a thicker cotton yarn and a larger hook to make a chunky, huggable version of Buzz that finishes much larger.

I add a tiny loop at the top of the helmet detail to turn the doll into a hanging ornament or keychain for a fun variation.

I recommend embroidering different badges β€” try stars or initials β€” to personalize every doll for gifts or keepsakes.

I often swap the plastic safety eyes for embroidered eyes when making toys for very young children to make them fully child-safe.

I sometimes add a small piece of wire inside the arms for posability so the figure can hold tiny props like a mini flag or a badge.

I like to make matching sets, for example creating a Woody companion using similar techniques and coordinating yarn colors.

I experiment with facial expressions by moving the placement of the embroidered mouth and eyes to give each doll a unique personality.

I suggest adding felt accessories, like a tiny badge or chest plate, glued or sewn on for extra detail if you prefer less embroidery.

I always encourage you to try different yarn brands and textures: mercerized cotton gives a neat finish, while acrylic offers more stretch and softness.

Common Mistakes & How to Fix Them

βœ— Skipping stitch markers during shaping and color changes can make rounds hard to track; use a stitch marker at the start of every round to avoid losing your place. βœ— Forgetting to leave a long tail for sewing will make assembly difficult later; always leave a generous tail where the pattern asks to sew pieces together. βœ— Understuffing or overstuffing the head and body creates uneven shaping; stuff gradually and firmly but not so much that stitches spread apart. βœ— Not counting stitches after increases or decreases leads to incorrect shaping; count your stitches frequently, especially after rounds with changes. βœ— Changing color mid-round without securing ends can cause loose strands; carry the color neatly or weave in ends as you switch to maintain clean color lines.

Buzz Lightyear Amigurumi Pattern

Make your own adorable Buzz Lightyear amigurumi with full step-by-step instructions and clear photos. This pattern guides you through color changes, embroidered details, and neat assembly so you can create a collectible Toy Story character. You'll find materials, abbreviations, and stitch-by-stitch rounds to follow along easily. Perfect for an afternoon crafting session or as a heartfelt handmade gift.

Intermediate 5-7 Hours

Materials Needed for Buzz Lightyear Amigurumi Pattern

β€” Main Fabric

  • 01
    Alize Cotton Gold - 126
  • 02
    Alize Cotton Gold - 152
  • 03
    Alize Cotton Gold - 55
  • 04
    Drops Love You 7 - 10
  • 05
    Drops I Love You 7 - 04
  • 06
    Fiber filling for stuffing

β€” Tools Required

  • 01
    Hook size No.2 (approximately 2.0 mm)
  • 02
    Tapestry needle for sewing
  • 03
    Scissors
  • 04
    Plastic safety eyes diameter 7-8 mm (2 pieces)
  • 05
    Fiber filling (polyester stuffing)

Progress Tracker

0% Complete

β€” Head :

Round 1 :

6 sc in mr

Round 2 :

6 inc (12)

Round 3 :

(1 sc, inc) x 6 (18)

Round 4 :

(2 sc, inc) x 6 (24)

Round 5 :

(3 sc, inc) x 6 (30)

Round 6 :

(4 sc, inc) x 6 (36)

Round 7 :

(5 sc, inc) x 6 (42)

Round 8 :

(6 sc, inc) x 6 (48)

Round 9 :

(7 sc, inc) x 6 (54)

Round 10-19 :

54 sc

Info :

Between the 15-16 rows insert safety eyes, 7-8 mm in diameter.

Round 20 :

(7 sc, dec) x 6 (48)

Round 21 :

(6 sc, dec) x 6 (42)

Info :

Stuff

Round 22 :

(5 sc, dec) x 6 (36)

Round 23 :

(4 sc, dec) x 6 (30)

Round 24 :

(3 sc, dec) x 6 (24)

Round 25 :

(2 sc, dec) x 6 (18)

Round 26 :

(1 sc, dec) x 6 (12)

Info :

Stuff

β€” Detail for head :

Round 1 :

6 sc in mr

Round 2 :

6 inc (12)

Round 3 :

(1 sc, inc) x 6 (18)

Round 4 :

(2 sc, inc) x 6 (24)

Round 5 :

(3 sc, inc) x 6 (30)

Round 6 :

(4 sc, inc) x 6 (36)

Round 7 :

(5 sc, inc) x 6 (42)

Round 8 :

(6 sc, inc) x 6 (48)

Round 9 :

(7 sc, inc) x 6 (54)

Round 10-16 :

54 sc

Round 17 :

(hdc, 2 dc, 2 inc (dc), 2 dc, hdc, 2 sc) x 2, 34 sc (58)

Round 18 :

(hdc, dc x 8, hdc, 2 sc) x 2, 34 sc (58)

Round 19 :

22 hdc, 36 sc (58)

Round 20 :

58 sc

Info :

Leave a long tail for sewing

Info :

Sew the detail on the head

β€” Ears (x2) :

Round 1 :

6 sc in mr

Info :

Leave a long tail for sewing

β€” Start forming head :

Info :

Between the 16-17 rows sew on ears. Distance from ears to eyes 5-6 sc.

Info :

Embroider nose.

Info :

Start forming eyes: Embroider eyes: insert the white threaded needle on bottom of the eye and thread it to the bottom as shown in the picture. Bring the thread out near the second eye and repeat the same steps.

Info :

Toned cheeks

β€” Legs (x2) :

Round 1 :

6 sc in mr

Round 2 :

6 inc (12)

Round 3 :

(1 sc, inc) x 6 (18)

Round 4 :

(2 sc, inc) x 6 (24)

Round 5 :

(3 sc, inc) x 6 (30)

Round 6 :

BLO 30 sc

Round 7 :

30 sc

Round 8 :

Change yarn color to the white color: 30 sc

Round 9 :

(8 sc, dec) x 3 (27)

Round 10-11 :

27 sc

Round 12 :

(7 sc, dec) x 3 (24)

Round 13 :

24 sc

Round 14 :

(6 sc, dec) x 3 (21)

Round 15-16 :

21 sc

Round 17 :

(5 sc, dec) x 3 (18)

Round 18 :

18 sc

Round 19 :

(4 sc, dec) x 3 (15)

Info :

Stuff

Info :

Crochet second leg the some way and continue crocheting the body.

β€” Body :

Info :

Do not cut off the thread on the second leg and continue crocheting the body. The gap between the legs should be 3 ch:

Round 1 :

15 sc on the leg, 3 sc on the chain, 15 sc on the leg, 3 sc on the chain (36)

Round 2 :

36 sc

Round 3 :

Change yarn color to the green color: 36 sc

Round 4 :

36 sc

Round 5 :

Change yarn color to the grey color: 36 sc

Round 6-7 :

36 sc

Round 8 :

Change yarn color to the white color: BLO (5 sc, inc) x 6 (42)

Round 9 :

(6 sc, inc) x 6 (48)

Round 10 :

(7 sc, inc) x 6 (54)

Round 11 :

Change yarn color to the green color: 54 sc

Round 12-13 :

54 sc

Round 14 :

(7 sc, dec) x 6 (48)

Round 15 :

(6 sc, dec) x 6 (42)

Round 16 :

(5 sc, dec) x 6 (36)

Round 17 :

(4 sc, dec) x 6 (30)

Info :

Stuff

Round 18 :

30 sc

Round 19 :

(3 sc, dec) x 6 (24)

Round 20-21 :

24 sc

Info :

Stuff

Info :

Leave a long tail for sewing

Info :

Sew the head to the body

Info :

Embroider emblem with blue and red thread

β€” Hands :

Round 1 :

6 sc in mr

Round 2 :

(1 sc, inc) x 3 (9)

Round 3-5 :

9 sc

Round 6 :

Change yarn color to the purple color: 9 sc

Round 7 :

Change yarn color to the white color: 9 sc

Round 8-9 :

9 sc

Round 10 :

Change yarn color to the green color: 9 sc

Round 11 :

9 sc

Round 12 :

Change yarn color to the white color: 9 sc

Round 13-14 :

9 sc

Round 15 :

Change yarn color to the green color: 9 sc

Round 16-17 :

9 sc

Info :

Stuff

Info :

Sew the hands to the body.

Assembly Instructions

  • Insert safety eyes between rounds 15-16 of the head, spacing them about 5-6 stitches apart before embroidering the facial details.
  • Sew the purple helmet detail onto the head using the long tail left from the detail piece, aligning the edge to the head rim and stitching evenly.
  • Attach the ears between rounds 16-17 with the long tail, making sure the distance from each ear to the nearest eye is about 5-6 single crochets.
  • Sew the head to the body using the long tail left on the body: align the head opening to the top of the body and stitch securely with a tapestry needle.
  • Embroider the small emblem on the chest using red and blue thread as shown in the photos, stitching short straight satin stitches for the badge details.
  • Position and sew the hands to the sides of the body at the indicated rounds, then secure firmly with hidden stitches so they sit naturally.

Important Notes

  • πŸ’‘Use a stitch marker to mark the beginning of each round to help you count stitches and manage increases and decreases.
  • πŸ’‘Leave a long tail on pieces that will be sewn (helmet detail, ears, body) to make assembly easier and neater.
  • πŸ’‘Stuff parts gradually and evenly to avoid lumps; overstuffing can distort the shape and under-stuffing makes sewing difficult.
  • πŸ’‘When changing yarn colors, carry or fasten off neatly to avoid loose ends; weave ends in as you go for a tidy finish.

This Buzz Lightyear amigurumi brings Toy Story charm to your crochet hooks with a mix of shaping and embroidery. The pattern includes helmet detail, color changes, and a cute embroidered emblem for authenticity. Make one for yourself or as a heroic handmade gift! 🧢✨

You ask,

we answer.

FAQs

What size will the finished piece be?

The finished amigurumi size depends on your yarn and hook tension, but using the recommended cotton yarn and a 2.0 mm hook will result in a small collectible approximately 20-25 cm tall.

Can I use different yarn weights for this pattern?

Yes, you can use different yarn weights, but the final size will change. Use an appropriate hook for your yarn and remember to check your gauge if you want a specific finished size.

Do I need prior crochet experience for this pattern?

This pattern is rated intermediate due to color changes, small embroidered details and assembly. Basic knowledge of amigurumi shaping, increases, decreases and sewing is recommended.

How long does this project typically take to complete?

Most crocheters complete this project in 5-7 hours, though time may vary depending on experience level, speed, and how much time you spend on embroidery and assembly.