🧢 Beautiful ✨ Detailed πŸ’ Adorable

Bobble Clutch Pattern

Bobble Clutch Pattern
4.7β˜… Rating
2-4 Hours Time Needed
1.5K Made This
βœ‚οΈ

Intermediate Level

Ideal for those with basic crochet experience, featuring slightly more advanced stitches and techniques to expand your skills.

⏱️

Bite-Sized Project

Finishes in 2-4 hoursβ€”perfect for an afternoon of creative relaxation.

✨

Stylish Touch

An elegant detail to elevate any look, combining traditional techniques with contemporary design sensibilities.

About This Bobble Clutch Pattern

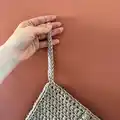
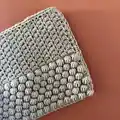
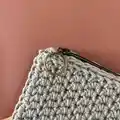
This pattern creates a bobble-clutch bag featuring a textured bobble panel and a crochet moss stitch upper section. You will work with Debbie Bliss Cashmerino Chunky yarn and a 6mm hook to create a compact, structured clutch. The design includes full instructions for two identical bag faces, joining, zipper insertion, and a simple crocheted handle. The finished piece measures approximately W 26cm x L 21cm and makes a beautiful handmade accessory.

Bobble Clutch Pattern crochet pattern - detailed view of completed project

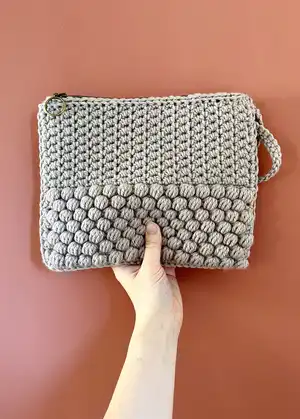
The pattern uses UK terminology and includes clear special abbreviation explanations for the MB bobble and BLO technique. Detailed finishing notes walk you through joining a zipper and assembling the clutch for a professional result.

Why You'll Love This Bobble Clutch Pattern

I absolutely love this pattern because the bobble stitch creates such a striking, tactile surface that always gets compliments. I enjoy the mix of texture β€” the bobble section paired with crochet moss stitch gives the clutch personality and structure. It is rewarding to see two identical bag faces join together and transform into a fully functional accessory. I appreciate how approachable the construction is: with basic stitches and a zipper, you get a polished finish every time.

Bobble Clutch Pattern step 1 - construction progress Bobble Clutch Pattern step 2 - assembly progress Bobble Clutch Pattern step 3 - details and accessories Bobble Clutch Pattern step 4 - final assembly and finishing

Switch Things Up

I love customizing this clutch by changing yarn color palettes β€” try a bold contrast for the bobble panel and a neutral top for a fashion-forward look.

If you want a larger clutch, use a chunkier yarn and a larger hook, or simply increase the starting chain count in multiples that keep the bobble pattern consistent.

For a smaller pouch or keychain-sized version, use finer yarn and a smaller hook to create a mini bobble accessory that's adorable for gifts.

I often add a fabric lining for a professional finish and to protect delicate contents; simply cut fabric to the bag dimensions and whipstitch the lining in before attaching the zipper.

Swap the zipper for a magnetic snap or button closure for a different aesthetic and easier closure options, especially if you prefer not to work with a zipper.

Try metallic or novelty yarns for the bobble section to add sparkle and texture for special occasion clutches and evening wear.

I sometimes embellish the clutch with simple embroidery on the moss stitch area once the piece is blocked to add initials or a small motif.

To make a wristlet, lengthen the handle chain or add a detachable strap with a small metal clip for easy carrying and versatility.

If you want more structure, add interfacing to a cut fabric lining or sew in a thin piece of plastic canvas to the base before finishing to help the bag hold its shape.

I recommend experimenting with the placement of the bobble panel β€” center it, place it lower, or use both front and back for a fully textured clutch depending on the look you want.

Common Mistakes & How to Fix Them

βœ— Skipping the initial chain count will change the width of the clutch; always chain 30 and check your gauge before starting. βœ— Failing to secure bobbles properly can make them loose and uneven; follow the MB steps exactly and use the miss ch to secure bobbles as written. βœ— Not checking tension for the bobble and moss stitches can alter the finished size; make a small gauge swatch of both stitches on 6mm hook and compare measurements. βœ— Joining the zipper after joining bag faces without leaving gaps can restrict zipper movement; join the zipper to the fasten off edge of both faces first, then crochet join the faces together. βœ— Overstuffing or pulling stitches too tight when joining can distort edges; work consistent dc joins and block your pieces before final assembly.

Bobble Clutch Pattern

Make a textured bobble stitch clutch that combines bold stitch texture with simple construction. You will enjoy working the bobble and moss stitches to create a stylish, tactile accessory. Perfect for gifting or keeping your essentials close, this pattern guides you through every stitch and finishing step. Clear instructions and assembly notes make this project approachable and rewarding.

Intermediate 2-4 Hours

Materials Needed for Bobble Clutch Pattern

β€” Main Fabric

  • 01
    Debbie Bliss Cashmerino Chunky, Shade: Pebble - 4 x 50g balls (main yarn)

β€” Tools Required

  • 01
    Crochet hook 6mm
  • 02
    Open ended zipper (cut to length)
  • 03
    Large eyed sewing needle
  • 04
    Scissors

Progress Tracker

0% Complete

β€” Details :

Infos :

UK Terminology. SIZE| Approx. W 26cm x L 21cm. YARN| Debbie Bliss Cashmerino Chunky Sh: Pebble x 4, 50g balls. HOOK| 6mm. OTHER MATERIALS| Open ended zipper. Large eyed sewing needle. Scissors. TENSION| Bobble Stitch 11 sts x 14 rows on 6mm hook to 10cm (4in). Crochet Moss Stich 12 sts x 20 rows on 6mm hook to 10cm (4in). ABBREVIATIONS| Ch chain; dc double crochet; rep repeat; sl st slip stitch; st/s stitch/es; WS wrong side. SPECIAL ABBREVIATIONS| BLO work the stitch in back loop only. MB (yrh, insert hook in st, pull yarn through) five times (11sts on hook), yrh and pull through all 11 sts (bobble made), ch 1 to secure bobble.

β€” Bag face (make 2) :

Foundation row :

Using 6mm hook, ch 30. 1 dc in in 2nd ch from hook, 1 dc in every ch, turn. 29sts

Row 1 :

Ch 1, 1 dc in first st, *MB in next st, 1 dc in next st; rep from * to end, turn.

Row 2 :

Ch 1, 1 dc in first st, *miss ch to secure bobble, 1 dc in next 2 sts; rep from * to end, turn.

Row 3 :

Ch 1, 1 dc in first 2 sts, *MB, 1 dc; rep from * to last st, 1 dc, turn.

Row 4 :

Ch 1, 1 dc in first 2 sts, * miss ch to secure bobble, 1 dc in next 2 sts; rep from * to last st, 1 dc, turn.

Info :

These 4 rows repeated form bobble stitch.

Info :

Repeat these 4 rows twice more, then rep rows 1 and 2 again.

Next row (WS) :

Ch 1, 1 dc in every st, turn.

Info :

Now work crochet moss st as folls:

Row 1 :

Ch 1, *1 dc in next st, 1 dc in st on row below over next st; rep from * to last st, 1 dc in last st, turn.

Row 2 :

Ch 1, *1 dc in st on row below over next st, 1 dc in next st; rep from * to last st, 1 dc in st on row below over last st, turn.

Info :

These 2 rows repeated form crochet moss st.

Info :

Repeat these 2 rows eight times more (18 rows in total)

Next row (WS) :

ch 1, 1 dc BLO in every st.

Info :

Fasten off.

β€” Finishing :

Step 1 :

Fasten off all loose ends.

Step 2 :

Press/block work using yarn ball band as a guide or desired method.

Step 3 :

Cut zipper to length, and join to fasten off edge of both bag faces using running stitch.

Step 4 :

Using a 6mm hook, WS of bag faces together and dc stitch join both bag faces together beginning at top left corner and then working around bottom of bag and right side until bag is fully joined.

Step 5 :

Join fasten off edge of bag before and after ending of the zipper just a couple of cm in from each bag edge.

β€” Handle :

Step 1 :

Using 6mm hook, start from top left corner of bag with zipper fastened (Zip at right corner), insert hook and ch 32.

Step 2 :

Insert hook back into same place on bag and secure loop with a sl st to form handle.

Step 3 :

Work 1 dc in every ch.

Step 4 :

Fasten off.

Assembly Instructions

  • Cut the open-ended zipper to the bag width and join it to the fasten-off edge of both bag faces using a running stitch to keep it aligned before crocheting the faces together.
  • With wrong sides (WS) of bag faces together, use a 6mm hook to dc stitch join both bag faces together, beginning at the top left corner, then work around the bottom and up the right side until fully joined.
  • When joining the bag faces, stop and join the fasten off edge of the bag a few centimetres before and after the zipper ends to allow the zipper to open and close freely.
  • Press or block the bag faces using the yarn ball band as a guide before final assembly to ensure even edges and a neat finish.
  • Form the handle by inserting the hook at the top left corner (zipper fastened), ch 32, insert hook back into same place and secure with a sl st, then dc in every ch and fasten off securely.

Important Notes

  • πŸ’‘Work a gauge swatch for both bobble stitch and crochet moss stitch to ensure your finished clutch measures approximately W 26cm x L 21cm.
  • πŸ’‘Always join the zipper to the fabric edges before crocheting the bag faces together so the zipper lies flat and functions correctly.
  • πŸ’‘Press or block your bag faces before joining for neater edges and easier joining; use yarn ball band recommended tension as a guide.
  • πŸ’‘Use the special MB instructions exactly (five yarn draws, pull through 11 loops, ch 1) to form consistent bobbles across the panel.

This bobble clutch pattern combines bold texture with simple construction to create a stylish accessory you will love to make and gift. The tactile bobble panel and moss stitch top add handcrafted charm and structure to the piece. Make it in Pebble or swap colors for seasonal variations β€” happy crocheting! 🧢✨

You ask,

we answer.

FAQs

What size will the finished piece be?

The finished clutch measures approximately W 26cm x L 21cm when worked using Debbie Bliss Cashmerino Chunky and a 6mm hook.

Can I use different yarn weights for this pattern?

Yes, but changing yarn weight will alter the size and texture; adjust your hook size accordingly and make a gauge swatch to match the listed tension.

Do I need prior crochet experience for this pattern?

This pattern is rated intermediate; you should be comfortable with chain, double crochet, working in back loop only, and following the MB bobble instructions.

How long does this project typically take to complete?

Most crocheters complete this clutch in 2-4 hours, though time may vary based on experience and how long you spend on finishing and blocking.