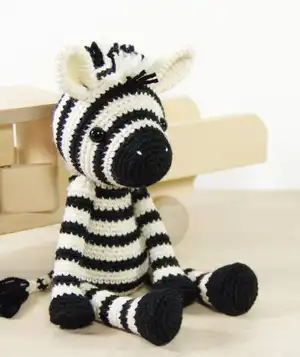
Create a cuddly bobble sheep with this detailed crochet pattern designed for intermediate crocheters. You will make a sweet sheep with textured bobble fleece, articulated limbs, and a charming embroidered face. Clear step-by-step instructions and helpful finishing tips guide you through assembly so your finished toy looks neat and professional. Perfect as a handmade gift or a cozy keepsake.
Progress Tracker
0% Complete
— Head :
Info :
The fleece is crocheted in rounds, starting each round with a ch and joining each round with a sl st through the first stitch. Do not count them as stitches. Start each round in the first stitch, the same one you slip stitched into earlier.
Round 1 :
mr, sc 10, sl st in 1st sc (10)
Round 2 :
ch, (sc, bo+sc) x 5, sl st in 1st sc (15)
Round 3 :
ch, (sc 2, inc) x 5, sl st in 1st sc (20)
Round 4 :
ch, (sc, bo+sc) x 10, sl st in 1st sc (30)
Round 5 :
ch, sc in each stitch, sl st in 1st sc (30)
Round 6 :
ch, (bo+sc, sc) x 15, sl st in 1st bo (45)
Round 7 :
ch, (sc 4, inc) x 9, sl st in 1st sc (54)
Round 8 :
ch, (sc 2, bo) x 18, sl st in 1st sc (54)
Round 9 :
ch, sc in each stitch, sl st in 1st sc (54)
Round 10 :
ch, sc, bo, (sc 2, bo) x 17, sc, sl st in 1st sc (54)
Round 11 :
ch, sc in each stitch, sl st in 1st sc (54)
Round 12 :
ch, (bo, sc 2) x 18, sl st in 1st bo (54)
Round 13 :
ch, sc in each stitch, sl st in 1st sc (54)
Round 14 :
ch, (sc 2, bo) x 18, sl st in 1st sc (54)
Round 15 :
ch, sc in each stitch, sl st in 1st sc (54)
Round 16 :
ch, sc, bo, (sc 2, bo) x 17, sc, sl st in 1st sc (54)
Round 17 :
ch, sc in each stitch, sl st in 1st sc (54)
Round 18 :
ch, (bo, sc 2) x 18, sl st in 1st bo (54)
Round 19 :
ch, (sc 4, sc2tog) x 9, sl st in 1st sc (45)
Round 20 :
ch, (sc 2, bo) x 15, sl st in 1st sc (45)
Info :
Fasten off. Attach the gray yarn with a slip stitch in the first stitch and continue crocheting in spiral.
Round 21 :
sl st (counts as first stitch), sc 13, sc2tog, (sc 2, sc2tog) x 4, sc 13 (40)
Round 22 :
sc in each stitch (40)
Round 23 :
(sc 6, dec) x 5 (35)
Round 24-25 :
sc in each stitch (35)
Round 26 :
sc 2, dec, (sc 5, dec) x 4, sc 3 (30)
Round 27 :
sc in each stitch (30)
Info :
Attach safety eyes between rounds 24 and 25, leaving 14 stitches (count 13 holes) between them. Start stuffing the head. Keep adding a bit of fiberfill after every few rounds, stuffing the head firmly.
Round 28 :
(sc 4, dec) x 5 (25)
Round 29 :
sc in each stitch (25)
Round 30 :
sc, dec, (sc 3, dec) x 4, sc 2 (20)
Round 31 :
(dec, sc 8) x 2 (18)
Round 32 :
(sc, dec) x 6 (12)
Info :
Finish stuffing. Cut the yarn, leaving a long yarn tail, fasten off, and close the opening (see finishing instructions on page 5).
Info :
a) Attach safety eyes after finishing round 27. Place the eyes between rows 24 and 25 leaving 14 stitches (count 13 holes) between them. Make sure you are satisfied with the placement of the eyes before pushing the washer into place.
Info :
b) Finish the head, stuff it firmly and close the opening. Cut the yarn, leaving a long tail, and fasten off. Thread the yarn tail onto a yarn needle. Insert the needle from the center and under the front loop only. Draw the yarn through and pick up all the remaining stitches. Grab the yarn and pull until the hole is tightly closed. Insert the needle into the center and bring the yarn to the bottom of the head.
Info :
c) Use yarn to shape the head. Insert the needle from the bottom of the head and bring it up right next to the eye. Go about half way around the eye and insert the needle right next to the eye. Bring it to the bottom of the head. Grab the yarn tails and tug gently, pulling the eye in just a bit. Knot the yarn tails together. Do the same with the other eye.
Info :
d) Embroider the nose. Insert the needle from the bottom of the head and bring it up just above the last round. Make a vertical stitch and bring the needle up where the nose starts. Go under the vertical stitch. Insert the needle where the nose ends and bring it up where the mouth begins. Go under the vertical stitch again. Insert the needle where the mouth ends and bring it to the bottom of the head. Knot the yarn ends together under the head and fasten off.
— EARS (make 2) :
Info :
With gray yarn. Make 2.
Round 2 :
(inc, sc) x 3 (9)
Round 3 :
(sc 2, inc) x 3 (12)
Round 4 :
sc, inc, (sc 3, inc) x 2, sc 2 (15)
Round 5 :
(sc 4, inc) x 3 (18)
Round 6 :
sc 2, inc, (sc 5, inc) x 2, sc 3 (21)
Round 7-12 :
sc in each stitch (21)
Round 13 :
dec, sc 9, dec, sc 8 (19)
Round 14 :
sc in each stitch (19)
Round 15 :
sc 14, dec, sc 3 (18)
Round 16 :
dec, sc 6, dec, sc 8 (16)
Info :
Fold the ear in half and crochet over the top with single crochet stitches. Cut the yarn, leaving a long yarn tail for sewing, and fasten off.
— Body :
Info :
The fleece is crocheted in rounds, starting each round with a ch and joining each round with a sl st through the first stitch. Do not count them as stitches. Start each round in the first stitch, the same one you slip stitched into earlier.
Round 1 :
mr, sc 10, sl st in 1st sc (10)
Round 2 :
ch, (sc, bo+sc) x 5, sl st in 1st sc (15)
Round 3 :
ch, (sc 2, inc) x 5, sl st in 1st sc (20)
Round 4 :
ch, (sc, bo+sc) x 10, sl st in 1st sc (30)
Round 5 :
ch, sc in each stitch, sl st in 1st sc (30)
Round 6 :
ch, (bo+sc, sc) x 15, sl st in 1st bo (45)
Round 7 :
ch, sc in each stitch, sl st in 1st sc (45)
Round 8 :
ch, (sc 2, bo) x 15, sl st in 1st sc (45)
Round 9 :
ch, sc in each stitch, sl st in 1st sc (45)
Round 10 :
ch, sc, bo, (sc 2, bo) x 14, sc, sl st in 1st sc (45)
Round 11 :
ch, sc in each stitch, sl st in 1st sc (45)
Round 12 :
ch, (bo, sc 2) x 15, sl st in 1st bo (45)
Round 13 :
ch, sc in each stitch, sl st in 1st sc (45)
Round 14 :
ch, (sc 2, bo) x 15, sl st in 1st sc (45)
Round 15 :
ch, sc in each stitch, sl st in 1st sc (45)
Round 16 :
ch, sc, bo, (sc 2, bo) x 14, sc, sl st in 1st sc (45)
Round 17 :
ch, sc in each stitch, sl st in 1st sc (45)
Round 18 :
ch, (bo, sc 2) x 15, sl st in 1st bo (45)
Round 19 :
ch, (sc 13, sc2tog) x 3, sl st in 1st sc (42)
Round 20 :
ch, (sc 2, bo) x 14, sl st in 1st sc (42)
Round 21 :
ch, sc 4, sc2tog, (sc 2, sc2tog) x 8, sc 4, sl st in 1st sc (33)
Round 22 :
ch, sc, bo, (sc 2, bo) x 10, sc, sl st in 1st sc (33)
Round 23 :
ch, (sc 3, sc2tog) x 6, sc 3, sl st in 1st sc (27)
Round 24 :
ch, (bo, sc 2) x 9, sl st in 1st bo (27)
Round 25 :
ch, sc in each stitch, sl st in 1st sc (27)
Info :
Cut the yarn, leaving a long yarn tail for sewing, and fasten off. Stuff the body firmly.
— ARMS (make 2) :
Info :
With gray yarn. Make 2.
Round 3 :
(sc, inc) x 6 (18)
Round 4 :
(inc, sc 2) x 6 (24)
Round 5 :
sc 8, dec, (sc, dec) x 2, sc 8 (21)
Round 6 :
sc in each stitch (21)
Round 7 :
sc 10, dec, sc 9 (20)
Round 8 :
sc 7, dec, sc 3, dec, sc 6 (18)
Round 9 :
(dec, sc 7) x 2 (16)
Round 10 :
sc 7, dec, sc 7 (15)
Round 11 :
sc 4, dec, sc 3, dec, sc 4 (13)
Round 12-14 :
sc in each stitch (13)
Round 15 :
sc 6, dec, sc 5 (12)
Round 16-18 :
sc in each stitch (12)
Round 19 :
sc 6, dec, sc 4 (11)
Round 20-28 :
sc in each stitch (11)
Info :
Sl st in next stitch. Cut the yarn, leaving a long yarn tail for sewing, and fasten off. Stuff the hands firmly. Make a long vertical stitch along the front of the hoof, draw it very tight and knot the yarn ends together (see page 7-8). Keep adding a bit of fiberfill after every few rounds, stuffing the arms lightly about 2/3 way up.
— LEGS (make 2) :
Info :
With gray yarn. Make 2.
Round 3 :
(sc, inc) x 6 (18)
Round 4 :
(inc, sc 2) x 6 (24)
Round 5 :
(sc 3, inc) x 6 (30)
Round 6 :
sc 10, dec, (sc 2, dec) x 2, sc 10 (27)
Round 7 :
sc 11, dec, sc, dec, sc 11 (25)
Round 8 :
(sc 7, dec) x 2, sc 7 (23)
Round 9 :
dec, sc 9, dec, sc 10 (21)
Round 10 :
sc 9, dec, sc 10 (20)
Round 11 :
(sc 5, dec) x 2, sc 6 (18)
Round 12 :
sc 8, dec, sc 8 (17)
Info :
Stuff the feet firmly. Make a long vertical stitch along the front of the hoof, draw it very tight and knot the yarn ends together (see page 7-8). Keep adding a bit of fiberfill after every few rows, stuffing the legs lightly.
Round 13 :
sc 7, dec, sc 8 (16)
Round 14-15 :
sc in each stitch (16)
Round 16 :
sc 7, dec, sc 7 (15)
Round 17-19 :
sc in each stitch (15)
Round 20 :
sc 7, dec, sc 6 (14)
Round 21-31 :
sc in each stitch (14)
Round 32 :
(sc, dec) x 4, sc 2 (10)
Info :
Sl st in next stitch. Cut the yarn, leaving a long yarn tail for sewing, and fasten off. Finish stuffing.
— Head Finishing Steps :
Info :
Head finishing step a: Place the eyes between rows 24 and 25 leaving 14 stitches (count 13 holes) between them. Make sure you are satisfied with the placement of the eyes before pushing the washer into place.
Info :
Head finishing step b: Cut the yarn, leaving a long tail, and fasten off. Thread the yarn tail onto a yarn needle. Insert the needle from the center and under the front loop only. Draw the yarn through. Pick up all the remaining stitches. Grab the yarn and pull until the hole is tightly closed. Insert the needle into the center and bring the yarn to the bottom of the head.
Info :
Head finishing step c: Use yarn to shape the head. Insert the needle from the bottom of the head and bring it up right next to the eye. Go about half way around the eye and insert the needle right next to the eye. Bring it to the bottom of the head. Grab the yarn tails and tug gently, pulling the eye in just a bit. Knot the yarn tails together. Repeat for the other eye.
Info :
Head finishing step d: Embroider the nose with pink floss. Insert the needle from the bottom of the head and bring it up just above the last round. Make a vertical stitch and bring the needle up where the nose starts. Go under the vertical stitch. Insert the needle where the nose ends and bring it up where the mouth begins. Go under the vertical stitch again. Insert the needle where the mouth ends and bring it to the bottom of the head. Knot the yarn ends together under the head.
— ARMS & LEGS Finishing :
Info :
a) Finish the hooves, stuff firmly and make a stitch along the front. Insert the needle from the top leaving a short tail. Go straight down and insert the needle just above the first round. Bring the yarn back up. Grab the yarn tails and draw the stitch very tight. Knot the yarn tails together.
Info :
b) Ears: Fold the ear in half. Insert the hook through all four stitches, yarn over and draw up a loop. Yarn over and draw through all loops. Crochet over the whole opening and cut the yarn leaving a yarn tail for sewing, and fasten off.
— Assembling the Sheep :
Info :
a) Sew the head to the body with whip stitch, placing it so the front edge of the body is just behind the last row of bobbles. Add a bit more stuffing before closing the seam.
Info :
b) Sew the arms and legs to the body and ears to the head. Tip: Use sewing pins to attach all the pieces to the head and body before sewing to find the right placement and get a symmetrical result. Place the arms to the sides of the body just below the last round of bobbles. Push the top of the arms flat and sew them to the body inserting the needle through both layers. Place the legs over the third round of bobbles leaving 4-5 bobbles between them. Sew the legs to the body placing the opening over a bobble. Place the ears to the sides of the head just behind the second to last round of bobbles and sew them to the head.
— Crochet Stitches :
Item Name (Bobble Stitch) :
Crochet 5 double crochet stitches together in the same stitch. 1: Yarn over once. 2: Insert the hook through the stitch. 3: Yarn over and draw up a loop. 4: Yarn over and draw through the first two loops on the hook. 5: Repeat steps 1-4 in the same stitch four more times until you have five half finished double crochet stitches on the hook. 6: Yarn over and draw through all six loops on the hook. Use your finger to push the bobble to the front of your work.
Item Name (Magic Ring) :
A magic ring is a way to begin crocheting in round by crocheting the first round into an adjustable loop and then pulling the loop tight. Alternatively you can chain 2 and then crochet the first round into the second chain from hook. 1: Make a loop about 2 cm / 1" from the yarn end so the working yarn goes over the yarn tail. 2: Grab the join between your thumb and forefinger and insert the hook through the loop from front to back. 3: Yarn over and pull up a loop. Yarn over and pull through the loop on the hook. 4: Pull the yarn tight. This does not count as the first stitch. 5: Hold the loop between your thumb and forefinger. Insert the hook through the loop from front to back. 6: Draw up a loop. Yarn over and draw through both loops on the hook completing the first sc. 7: Continue crocheting through the loop and over the yarn tail until you have the required number of sc-s. 8: Hold the last stitch between your fingers, grab the yarn and pull ... 9: ... until the center is tightly closed.
Item Name (Invisible Single Crochet Decrease) :
Pick up the front loops of both stitches and crochet one single crochet stitch into the loops. Alternatively you can replace it with a regular single crochet decrease. 1: Insert the hook under the front loop of the first single crochet stitch. 2: Insert the hook under the front loop of the second stitch and pick it up onto the hook. 3: Yarn over and draw through both loops on the hook. Yarn over ... 4: ... and draw through both loops on the hook completing the single crochet stitch.
Item Name (Finishing an Open Piece) :
1: Finish the last stitch and then slip stitch in the next stitch. 2: Cut the yarn and fasten off. 3: Insert your hook through the next stitch, front to back. 4: Draw the yarn tail through. If you want to use the yarn tail for sewing stop here. 5: Go through the next stitch back to front. 6: And draw the yarn tail through. Now you can hide it inside the piece.
Item Name (Sewing an Open Piece to a Closed Piece with Whip Stitch) :
When you finish the open piece leave a long yarn tail for sewing and then fasten off. 1: Thread the yarn tail onto a needle. Insert the needle below the yarn tail and bring it up under the next stitch. 2: Draw the stitch tight. 3: Go through the next stitch front to back inserting the needle under both loops. 4: Go back into the same hole you brought the yarn up last time and bring it up under the next stitch. Draw the stitch tight. 5: Or you can go through the stitch back to front inserting the needle under both loops. 6: Draw the yarn through. 7: Go back into the same hole you brought the yarn up last time and bring it up under the next stitch. Draw the stitch tight. 8: Keep stitching repeating steps 3-4 or 5-7 and go all around the open piece.
Item Name (Sewing an Open Piece to a Closed Piece with Mattress Stitch) :
When you finish the open piece leave a long yarn tail for sewing and then fasten off. 1: Thread the yarn tail onto a needle. Insert the needle below the yarn tail and bring it up under the next stitch. 2: Draw the yarn through. 3: Insert the needle under the vertical bar of the next stitch. 4: Draw the yarn through. 5: Go back in the same hole where you brought the yarn up last time and bring it up under the next stitch. 6: Draw the yarn through. 7: Keep repeating steps 3-6. 8: Make a couple of stitches. Then grab the yarn tail and draw the stitches as tight as you can. 9: Go around the open piece, drawing the yarn tight after every couple of stitches.
Item Name (Fastening and Hiding Yarn Tails) :
The quickest way to hide yarn tails is to just weave it through the stuffing a couple of times going in different directions. 1: Bring the yarn up through a hole in the fabric. 2: Insert the needle under one loop of a stitch right next to the hole. 3: Pull until you have a small loop. 4: Knot the loop and yarn together making a double knot. Do not push the first knot too close to the fabric. 5: Cut off the loop end. 6: Insert the needle into the same hole going up and through the piece. 7: Pull lightly until the knot disappears into the fabric. 8: Cut off the yarn close to the fabric. 9: The yarn tail will completely disappear into the fabric.
This bobble sheep pattern combines a textured bobble fleece with charming facial details to create a lovable handmade critter. Whether you gift it or keep it, this sheep will bring a cozy, handmade touch to any space. Happy crocheting and enjoy making your own fluffy friend! 🐑🧶