🧢 Beautiful ✨ Detailed πŸ’ Adorable

Bobby the Bighorn Sheep Amigurumi Pattern

Bobby the Bighorn Sheep Amigurumi Pattern
4.0β˜… Rating
2-4 Hours Time Needed
1.8K Made This
βœ‚οΈ

Intermediate Level

Ideal for those with basic crochet experience, featuring slightly more advanced stitches and techniques to expand your skills.

⏱️

Bite-Sized Project

Finishes in 2-4 hoursβ€”perfect for an afternoon of creative relaxation.

🧸

Cute Companion

An adorable friend to cherish, handcrafted with love to bring comfort and joy for years to come.

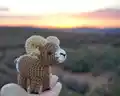
About This Bobby the Bighorn Sheep Amigurumi Pattern

This pattern creates a small bighorn sheep amigurumi named Bobby with detailed horns, a white snout, and solid little legs. You will work the head, body, four legs, a tail, and two horns separately and sew them together. Techniques include color changes, working in the magic circle, stuffing, and simple shaping for realistic features.

Bobby the Bighorn Sheep Amigurumi Pattern crochet pattern - detailed view of completed project

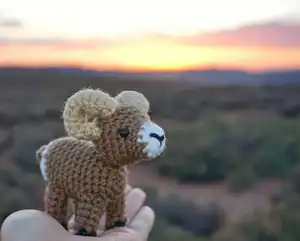
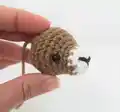
The pattern provides exact round-by-round instructions and placement notes for eyes and nose. Photos illustrate assembly to help you finish a standing, weighted sheep that holds its shape.

Why You'll Love This Bobby the Bighorn Sheep Amigurumi Pattern

I absolutely love this pattern because it captures the charm of a bighorn sheep in a tiny, collectible form. I enjoy how the horns are crocheted separately and then shaped to give the character a unique silhouette. The design is compact but full of detail, from the snout color change to the little black hooves. I also love that you can easily customize colors and details to make each Bobby your own.

Bobby the Bighorn Sheep Amigurumi Pattern step 1 - construction progress Bobby the Bighorn Sheep Amigurumi Pattern step 2 - assembly progress Bobby the Bighorn Sheep Amigurumi Pattern step 3 - details and accessories Bobby the Bighorn Sheep Amigurumi Pattern step 4 - final assembly and finishing

Switch Things Up

I love how easy it is to customize Bobby by changing yarn colors to create different breeds of sheep.

I often substitute a lighter beige or cream for the horns to make a more subtle curl contrast.

To make Bobby bigger, I switch to bulky yarn and a larger hook; to make him tiny, I use a thinner yarn and smaller hook.

I like to embroider small facial expressions or freckles using contrasting yarn to give each sheep character.

For an extra tactile effect, try using loop or fuzzy yarn for the body while keeping the head and legs in smooth yarn for structure.

I also sometimes add a tiny scarf or felt ear tags to personalize the sheep for gifts.

If you want posable limbs, I insert a short piece of craft wire into each leg before stuffing, securing the ends safely inside the body.

I recommend trying different eye sizesβ€”safety eyes or embroidered eyes both give distinct personalities to Bobby.

Mixing textures, like a slightly shinier yarn for hooves or a fluffy yarn for the tail tip, creates lovely contrast.

I enjoy making a whole herd of Bobs with varied colors and sizes for a charming display or a thoughtful handmade gift set.

Common Mistakes & How to Fix Them

βœ— Placing safety eyes too low or too high can ruin facial proportion; follow the eye placement note and place eyes between rows 5 and 6, eight stitches apart. βœ— Forgetting to change color on the last stitch can leave a visible jog; always change to the next color on the final yarn over of the indicated stitch.
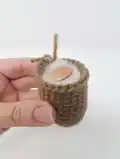
 βœ— Not stuffing the body enough before adding the penny will make the sheep flop over; lightly stuff, add the penny, then continue stuffing firmly so the body stays balanced. βœ— Skipping stitch counts during increases and decreases leads to misshapen pieces; count your stitches every round and mark the beginning of rounds with a stitch marker. βœ— Sewing legs or horns in the wrong rows will give an unnatural pose; pin parts in place first and reference the row numbers for front legs (rows 4-6) and back legs (rows 11-13).

Bobby the Bighorn Sheep Amigurumi Pattern

Make your own adorable Bobby the Bighorn Sheep with this complete crochet pattern. You will enjoy clear, step-by-step rounds for the head, body, legs, tail and horns plus assembly photos and tips. Perfect for gifting or displaying, this little amigurumi is full of personality and charm.

Intermediate 2-4 Hours

Materials Needed for Bobby the Bighorn Sheep Amigurumi Pattern

β€” Main Fabric

  • 01
    Worsted weight yarn (#4) - Brown (main body) approximately 30-50g
  • 02
    Worsted weight yarn (#4) - Beige (horns) approximately 10-20g
  • 03
    Worsted weight yarn (#4) - White (snout and tail tip) approximately 10g
  • 04
    Worsted weight yarn (#4) - Black (hooves and mouth stitching) small amount

β€” Tools Required

  • 01
    Crochet hook size 3 mm (for horns only)
  • 02
    Crochet hook size 3.5 mm (for main pieces)
  • 03
    6 mm black safety eyes (2 pieces)
  • 04
    Fiber fill / polyester stuffing
  • 05
    Scissors
  • 06
    Stitch markers or stitch counter (if needed)
  • 07
    Sewing needle / yarn needle
  • 08
    A penny (or small weight) to place inside the body

Progress Tracker

0% Complete

β€” Head :

Info :

*Start using white yarn

Round 1 :

6 SC in MC (6)

Round 2 :

INC X 6 (12)

Info :

*on the last stitch change color to brown, the remainder of the head will be made using brown yarn.

Round 3 - 4 :

SC around (12)

Round 5 :

6 SC, 6 INC (18)

Round 6 :

SC around (18)

Round 7 :

(2SC, INC) X 6 (24)

Round 8 :

(3SC, INC) X 6 (30)

Info :

*Stop and put eyes in and using your needle stitch in the nose.

Round 9 :

SC around (30)

Round 10 :

(3SC, DEC) x 6 (24)

Round 11 :

(2SC, DEC) x 6 (18)

Info :

*stop and lightly stuff head

Round 12 :

(SC, DEC) x 6 (12)

Info :

*continue stuffing so head will stay nice and firm

Round 13 :

SC around (6)

Info :

*SL, close up hole and leave long tail of yarn for sewing onto body

Info :

**Eyes should be placed in between rows 5 & 6 and be 8 stiches apart. The top of the nose should start between rows 2 and 3 and the bottom should be in the middle of the original magic circle.

β€” Body :

Info :

*Use brown yarn

Round 1 :

6 SC in MC (6)

Round 2 :

INC X 6 (12)

Round 3 :

(SC, INC) X 6 (18)

Round 4 :

(2SC, INC) x 6 (24)

Round 5 - 14 :

24 around (24)

Info :

*On last stitch change to white yarn. At this point you lightly stuff and add a penny inside to weigh it down.

Round 15 :

(2SC, DEC) x 6 (18)

Round 16 :

(SC, DEC) x 6 (12)

Info :

*stop and stuff generously so it will stay nice and firm

Round 17 :

DEC x 6 (6), SL and close up hole.

β€” Legs (Make 4) :

Info :

*Start off using black yarn

Round 1 :

5SC in MC (5)

Round 2 :

SC around in BLO (change to brown yarn in 5th stitch)

Round 3 :

INC, 4SC (6)

Round 4 :

SC around (6)

Round 5 :

(2 SC, INC) X 2 (8)

Round 6 - 7 :

SC around (8)

Info :

*SL, stuff with fiber fill and leave long tail for sewing onto body

β€” Tail :

Info :

*Use brown yarn

Item Tail (P1) :

Chain 4

Item Tail (P2) :

SC in 2nd chain from hook and next two stitches, SL in last stitch. Leave tail for sewing onto body.

β€” Horns (Make 2) :

Info :

*Use Beige Yarn & 3mm hook

Round 1 :

4SC in MC (4)

Round 2 :

3SC, INC (5)

Round 3 :

4SC, INC (6)

Round 4 :

6 around (6)

Round 5 :

(2 SC, INC) X 2 (8)

Round 6 - 7 :

SC around (8)

Round 8 :

(3SC, INC) X 2 (10)

Round 9 :

SC around (10)

Round 10 :

4SC, INC X 2 (12)

Round 11 :

12 around (12)

Round 12 :

(2 SC, DEC) X 3 (9)

Round 13 :

SC around (9)

Info :

*Finish off and leave a long tail for sewing onto head. Lightly stuff your horns.

β€” Assembly :

Step 1 :

Attach head to body between rows 4 and 5. Tail should be sewed on the back 2 rows up.

Step 2 :

Attach horns between rows 8 & 9 of the head. Roll horns backward and attach to head.

Step 3 :

Sew front legs between rows 4-6. Back legs will go between rows 11-13.

Assembly Instructions

  • Attach head to body between rows 4 and 5; sew securely with the long tail left from closing the head.
  • Sew the tail onto the back of the body two rows up from the bottom edge so it sits centered.
  • Attach horns between rows 8 and 9 of the head; form the curl by rolling the horn pieces backward before sewing in place.
  • Position and sew front legs between rows 4-6 and sew back legs between rows 11-13, checking symmetry and spacing before securing.

Important Notes

  • πŸ’‘Use stitch markers to keep track of your rounds, especially during increases and decreases for accurate shaping.
  • πŸ’‘Stuff the pieces firmly but not overstuffed; add a penny inside the body before final stuffing to help the sheep stand.
  • πŸ’‘Change colors on the last stitch as indicated to avoid visible jogs and to create a neat color transition.
  • πŸ’‘Pin and position parts before sewing to ensure correct placement and symmetry across the finished toy.

This sweet Bobby the Bighorn Sheep is a joy to crochet and makes a delightful handmade gift. πŸ‘ The pattern includes clear rounds for each part plus assembly guidance so you can finish a standing, weighted sheep. 🧢 Enjoy customizing Bobby with different shades and tiny details to make each one uniquely yours. ✨

You ask,

we answer.

FAQs

What size will the finished piece be?

The finished amigurumi measures approximately 8-10 cm tall when using worsted weight yarn and the recommended hooks, though size may vary slightly with tension.

Can I use different yarn weights for this pattern?

Yes, you can use different yarn weights, but this will change the final size; choose an appropriate hook for your yarn and expect the piece to become larger or smaller accordingly.

Do I need prior crochet experience for this pattern?

This pattern is rated intermediate and assumes familiarity with working in the round, magic circle, increases, decreases, and basic assembly skills.

How long does this project typically take to complete?

Most crocheters finish this project in 2-4 hours, depending on experience level and how much time you spend on assembly and finishing details.