About This Felted Bowl Trio Pattern
This pattern creates a trio of nesting felted bowls in three sizes that are great for holding yarn, notions, or small household items. The bowls are crocheted from 100% wool and then felted to produce a sturdy, tactile finished piece. You will work in the round from the center-bottom outward, then shape and decorate after felting. The pattern includes simple shaping, color changes, and instructions for using a pen-style felting tool for decoration.
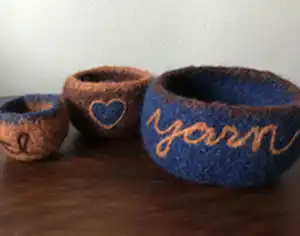
Three sizes are provided: large, medium, and small, each using one of the three colors included in the materials. Felting makes exact gauge less critical, so this is a forgiving project for beginners trying felting for the first time.
Why You'll Love This Felted Bowl Trio Pattern
I absolutely love this pattern because it combines simple crochet with the satisfying transformation of felting to create functional, beautiful bowls. I enjoy how forgiving the felting process is—small differences in size blend together once felted, so you can focus on creativity rather than exact measurements. I also love the opportunity to add personalized details with a felting pen; it lets me make each bowl unique. Working through the rounds is meditative, and finishing in the washer gives a dramatic, rewarding result I never tire of.
Switch Things Up
I love how easy it is to customize these bowls with different color combinations; try a monochrome set or three contrasting hues for a bold look.
If you want a chunkier bowl, I sometimes use a bulkier 100% wool yarn and a larger hook to make a more robust, faster project.
To make miniature bowls for keychains or ornaments, use fingering or sport weight wool and a small hook, and reduce the starting rounds accordingly.
I often add embroidered details before felting for subtle texture, or use the pen-style felting tool after felting for brighter, raised motifs.
You can change the rim height by adding or subtracting rounds before the decrease section if you want a shallower or deeper bowl.
I sometimes wet-felt by hand in a sink to have more control over the shape instead of using a washing machine.
For a two-tone rim, switch colors for the last few rounds prior to decreases and fasten off using the color-change finish described in the pattern.
I recommend testing a small swatch to check how much felting occurs with your yarn and adjust number of felting cycles accordingly.
Try combining surface needle felting and sewn-on embellishments like buttons or small labels for mixed-media decoration.
If you want a non-felted, flexible bowl instead, use a cotton or acrylic yarn and skip the felting step; the shape will be softer and more pliable.
Common Mistakes & How to Fix Them
✗ Skipping stitch markers when working in continuous rounds leads to losing track of the beginning of rounds; place a contrasting stitch marker at the post of the first stitch of the marked round to keep track.
✗ Not weaving in and securing yarn tails before felting can cause loose ends after the felting process; weave in ends securely and check again after initial felting before a final wash.
✗ Overstretching the top edge by skipping decreases will create a bowl that loses shape after felting; be sure to follow decrease rounds at the top edge to preserve the bowl form.
✗ Failing to shape bowls while wet after felting will result in uneven rims and bodies; shape the bowl with your hands and allow it to air dry for a smooth, functional finish.


