🧢 Beautiful ✨ Detailed πŸ’ Adorable

Boho Rainbow Baby Blanket Pattern

Boho Rainbow Baby Blanket Pattern
3.9β˜… Rating
12-15 Hours Time Needed
2.7K Made This
βœ‚οΈ

Beginner Friendly Level

Perfect for those just starting their crochet journey, with clear instructions and simple techniques

⏱️

Multi-Day Project

A rewarding 12+ hour journeyβ€”perfect for dedicated crafters who love detailed work.

πŸ€—

Soft Hug

Gentle, plush, and full of warmth, creating a sense of comfort and coziness wherever they find a home.

About This Boho Rainbow Baby Blanket Pattern

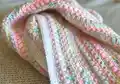
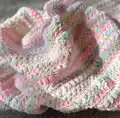
This pattern creates a 36" x 40" boho-inspired baby blanket using a repeating 20-row color and stitch sequence. Youll work four simple stitch rows (moss, puff, alternating SC/DC, and 2 HDC) with a color change every row to get a textured rainbow look. The pattern is designed to be beginner friendly and easy to customize by changing yarns, colors, or final length.

Boho Rainbow Baby Blanket Pattern crochet pattern - detailed view of completed project

The blanket is worked flat starting with a foundation chain of 124 (or any even number) and repeats the 20-row color/stitch sequence to reach your desired size. A simple two-round border in White finishes the blanket neatly.

Why You'll Love This Boho Rainbow Baby Blanket Pattern

I absolutely love this pattern because it combines simple stitches to create a sophisticated boho texture that looks much more complex than it actually is. I enjoy the rhythm of changing colors every row; it keeps the work interesting and gives a playful striped effect. I appreciate that the pattern repeats every 20 rows, which makes it easy for me to measure progress and customize length. I also love that it uses common, widely available medium weight yarns so you can grab supplies easily and start right away.

Boho Rainbow Baby Blanket Pattern step 1 - construction progress Boho Rainbow Baby Blanket Pattern step 2 - assembly progress Boho Rainbow Baby Blanket Pattern step 3 - details and accessories Boho Rainbow Baby Blanket Pattern step 4 - final assembly and finishing

Switch Things Up

I love playing with color order in this blanket; try reversing the color sequence or using neutrals between brights for a softer look.

If you want a larger blanket, simply increase your starting chain (keep it even) and repeat the 20-row pattern more times to reach your desired size.

Use a bulkier yarn and a larger hook to create a chunky, cozy version; this will make the blanket much quicker to finish and super snuggly.

For a mini version perfect as a lovey or stroller blanket, use fingering or sport weight yarn with a smaller hook and reduce the number of repeats.

I sometimes add embroidered initials or a small crocheted appliqu to personalize a gift; sew these on after completing the border for a neat finish.

Try different border styles: a scalloped edge or a granny-style border will change the look dramatically while using the same center pattern.

I also like to swap one of the four colors for a variegated or speckled yarn to add subtle texture without extra color changes.

If youre worried about weaving ends, carry two rows of each color before cutting to shorten the number of ends to weave at the end.

You can mix cotton and acrylic for a breathable summer blanket or stick to 100% acrylic for easy care and machine washing.

Experiment with block placement and layout: work a set number of repeats then switch to a different color schedule for a striped or ombre effect.

Common Mistakes & How to Fix Them
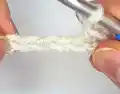
βœ— Carrying every color incorrectly can make your edge messy and cause snagging; cut your ends to 5-6 inches and carry them parallel to the row, crocheting over them so they are woven in as you work. βœ— Working with inconsistent tension can make the blanket ripple or curl; maintain even, comfortable tension and check your gauge frequently, especially during stitch changes. βœ— Forgetting to chain 2 and turn at the end of rows will shift your stitch placement; always finish each row with the exact chain and color change instructions provided to keep the pattern aligned. βœ— Placing the last stitch or color change incorrectly will misalign the next row; when changing colors, pull up the new color through the final loops of the last stitch exactly as shown to ensure smooth color transitions.

Boho Rainbow Baby Blanket Pattern

Make a soft, textured boho rainbow baby blanket with this easy-to-follow crochet pattern. Youll work simple moss, puff, alternating SC/DC and HDC rows while changing colors each row for a playful striped effect. The pattern repeats every 20 rows so you can customize the length and color order to suit your style. Perfect for gifting or keeping as a cozy nursery staple.

Beginner Friendly 12-15 Hours

Materials Needed for Boho Rainbow Baby Blanket Pattern

β€” Main Fabric

  • 01
    Caron One Pound Yarn - 100% acrylic, 454g / 16oz, 742m / 812yd - 1 skein "White"
  • 02
    Caron One Pound Yarn - 100% acrylic, 454g / 16oz, 742m / 812yd - 1 skein "Off-White"
  • 03
    Caron One Pound Yarn - 100% acrylic, 340g / 12oz, 544m / 595yd - 1 skein "Baby Rainbow"
  • 04
    Red Heart Super Saver Yarn - 100% acrylic, 198g / 7oz, 333m / 364yd - 1 skein "Baby Pink"

β€” Tools Required

  • 01
    Crochet hook size 5 mm (U.S. H/8)
  • 02
    Optionally go up or down 0.5mm in hook sizes depending on tension
  • 03
    Scissors
  • 04
    Yarn needle or tapestry needle for weaving in ends
  • 05
    Stitch markers (optional)
  • 06
    Measuring tape or ruler to check gauge
  • 07
    Pins for blocking or assembly (optional)

Progress Tracker

0% Complete

β€” Blanket :

Start :

Chain 124 with Off-White (OW), or any even number

Round 1 :

Moss Stitch; With OW, 1 SC into the 4th chain from the hook. Skip (SK) the next chain and CH 1. SC into the next chain. Repeat until the end of the row. Finish with a SC into the last chain and pull through with Baby Pink (BP). CH 2 and turn.

Round 2 :

Moss Stitch; With BP, SK the first SC. *1 SC into CH space of the previous row, SK the next SC and CH 1. Repeat * until the end of the row. Finish with a SC into the chain space (AFTER THE LAST SC) and pull through with White (W). CH 2 and turn.

Round 3 :

Puff Stitch; With W, SK the first SC. *PS into the chain space, SK the next SC and CH 1. Repeat * until the end of the row. Finish your row with a PS into the chain space and pull through with Baby Rainbow (BR). CH 2 and turn.

Round 4 :

Alt. SC and DC; With BR, *SC into the top of the first PS, DC into the chain space. Repeat * until the end of the row. Finish with a DC into the chain space (AFTER THE LAST PS) and pull through with OW. CH 2 and turn.

Round 5 :

2 HDC; With OW, 2 HDC into the first SC of the previous row. *SK the DC. Stitch two HDC into the next SC. Repeat * until the end of the row. Finish with 2 HDC in the last SC and pull through with BP. CH 2 and turn.

Round 6 :

Moss Stitch; With BP, *SC into the space between the HDC pairs, SK 2 HDC, CH 1. Repeat * until the end of the row. Finish with a SC into the chain space (AFTER YOUR LAST HDC PAIR) and pull through with W. CH 2 and turn.

Round 7 :

Moss Stitch with W

Round 8 :

Puff Stitch with BR

Round 9 :

Alt. SC and DC with OW

Round 10 :

2 HDC with BP

Round 11 :

Moss Stitch with W

Round 12 :

Moss Stitch with BR

Round 13 :

Puff Stitch with OW

Round 14 :

Alt. SC and DC with BP

Round 15 :

2 HDC with W

Round 16 :

Moss Stitch with BR

Round 17 :

Moss Stitch with OW

Round 18 :

Puff Stitch with BP

Round 19 :

Alt. SC and DC with W

Round 20 :

2 HDC with BR

Info :

Repeat Rows 1-20 5 times, or until desired length.

Border Info :

Weave in any loose ends.

Border Round 1 :

Pull up a loop of White in any corner. CH 2 and SC into that same space. SC around the blanket. SC in each stitch on top and bottom, 1-2 stitches in each row on the sides (Work as evenly as you can!) and 3 SC into each corner space. At the end of the round, SL ST into the top first stitch of the round. CH 2.

Border Round 2 :

In same direction, stitch 1 DC into each SC of previous round. stitch 3 DC into each corner stitch. At the end of the round, SL ST into the top of the first DC. Tie off and weave all ends.

Assembly Instructions

  • Weave in all loose ends as you go or after finishing the blanket; hide carried strands by pulling them parallel to the last worked row and crocheting over them to secure.
  • Create the border by joining White in a corner, CH 2 and SC evenly around the blanket, placing 3 SC into each corner space; finish with a second round of DCs and SL ST to join.
  • After the final stitch in your last row, CH 1, pull up the last loop 5-6 inches, cut the yarn, and pull the yarn end through to fasten off; pull the yarn connected to your skein out and tighten before weaving in.
  • Pin or inspect the blanket edges and sides to ensure the border lies flat; if any side is rippling or curling, adjust tension or add/remove a stitch in that section before final weaving.
  • Weave and secure any remaining ends with a tapestry needle and trim excess to keep the finished blanket neat and safe for baby use.

Important Notes

  • πŸ’‘Use the recommended hook or adjust by 0.5mm if your tension is noticeably tight or loose to meet the gauge provided.
  • πŸ’‘Carry color ends by cutting to 5-6 inches and crocheting over them on the next row to avoid weaving in many short tails later.
  • πŸ’‘If your blanket starts curling, your stitches are too tight; undo to before the curling point and stitch more evenly to flatten the fabric.

This Boho Rainbow Baby Blanket was designed to be both cozy and charming, made with simple stitches for beautiful texture and color. Customize the color order or size to make a truly unique gift that will be treasured for years to come. Happy crocheting and enjoy every colorful row! 🧢🌈

You ask,

we answer.

FAQs

What size will the finished piece be?

The finished blanket measures approximately 36" x 40" when using the recommended yarn and 5 mm hook, though size may vary with tension and yarn choice.

Can I use different yarn weights for this pattern?

Yes, you can use different yarn weights, but this will affect the final size and drape; be prepared to adjust the hook and gauge accordingly.

Do I need prior crochet experience for this pattern?

This pattern is beginner friendly; basic crochet knowledge (SC, HDC, DC, puff stitch, and changing colors) is helpful for the best results.

How long does this project typically take to complete?

Most crocheters complete this blanket over multiple days; expect approximately 12-15 hours depending on speed and how many repeats you make.