🧢 Beautiful ✨ Detailed πŸ’ Adorable

Brighten Your Day Crochet Rainbow Stuffie Amigurumi Pattern

Brighten Your Day Crochet Rainbow Stuffie Amigurumi Pattern
4.2β˜… Rating
2-4 Hours Time Needed
1.4K Made This
βœ‚οΈ

Beginner Friendly Level

Perfect for those just starting their crochet journey, with clear instructions and simple techniques

⏱️

Bite-Sized Project

Finishes in 2-4 hoursβ€”perfect for an afternoon of creative relaxation.

🧸

Cute Companion

An adorable friend to cherish, handcrafted with love to bring comfort and joy for years to come.

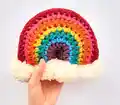
About This Brighten Your Day Crochet Rainbow Stuffie Amigurumi Pattern

This pattern creates a small, cuddly rainbow stuffie worked in two matching single crochet pieces that are seamed and stuffed. It uses Bernat Softee Chunky yarn and bold contrast stripes to produce a vivid rainbow arc. Fluffy pom-pom clouds are attached across the bottom for a playful finishing touch.

Brighten Your Day Crochet Rainbow Stuffie Amigurumi Pattern crochet pattern - detailed view of completed project

The construction is simple and beginner-friendly, great for practicing color changes and seaming techniques. The end result is a charming handmade gift or decorative accent for any room.

Why You'll Love This Brighten Your Day Crochet Rainbow Stuffie Amigurumi Pattern

I absolutely love this pattern because it turns simple stitches into a piece that instantly lifts your mood with bright color. I created it to be approachable so crocheters of any level can finish a lovely handmade gift in a single afternoon. The construction is straightforward, but the color changes and pom-pom clouds give it a delightful, professional look. I enjoy seeing how different color combinations make each rainbow unique and cheerful.

Brighten Your Day Crochet Rainbow Stuffie Amigurumi Pattern step 1 - construction progress Brighten Your Day Crochet Rainbow Stuffie Amigurumi Pattern step 2 - assembly progress Brighten Your Day Crochet Rainbow Stuffie Amigurumi Pattern step 3 - details and accessories Brighten Your Day Crochet Rainbow Stuffie Amigurumi Pattern step 4 - final assembly and finishing

Switch Things Up

I love changing colors to give each rainbow a unique personality; try pastel shades or a monochrome gradient for a different mood.

To make a smaller or larger rainbow, swap yarn weight and adjust hook size β€” thinner yarn with a smaller hook creates a mini version perfect for keychains.

I often swap the bulky yarn for a super bulky yarn and a larger hook to make a plush, pillow-like rainbow for nurseries.

Instead of pom-poms, you can crochet small clouds and sew them on for a more polished finished look.

Try embroidering small stars or raindrops on the rainbow stripes to add a whimsical touch and personalize each piece.

I sometimes add a loop at the top and turn the rainbow into a hanging ornament or wall decor piece.

For a gift set, I make a matching little sun or star using the same yarn colors to create a coordinated collection.

Use novelty yarn for the cloud section to create extra fluffy, textured pom-poms that really pop visually.

I recommend testing eye placement or embroidered faces on scrap pieces first so you can experiment with expressions before committing to the final piece.

If you like, add a small felt backing and a safety pin to convert the finished rainbow into a wearable brooch or bag charm.

Common Mistakes & How to Fix Them

βœ— Changing color incorrectly and carrying too many loops; be sure to work to the last two loops on the hook, yarn over with the new color and pull through two loops to complete the stitch and continue in the new color. βœ— Overstuffing the rainbow before seaming can distort its arc shape; stuff gradually and shape the piece as you go to maintain the curved profile. βœ— Not aligning stripes when sewing front and back together results in mismatched colors; pin or clip the two pieces together, align stripes carefully, then seam keeping the colors matched. βœ— Cutting pom-pom loops unevenly makes lumpy clouds; trim loops evenly and shape the pom-poms into smooth rounds before attaching with long yarn tails.

Brighten Your Day Crochet Rainbow Stuffie Amigurumi Pattern

Bring a little color into your home with this cheerful crochet rainbow stuffie. You will make two simple single crochet pieces, seam them together, stuff them, and add fluffy pom-pom clouds across the bottom. The pattern is written in standard US terms and uses bulky yarn for a squishy, quick-to-finish project.

Beginner Friendly 2-4 Hours

Materials Needed for Brighten Your Day Crochet Rainbow Stuffie Amigurumi Pattern

β€” Main Fabric

  • 01
    Bernat Softee Chunky Yarn (#6 Bulky) 3.5 oz [100 g] / 108 yds [99 m]
  • 02
    Contrast A - Dark Mauve (28323) 1 ball or 7 yds [7 m]
  • 03
    Contrast B - Ultra Blue (28742) 1 ball or 4 yds [4 m]
  • 04
    Contrast C - Emerald (28200) 1 ball or 6 yds [6 m]
  • 05
    Contrast D - Glowing Gold (28607) 1 ball or 6 yds [6 m]
  • 06
    Contrast E - Pumpkin (28630) 1 ball or 8 yds [8 m]
  • 07
    Contrast F - Hot Pink (28416) 1 ball or 9 yds [9 m]
  • 08
    Contrast G - Wine (28532) 1 ball or 21 yds [20 m]
  • 09
    Contrast H - Natural (28008) 1 ball or 21 yds [20 m]

β€” Tools Required

  • 01
    Crochet hook US J/10 (6 mm) or size needed to obtain gauge
  • 02
    Polyester stuffing
  • 03
    Scissors
  • 04
    Yarn needle for sewing
  • 05
    Piece of cardboard 2" [5 cm] wide for making pom-poms
  • 06
    Pins or clips for holding pieces while seaming

Progress Tracker

0% Complete

Info :

A cute little rainbow to brighten your day! This colorful stuffie is worked in two simply shaped single crochet stitch pieces that are seamed together and stuffed before fluffy pom-pom clouds are attached across the bottom.

Info :

Note: To change color, work to last 2 loops on hook, yoh with new color. Pull through 2 loops on hook to complete st and proceed in new color.

Infos :

Gauge: 10 sc and 11 rows = 4" [10 cm]. Written in Standard US Terms. Skill Level: Easy Crochet.

β€” Front and Back :

Info :

Front and Back (make alike). With A, ch 8.

Round 1 :

(RS). 1 sc in 2nd ch from hook (counts as ch 1. 1 sc). 1 sc in next ch. 2 sc in next ch. 1 sc in next ch. 2 sc in next ch. 1 sc in each of last 2 ch. Turn. (9 sc).

Round 2 :

Ch 1. 1 sc in each of first 2 sc. 2 sc in each of next 5 sc. 1 sc in each of last 2 sc. Join B. Break A. Turn. (14 sc).

Round 3 :

With B, ch 1. 1 sc in each sc across. Join C. Break B. Turn.

Round 4 :

With C, ch 1. 1 sc in each of first 3 sc. 2 sc in next sc. 1 sc in next sc. 2 sc in next sc. 1 sc in each of next 2 sc. 2 sc in next sc. 1 sc in each of last 3 sc. Join D. Break C. Turn. (18 sc).

Round 5 :

With D, ch 1. 1 sc in each of first 5 sc. 2 sc in next sc. 1 sc in next sc. 2 sc in next sc. 1 sc in each of next 2 sc. 2 sc in next sc. 1 sc in each of next 5 sc. Join E. Break D. Turn. (22 sc).

Round 6 :

With E, ch 1. 1 sc in each of first 4 sc. 2 sc in next sc. (1 sc in next sc. 2 sc in next sc) 3 times. (2 sc in next sc. 1 sc in next sc) 4 times. 1 sc in each of last 3 sc. Join F. Break E. Turn. (30 sc).

Round 7 :

With F, ch 1. 1 sc in each sc across. Join G. Break F. Turn.

Round 8 :

With G, ch 1. 1 sc in each of first 10 sc. (2 sc in next sc. 1 sc in next sc) twice. 2 sc in each of next 2 sc. (1 sc in next sc. 2 sc in next sc) twice. 1 sc in each of last 10 sc. Turn. (36 sc).

Round 9 :

Ch 1. 1 sc in each sc across. Fasten off.

β€” Finishing :

Info :

With WS facing each other, sew Front and Back tog using appropriate color while aligning stripes and leaving a small opening for stuffing. Stuff stuffie, making sure to maintain Rainbow shape. Sew opening closed.

Info :

Note: To sew the inner arc of Rainbow closed, I used a strand of A and a flat slip stitch join method across. To seam top arc of Rainbow closed, I used a strand of G and flat slip stitch join method across. To sew the bottoms of the Rainbow closed, I used a strand of yarn (any shade) and sewed them together.

Item Name (P1) :

2" [5 cm] Pom-Poms (make 4): Wind yarn around 2" [5 cm] piece of cardboard 40 times. Tie tightly in the middle and leave a long end for attaching to Rainbow. Cut loops at both ends and trim to smooth round shape.

Info :

Using long ends, sew 2 pom-poms evenly across each bottom of Rainbow (as shown in photo).

Info :

Flat Slip Stitch Join Method = With RS facing, insert hook into back loop only of first stitch on one side of seam and into back loop only of first stitch on other side of seam. With working yarn behind both pieces, pull up a loop through back loops and loop on hook to slip stitch the seams together. Repeat for each set of stitches along seam.

Assembly Instructions

  • Align Front and Back (make alike) with WS facing each other, matching color stripes exactly, and pin in place before seaming to ensure stripes line up.
  • Sew the inner arc closed using a strand of Contrast A and the flat slip stitch join method across the seam to create a neat inside curve.
  • Seam the top arc of the rainbow closed using a strand of Contrast G and the flat slip stitch join method, keeping tension even for a smooth curve.
  • Leave a small opening at the bottom when seaming, stuff the rainbow firmly but evenly to maintain its arc shape, then sew the opening closed securely.
  • Make four 2" [5 cm] pom-poms, trim them into smooth rounds, and use the long yarn tails to sew two pom-poms evenly across each bottom edge of the rainbow.

Important Notes

  • πŸ’‘To change color, work to the last two loops on the hook and yarn over with the new color, then pull through both loops to finish the stitch cleanly.
  • πŸ’‘Use the flat slip stitch join method with RS facing for smooth, low-profile seams when joining the two arc pieces together.
  • πŸ’‘Align stripes carefully before seaming both pieces to avoid mismatched color bands and to achieve a professional-looking finish.
  • πŸ’‘Wind yarn around a 2" [5 cm] piece of cardboard 40 times to make each pom-pom, tie tightly in the middle, and trim to a smooth round shape before attaching.

This sweet little rainbow is designed to brighten any space and bring a smile to your day. The chunky yarn and bold stripes make it quick to crochet and wonderfully tactile to hold. Attach fluffy pom-pom clouds and give it as a handmade gift or keep it as a cheerful decor piece. 🧢🌈

You ask,

we answer.

FAQs

What size will the finished piece be?

The finished rainbow measures approximately 7" [18 cm] wide x 6" [15 cm] tall using the recommended yarn and hook size.

Can I use different yarn weights for this pattern?

Yes, you can substitute yarn weights, but this will change the final size; choose an appropriate hook for your yarn and check your gauge to adjust as needed.

Do I need prior crochet experience for this pattern?

This pattern is beginner friendly, so basic knowledge of single crochet, chaining, and simple color changes is sufficient to complete it.

How long does this project typically take to complete?

Most crocheters finish this project in 2-4 hours, though time will vary based on experience and how much time you spend making pom-poms and seaming.