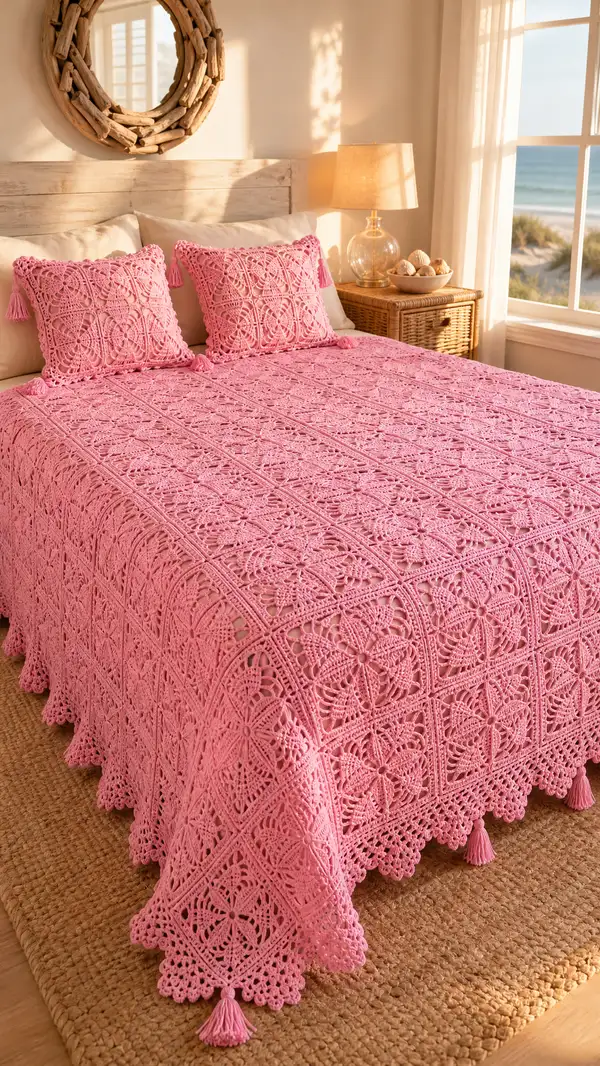
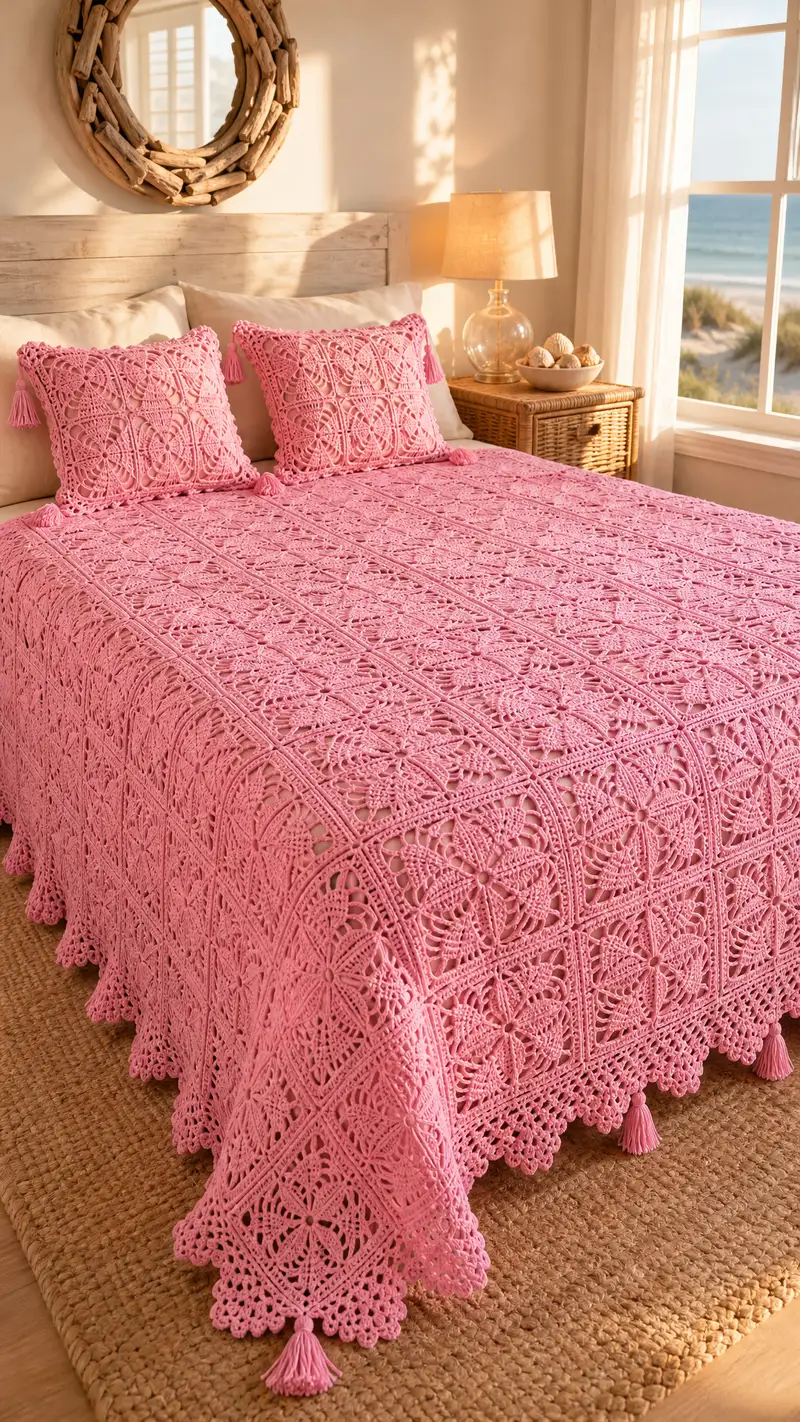
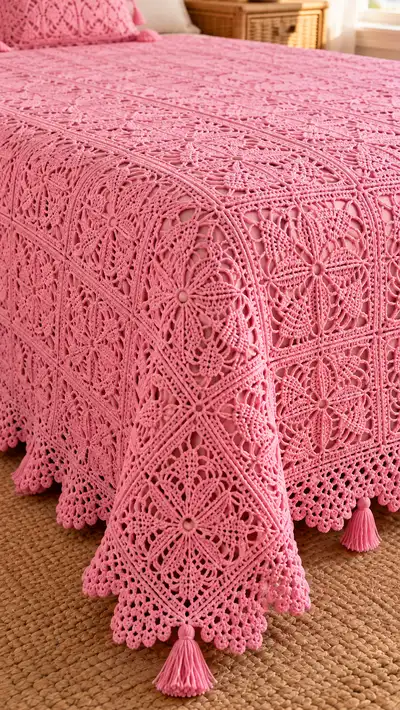
A romantic, vintage-inspired bedspread made from lacy granny-style squares in a cheerful bubblegum pink. This pattern uses repeatable lace square motifs joined with a join-as-you-go method, finished with a scalloped border and playful tassels at the corners. The finished spread drapes beautifully over a full/queen bed and brings a cottage-chic, handmade charm to any bedroom.
Progress Tracker
0% Complete
— Overview & Gauge :
Info :
This pattern is module-based: you will make identical lace granny squares and join them to form the bedspread. Gauge for one finished square (blocked) approximately 12" x 12" using recommended yarn and 4.0mm hook — adjust number of squares to fit bed size. Gauge is for blocking sake; lace stretches, so block to size as you assemble.
Finished Size :
Suggested layout for a queen bed: 6 squares across x 7 squares down = 42 squares. At 12" per square the spread will measure about 72" x 84" before border. Adjust number of squares to fit twin, full or king as desired.
Info :
Block each square after finishing to even up stitches and achieve consistent square shape; this will make joining much neater. Use a steam or wet-block method appropriate for your yarn.
— Motif (make 42 squares for suggested queen size; adjust quantity) :
Round 1 :
8 dc in magic ring; join with sl st to first dc (8)
Round 2 :
(1 dc, inc) x 8 — Place 1 dc in next st, 2 dc in next st, repeat around; join (16)
Round 3 :
(2 dc, inc) x 8 — (2 dc in successive sts, 2 dc in next) repeat; join (24)
Info :
Rounds 1-3 create a compact petal-like center. Keep stitches neat and even. You may use a small hook for these rounds if you prefer a tighter center, but maintain same hook for consistency when matching other squares.
Round 4 :
(3 dc, inc) x 8 — (3 dc, 2 dc in next st) x 8; join (32)
Round 5 :
(4 dc, inc) x 8 — (4 dc, 2 dc in next st) x 8; join (40)
Info :
At the end of Round 5 the motif begins to open. Maintain consistent tension; if your cloth looks ruffled, try one size smaller hook for future squares or block more aggressively.
Round 6 :
(5 dc, inc) x 8 — join (48)
Round 7 :
1 dc in each st around; join (48)
Round 8 :
*(Ch 4, sk 1 st, dc in next 3 sts) repeat from * around to create long chain arches; Join with sl st to first dc base (48 dc + chain arches)
Info :
Round 8 introduces open chain arches to give the lacy negative space seen in the photos. Chains are not counted in the dc stitch total; make sure you anchor arches into the correct stitch bases.
Round 9 :
In each chain-arch: work (dc, ch2, dc) into the chain-space to form small loops; in dc groups, work 1 dc into each dc base. Repeat around; join (48 + 8 corner-style loops counted as additional ch-spaces)
Round 10 :
*(In every 6th stitch group work a corner: (dc, ch3, dc) in same chain-sp; then 1 dc in next 11 sts) x 4 to create 4 corner points for square shaping; join — total dc count across non-corner groups 48
Info :
Round 10 creates corner spaces to square the motif. The pattern repeats 4 times around the circle so math uses 4 corners; keep a stitch marker on the first corner to keep orientation consistent across squares when joining.
Round 11 :
Work into each side sequence: (ch3, sk 1, sc, ch1, sc, ch3) across the side segments to create a side-lace chain; at each corner work (dc, ch4, dc) to open corner larger; join (dc count will be 48 plus chain lattices)
Round 12 :
Across each side, work a row of shell clusters: *(ch1, (dc, ch1, dc, ch1, dc) into central side st, sk 2, rep across side), at corners work (dc, ch5, dc). Join (approx. 64 dc bases counted for next structural round)
Info :
Round 12 builds raised petal clusters; use your fingers to coax petals upward and keep consistent height. This round contributes to the floral look seen in each square.
Round 13 :
Work 1 dc in each dc base around; in chain spaces work (ch3, sl st) to maintain lace openings as needed; join (approx. 64)
Round 14 :
Using FLO only: 1 dc in each st FLO to create a raised ridge on the surface; join (64)
Info :
FLO on Round 14 forms the thin ridges that are visible between motifs and also helps bonding when joining squares. Keep tension even to ensure ridges line up when squares are joined.
Round 15 :
Work decorative pineapple-like arches along each side: *(ch5, sk 3, sc in next st, ch5, anchor with sl st) repeat across the side; in corners work (dc, ch6, dc) to maintain square outline; join
Round 16 :
(Shell edging round) In each side segment work (sc, ch3, 3 dc in next st, ch3, sc) to begin scallop edge; at corners work (sc, ch4, sc). Join (edge bases approx. 80)
Info :
Finish motif with two tidy rounds to ensure squares align when joined. After Round 16 fasten off leaving a 10" tail for blocking and joining (if you prefer to join with tails) or weave in and save tails for final join.
Round 17 :
(Optional decorative picot rows) Work (sc, ch3, picot, sk 1) around side loops to add tiny points along the outer edge; join (picots not counted as base stitches)
Round 18 :
Weave in ends or clip leaving tails for joined seams; block square to 12" x 12" using pins. Allow to dry completely before joining.
Info :
At least one seam tail is recommended for join-as-you-go (JAYGO). Keep two tails if you plan to whipstitch for reinforcement later; otherwise JAYGO will hide most joins under a ridge.
— Join-As-You-Go (JAYGO) layout method :
Info :
Arrange blocked squares in final layout before joining. For queen example: 6 across x 7 down. Work joins left-to-right across rows and then join rows together. JAYGO will connect each new square to already-joined neighbors on its left and above as you work the final round(s).
Round 1 :
Begin with your first square (center or top-left); with RS facing, attach yarn at one corner and work 1 sc in each base stitch along the edge to square’s midpoint; leave remainder unworked — this prepares the joining ridge (stitch count variable per edge, typically 24 sc across one edge)
Round 2 :
When joining an adjacent square: align new square RS to RS, begin working last round into new square and at each stitch that corresponds to joined square work sl st through both loops (1 sl st through new square st + corresponding st on already-joined square) to join; where no neighbor exists work sc in new square st. Repeat for entire side. Join ends with sl st. (Maintain same number of join points as base stitches; count equals number of base points on edge)
Info :
Use the FLO ridge row as your joining round — this creates a neat ribbed seam that looks intentional in the overall layout. Pin squares before joining if needed to maintain alignment.
Round 3 :
After joining left side neighbors across the row, attach at the top edge and join to the square above using the same sl st-through-both technique. At corner intersections, work 2 sl st to lock corner alignment. Count sl st joins to ensure even spacing across entire bedspread.
Round 4 :
Continue joining subsequent squares: each new square will be joined on its left and top edges (two joins) until the first row is complete; then start next row down and join each new square to its left and above neighbors as you go. Keep marked corner stitch consistent for each motif orientation.
Info :
JAYGO is the fastest way to build a neat bedspread without large sewing sessions; take your time to ensure each corner aligns. If one square pulls slightly after joining, block the seam lightly and re-tension by unpicking a few sl sts and reworking tighter or looser as needed.
— Center seam and reinforcement rounds (per joined intersection) :
Round 1 :
With bedspread partially assembled, work a reinforcement row along interior join lines: join yarn at one end of a horizontal join and work 1 hdc in each joined sl st (hdc through both layers) across the length; join with sl st to secure. Repeat for each horizontal and vertical seam. (count = number of join points)
Info :
Reinforcement rows reduce stretch and help the spread lay flat. Use hdc for slightly raised seam that adds a framed look between motifs and echoes the ridge formed in motif Rnd 14.
— Inner Border Build (work all around the assembled rectangle) :
Round 1 :
Attach yarn to any outside corner. Work 1 sc evenly around the entire outer edge, placing (3 sc) in each motif corner to maintain shape; join with sl st to first sc. (Count variable based on number of motif sides — e.g., queen 6x7 layout will have approx. 6*12 + 7*12 edge stitch bases depending on motif detail.)
Round 2 :
Work (sc, ch3, sk 2, sc) repeating along each outer side to build open chain mesh for the later scalloped rounds; at corners work (sc, ch5, sc) to keep corner open; join. (sc base count approx. 120–160 depending on layout)
Info :
This inner border evens the bedspread edge and creates a consistent base for the elaborate scalloped edging. Keep stitch counts even on all four sides for symmetric scallop placement.
Round 3 :
In each ch3 sp work (3 dc, ch2, 3 dc) to form a fan shell across the outer edge; at corners work (4 dc, ch4, 4 dc) to form larger corner fans; join with sl st (fan bases approx. equal to number of chain spaces previously worked)
Round 4 :
1 sc in each dc base and in fan ch-2 spaces work (sc, ch3, sc) to stabilize; join. (count approximates fan bases)
Info :
After this small band of fans you will switch into several decorative rounds to create the layered scalloped border seen in the photo. The border uses shells, picots, and layered shells to produce the deep scallop profile.
— Main Scalloped Border (multi-row, visual depth) :
Round 1 :
Change to 3.5mm hook if you prefer a crisper scallop. Work (ch3, 4 dc in same sp, ch2, 5 dc in next sp) around to form alternating large shells; join. (DC base counts will be even multiples of 9 per repeat)
Round 2 :
In each large shell work (ch1, sc in same st, ch4, sc) to emphasize scallop valleys; in shell peaks anchor with 1 sc; join. (stitch count equals number of shells times 2 sc anchors)
Info :
Work slowly on these rounds to avoid distortion. Pin scallop tips to blocking mats if needed to keep them even. Using a slightly smaller hook for this band will make scallops sit up nicely.
Round 3 :
Work 3 rounds of alternating shell clusters and picot highlights: Round A — (3 dc, ch2, 3 dc) in each shell peak; Round B — (sc, picot, sc) in each shell valley; Round C — 1 sc between peaks to set bases. Join each round. (Repeat set 3 times) — counts vary by repeats but remain mathematically consistent with number of shell peaks.
Round 4 :
Work a decorative lattice: *(ch5, sl st into shell middle), repeat around — this creates the eyelet mesh row right at the scallop base; join.
Info :
The layered shells create the deep edge visible in the photograph. If your scallops flair too wide, reduce ch counts in the shell rounds by 1 or tighten tension slightly.
Round 5 :
Final finishing row for scallops: in each scallop tip work (sc, ch3, picot, ch3, sc) to produce tiny loops and points; join and fasten off. Block scallops outward to create curve and allow to dry fully.
Round 6 :
Weave in all perimeter tails with yarn needle, tuck ends into border ridges for invisibility.
— Corner Tassels (make 4 large tassels and 4 small tuft tassels for pillow corners) :
Round 1 :
Cut 60 strands of yarn approximately 12" long for each large tassel (adjust length as desired after trimming). Fold strands in half and attach to corner with a tight lark’s head knot, then wrap the upper portion with 6" of yarn to form a tassel head; secure with tight double knot and additional wrapping. Repeat for each corner.
Info :
Tassel weight helps border drape; heavier tassels pull edge down slightly. Trim evenly and steam-block tassels for polished finish. Consider using smaller 30 strand tassels for decorative pillow corners to match bedspread scale.
— Pillow Covers (make 2 matching square pillow shams) :
Info :
Pillow covers are made of the same motif joined 2 x 2 for a single sham front (4 squares) with a simple seamed back or zipper insertion. Each sham uses 4 blocked motifs measuring approx. 12" square when assembled (finished sham approx. 24" square).
Round 1 :
Arrange 2 x 2 squares RS facing. Join using JAYGO method along two seams as described in motif join section so the texture lines align. Reinforce seams with 1 round of hdc worked through both layers on WS to strengthen pillow sham.
Round 2 :
For the back, create a rectangle of sc rows sized to overlap the sham by 2" each to create an envelope closure: ch (approx. 24+ width in inches converted to sts), work hdc rows until desired height; fold and slip stitch edges to form back pockets. Attach to front of sham using whipstitch around three sides leaving top open. Insert pillow form and close.
Info :
For a neater finish you can add a zipper into one edge of the back panel before attaching to the front. Use matching yarn to conceal zipper using a narrow reverse single crochet ridge.
— Finishing & Blocking :
Info :
Once assembled and borders complete, wet-block the entire bedspread on a large surface with blocking mats (or multiple mattress pads) pinning each scallop and corner tassel to create the gentle drape. Press lightly with steam if yarn allows. Ensure all seams lay flat and adjust any small gaps by unpicking a few joins and reworking tighter.
Round 1 :
Check all yarn tails: weave in with yarn needle into the ridge rows to hide ends. For extra security, knot tails at inside seam and weave back through several stitches.
Round 2 :
Add optional edging beads or small sewn-on buttons at corner motif centers for an additional decorative touch — use upholstery thread to secure and avoid catching the lace fabric.
Info :
Store the bedspread loosely folded to avoid permanent creases. Spot-wash with gentle soap; cotton may shrink slightly if exposed to high heat — re-block if needed after washing.
— Tips, Troubleshooting & Adjustments :
Info :
If you want a smaller scale bedspread, use DK weight yarn and a 3.5mm hook and reduce motif count proportionally. For a larger or heavier drape, use bulkier yarn and a larger hook, but remember square stitch counts and blocking will vary. Always block a sample square to finalize your motif size before committing to full assembly.
Round 1 :
If motifs won’t lie flat: add or remove a short foundation round of sc around motif to adjust perimeter tension. Two extra sc distributed evenly reduce cupping; one fewer sc will relax a tight edge.
Info :
When working long projects, alternate skeins every 2-3 squares to avoid visible dye lot changes; join new skeins at seam lines where texture camouflages yarn joins.
This Bubblegum Lace Granny Square Bedspread is a celebration of texture, color and patient handmade skill. Each square brings vintage charm while the bright pink color modernizes the look. The join-as-you-go assembly and layered scalloped edge give the spread its signature, beautifully draped silhouette. I hope creating it brings you as much joy as I felt designing it! 🧶🌸