🧢 Beautiful ✨ Detailed πŸ’ Adorable

Bucket Hat for Winners Pattern

Bucket Hat for Winners Pattern
4.6β˜… Rating
2-4 Hours Time Needed
2.6K Made This
βœ‚οΈ

Beginner Friendly Level

Perfect for those just starting their crochet journey, with clear instructions and simple techniques

⏱️

Bite-Sized Project

Finishes in 2-4 hoursβ€”perfect for an afternoon of creative relaxation.

πŸ‘•

Casual Chic

Relaxed style with a modern twist, perfect for everyday wear while maintaining that handcrafted uniqueness.

About This Bucket Hat for Winners Pattern

This pattern teaches you to crochet a raffia bucket hat with a firm brim using rigilene boning for structure. You will follow clear step-by-step rounds from the bottom through the crown and brim. It is designed for beginner crocheters and includes tips for working with raffia yarn and finishing for a neat result.

Bucket Hat for Winners Pattern crochet pattern - detailed view of completed project

The pattern uses Ispie or Fibranatura raffia and a 3 mm hook in the example, and includes a size M reference (56-57 cm). Full guidance is provided to adapt the hat to other head sizes.

Why You'll Love This Bucket Hat for Winners Pattern

I absolutely love this pattern because it makes a polished, wearable hat from inexpensive raffia yarn. I enjoy how the instructions walk you through shaping the bottom, crown and brim with clear rounds so the result always fits well. The use of rigilene boning gives the brim professional structure, which makes the finished hat feel high quality. Crocheting this hat is relaxing and quick, and I find it rewarding to customize colors and trims for friends and gifts.

Bucket Hat for Winners Pattern step 1 - construction progress Bucket Hat for Winners Pattern step 2 - assembly progress Bucket Hat for Winners Pattern step 3 - details and accessories Bucket Hat for Winners Pattern step 4 - final assembly and finishing

Switch Things Up

I love experimenting with colors in this hat; try combining two contrasting raffia shades for a striped brim for a bold look.

I often change the size by using a thicker or thinner yarn and adjusting the hook size β€” a bulkier yarn creates a chunky oversized hat while thinner raffia makes a delicate mini hat.

If you want a softer brim edge, skip crocheting directly into the rigilene and instead crochet a decorative trim over the edge for a gentle finish.

I like to add a cotton lining for extra comfort and to hide any internal joins; you can sew in a circular fabric lining after finishing the brim.

Try embellishments like a simple crocheted flower, a ribbon band, or metal eyelets for ventilation and style β€” these personalize the hat instantly.

To make a packable hat, use a lighter-weight boning or a removable wire insert so the brim can be removed for folding and travel.

I sometimes switch to natural, undyed raffia for a classic, earthy look and add a colorful trim for contrast.

For a child's version, scale down the rounds and use brighter colors or small appliques to make it playful and fun.

I also experiment with adding a small brim facing in fabric to increase structure without additional boning for a more subtle finish.

Want a sun hat variant? Increase the brim rounds for a wider shade and consider lining the brim for added UV protection.

For a dressier version, use metallic or sparkly raffia trims or sew on a decorative band and a brooch for an elevated finish.

Common Mistakes & How to Fix Them
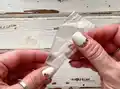
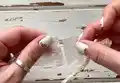
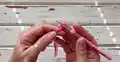
βœ— Not straightening raffia before starting; always straighten or steam the raffia yarn first so it crochets smoothly and does not twist. βœ— Leaving large gaps when crocheting single crochet in raffia; pull the working thread up to the level of the hook when making SC to avoid holes in the fabric. βœ— Joining new skeins without a secure overlap; overlap the old and new threads by about 5 mm and secure with PVA glue, then wrap tightly after drying for a seamless join. βœ— Forgetting to measure the head and calculate the bottom diameter; measure HS (head size) and use the formula (HS - 4 cm) / 3.14 to calculate the correct bottom diameter to match your intended size. βœ— Not using a marker at the start of rounds; place a marker in the first loop of row 2 and move it to the first loop of each subsequent row to keep track of round starts and increases.

Bucket Hat for Winners Pattern

Make a stylish raffia bucket hat using this clear beginner-friendly crochet pattern. You will learn how to shape the bottom, transition into the crown, and crochet a structured brim reinforced with rigilene boning. The pattern includes full materials, step-by-step rounds, photos and tips so you can tailor the hat to any head size. Perfect for summer accessories or handmade gifts, this pattern makes it easy to create a polished, wearable bucket hat.

Beginner Friendly 2-4 Hours

Materials Needed for Bucket Hat for Winners Pattern

β€” Main Fabric

  • 01
    Raffia yarn (Ispie or Fibranatura), approximately 220 yards (200 meters) – example used: Ispie, Beauty color
  • 02
    Raffia yarn additional amounts as needed to finish brim and trim (one full 220 yd skein recommended for a medium hat)

β€” Tools Required

  • 01
    Crochet hook size 3.0 mm (as used in example)
  • 02
    Optional crochet hook 4.0 mm for airy base trim
  • 03
    1 stitch marker
  • 04
    Rigilene boning 5 mm, 31 inches (80 cm) (cut to brim perimeter)
  • 05
    Heat shrink tube 3-4 mm, 2 inches (5 cm)
  • 06
    PVA glue or glue stick
  • 07
    Scissors
  • 08
    Tape measure
  • 09
    Iron for steaming and shaping
  • 10
    Lighter or heat source to process heat shrink tube

Progress Tracker

0% Complete

β€” Bottom :

Info :

Bottom. Crochet 2 CH.

Round 1 :

Crochet 8 SC in the 2nd loop from the hook. Next crochet a spiral. (8)

Round 2 :

1 Inc*8 = 16. (16)

Info :

Place the marker in the 1st loop of this row. Then, rearrange the marker in the 1st loop of the each subsequent row. Straighten the loop on the hook, if it has not opened.

Round 3 :

(1 SC, 1 Inc)*8 = 24. (24)

Round 4 :

(3 SC, 1 Inc)*6 = 30. (30)

Info :

Crochet + 1 SC, and repeat this in the each subsequent row. Thus, the circle will come out in the correct form.

Round 5 :

(4 SC, 1 Inc)*6 = 36. +1 SC. (36)

Round 6 :

(5 SC, 1 Inc)*6 = 42. +1 SC. (42)

Round 7 :

(6 SC, 1 Inc)*6 = 48. +1 SC. (48)

Round 8 :

(7 SC, 1 Inc)*6 = 54. +1 SC. (54)

Round 9 :

(8 SC, 1 Inc)*6 = 60. +1 SC. (60)

Round 10 :

(9 SC, 1 Inc)*6 = 66. +1 SC. (66)

Round 11 :

(10 SC, 1 Inc)*6 = 72. +1 SC. (72)

Info :

Steam the bottom with an iron on the wrong side. Shape with hands. Strengthen and hide the end on the wrong side.

β€” Transition to crown :

Info :

Transition to the crown. Crochet two rows for smooth rounding.

Round 12 :

72 SC. (72)

Info :

Add +1 SC between Increases to the number of SC where the bottom ended.

Round 13 :

(11 SC, 1 Inc)*6 = 78. +1 SC. (78)

β€” Crown :

Info :

The crown is crocheted to the tip of the ear, about 10-11 rows.

Round 14 :

78 SC. (78)

Round 15-23 :

78 SC. (78)

Info :

Steam the crown with an iron on the wrong side. Measure the diameter of the crown and calculate the head size to check fit. Use formula D * 3.14 = HS when verifying measurement.

β€” Brim :

Info :

Brim. Crochet the brim of the required width: two rows with Increases, one row without Increases (usually 9-11 rows). Add +1 SC between Increases to the number of SC where the transition to the crown ended.

Round 24 :

(12 SC, 1 Inc)*6 = 84. +1 SC. (84)

Round 25 :

(13 SC, 1 Inc)*6 = 90. +1 SC. (90)

Round 26 :

90 SC. (90)

Round 27 :

(14 SC, 1 Inc)*6 = 96. +1 SC. (96)

Round 28 :

(15 SC, 1 Inc)*6 = 102. +1 SC. (102)

Round 29 :

102 SC. (102)

Round 30 :

(16 SC, 1 Inc)*6 = 108. +1 SC. (108)

Round 31 :

(17 SC, 1 Inc)*6 = 114. +1 SC. (114)

Round 32 :

114 SC. (114)

Info :

Steam the brim with an iron on the wrong side.

β€” Preparing the rigilene boning :

Info :

Measure the perimeter of the brim with a tape measure. Cut off a piece of the rigilene boning to a length equal to the perimeter of the brim leaving a small gap. Cut the rigilene in half lengthwise. Wrap the straightened raffia yarn around the rigilene boning and fix with a glue stick every 1 inches (2-3 cm).

β€” Rigiline insertion and finishing :

Info :

Crochet in the rigilene boning in the next row. Transition method: Pull the loop 20 mm long. Tighten the loop under the 1st SC to the wrong side. Take out the hook and insert it between the legs of SC. Pull the 2nd loop. Insert the rigilene boning between loops and crochet 2 loops together.

Round 33 :

Crochet in the rigilene boning with 114 SC, crochet the split single stitches. For that, insert the hook between the legs of each stitch to split the stitch from the face and from the wrong side. Stop crocheting a few inches before the end of the row (5-6 cm). (114)

Info :

Steam the brim again and shape with hands. Cut off the ends of the rigilene boning so that they meet end-to-end. Put the heat shrink tube on the joint and process with fire. Wrap the tube with a piece of raffia yarn and crochet to the end of the row. If you want a soft edge, do not crochet directly into the rigilene boning for the final finish.

β€” Base trim :

Info :

Base trim. Crochet the base trim with SlSt in each loop. Crochet the SlSt freely so that the loops don't tighten the edge. You can take the 4 mm hook for the base trim. Cut the thread and pull out the end. Insert the hook under the 1st SlSt of the row, pull out the end, tighten the end back to the wrong side. Strengthen and hide the end. Steam the edge of the brim with an iron on the wrong side and shape with hands.

Assembly Instructions

  • Measure the head (HS) and calculate the bottom diameter using (HS - 4 cm) / 3.14 to ensure the bottom fits your intended head size before continuing the brim.
  • Cut rigilene boning to the brim perimeter (leave a small gap), wrap it with raffia yarn and glue every 1 inch, then insert the wrapped boning between loops and crochet over it to secure the boning inside the brim.
  • Steam the bottom, crown and brim on the wrong side with an iron to shape the hat and to return raffia fibers to their proper shape; reshape by hand after steaming.
  • Join the rigilene boning ends end-to-end, cover the join with heat shrink tube, apply heat to secure, then wrap and crochet over the tube for a neat invisible seam.
  • Finish the brim edge with a base trim of SlSt worked loosely in each loop, hide and strengthen ends on the wrong side, and final-steam the edge to set the shape.

Important Notes

  • πŸ’‘Straighten or 'fluff' raffia yarn before starting; Ispie raffia can be steamed with an iron to straighten and shape.
  • πŸ’‘Use a stitch marker at the first stitch of each round and move it each round to maintain accurate stitch counts.
  • πŸ’‘When replacing a skein, overlap ends by about 5 mm, glue with PVA, let dry, then wrap the join to secure it and avoid bulky knots.
  • πŸ’‘Pull the working loop to the level of the hook while crocheting SC in raffia to avoid holes in the fabric and keep a tight canvas.
  • πŸ’‘Steam components on the wrong side and shape with your hands for a consistent finished form.

This raffia Bucket Hat pattern gives you a polished summer accessory with a firm, professional-looking brim. The step-by-step rounds, reinforced brim method, and finishing tips make it perfect for handmade gifts or a personal wardrobe update. Have fun customizing colors and trims β€” happy crocheting! 🧢✨

You ask,

we answer.

FAQs

What size will the finished piece be?

The example in the pattern is for size M (head circumference 56-57 cm). You can adjust to any size by measuring the head and using the formula provided to calculate the bottom diameter.

Can I use different yarn weights for this pattern?

This pattern is written for raffia yarn (Ispie or Fibranatura). You can use other yarns, but the size and structure will change; you will need to recalculate the bottom diameter and may need different boning or finishing techniques.

Do I need prior crochet experience for this pattern?

This pattern is beginner friendly, but familiarity with single crochet, increases, and working in the round will help you complete the hat smoothly.

How long does this project typically take to complete?

Most crocheters complete this project in 2-4 hours using the recommended materials, though time may vary depending on experience and customization.