🧢 Beautiful ✨ Detailed πŸ’ Adorable

Plush Bonanza Beechcraft V-tail Amigurumi Pattern

Plush Bonanza Beechcraft V-tail Amigurumi Pattern
4.3β˜… Rating
5-7 Hours Time Needed
3.2K Made This
βœ‚οΈ

Intermediate Level

Ideal for those with basic crochet experience, featuring slightly more advanced stitches and techniques to expand your skills.

⏱️

Weekend Treat

Takes 5-7 hours, making it an enjoyable project to finish over a couple of days.

🧸

Cute Companion

An adorable friend to cherish, handcrafted with love to bring comfort and joy for years to come.

About This Plush Bonanza Beechcraft V-tail Amigurumi Pattern

This pattern guides you through creating a soft, plush airplane modeled after the Bonanza Beechcraft V-tail. You will create a sturdy fuselage starting with a triangle shape, assemble multi-layered wings for stability, and add detailed engines and propellers. The finished toy measures approximately 30 cm (11.8 in) in length and width when using the recommended plush yarn.

Plush Bonanza Beechcraft V-tail Amigurumi Pattern crochet pattern - detailed view of completed project

The design features felt window details and a clever construction method for the wings and tail to ensure they hold their shape without wire. It uses a mix of plush yarn for the body and cotton yarn for the fine details.

Why You'll Love This Plush Bonanza Beechcraft V-tail Amigurumi Pattern

I absolutely love this pattern because it transforms a mechanical machine into something incredibly soft and huggable. The V-tail design gives it such a unique silhouette that stands out from standard airplane toys. I really enjoy the construction of the wings, where crocheting two pieces together creates a perfect, sturdy shape without needing cardboard inserts. Plus, the finished size is substantial enough to be a real 'wow' gift for any little pilot!

Plush Bonanza Beechcraft V-tail Amigurumi Pattern step 1 - construction progress Plush Bonanza Beechcraft V-tail Amigurumi Pattern step 2 - assembly progress Plush Bonanza Beechcraft V-tail Amigurumi Pattern step 3 - details and accessories Plush Bonanza Beechcraft V-tail Amigurumi Pattern step 4 - final assembly and finishing

Switch Things Up

I love how customizable this airplane pattern is! You can easily change the personality of the plane just by swapping the yarn colors. While the classic blue and white looks great, try using bright red or yellow for a sporty racing plane look, or maybe grey and green for a military style.

For the windows, if you aren't a fan of working with felt, you could crochet flat panels using fine cotton yarn and sew them on instead. This gives a more textured, completely crocheted finish that some crafters prefer.

I also find that you can play with the size significantly. Using a super bulky Chenille yarn with a larger hook will create a massive, pillow-sized huggable plane perfect for a bed decoration. Conversely, using worsted weight acrylic yarn will make a smaller, firmer toy that's easier for small hands to zoom around the room.

If you want to add a personal touch, consider embroidering a name or a registration number on the side of the fuselage or the wings. It turns a cute toy into a personalized keepsake that's extra special for the recipient.

Finally, for the propeller, you could experiment with adding a spinner cap in a contrasting color or even using a silver yarn to mimic metal blades. Small details like this really make your handmade creation unique!

Common Mistakes & How to Fix Them

βœ— Stuffing the fuselage unevenly can make the plane look lumpy; stuff gradually and firmly as you go, especially towards the tail. βœ— Misaligning the increases in the fuselage (Round 11 and 14) will twist the plane's body; find the exact center of your triangle base before placing these increases. βœ— Sewing the wings on crookedly affects the plane's balance; use plenty of pins to secure them symmetrically between rows 14 and 22 before sewing. βœ— Not tightening the propeller knots securely can cause them to come loose; tie the yarn tails firmly into double knots inside the holder.

Plush Bonanza Beechcraft V-tail Amigurumi Pattern

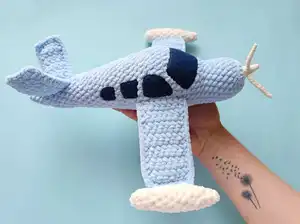
Take to the skies with this adorable plush Bonanza Beechcraft V-tail plane! This soft and cuddly amigurumi features a unique V-tail design, rotating propellers, and a chubby fuselage perfect for hugging. At approximately 30 cm in length and width, it makes an impressive gift for aviation enthusiasts or a cozy addition to any nursery.

Intermediate 5-7 Hours

Materials Needed for Plush Bonanza Beechcraft V-tail Amigurumi Pattern

β€” Main Fabric

  • 01
    One skein of plush yarn Yarnart Dolce or analogs (100 grams / 120 meters) of blue color
  • 02
    Little of plush yarn Yarnart Dolce or analogs (100 grams / 120 meters) of milk color
  • 03
    Little of strong thin yarn of blue and milk color for propeller and sewing (Yarnart Jeans 50g/160m)
  • 04
    Some blue or black felt for the windows

β€” Tools Required

  • 01
    Hook 4 mm
  • 02
    Hook 1.5 mm
  • 03
    Hollofiber filler
  • 04
    Scissors
  • 05
    Needle
  • 06
    Markers
  • 07
    Pins
  • 08
    Black sewing thread or glue

Progress Tracker

0% Complete

β€” Fuselage :

Info :

Use Blue plush yarn. You need to make a triangle shape. This will work if we make 3 stitches in one loop.

Round 1 :

9 sc in MR (9)

Round 2 :

(2 sc, 3 sc in 1 loop) * 3 (15)

Round 3 :

(4 sc, 3 sc in 1 loop) * 3 (21)

Round 4 :

21 sc for the back half of the loop (21)

Round 5-10 :

21 sc (21)

Round 11 :

You need to make 6 increases exactly in the middle of the triangle. I have it: 7 sc, 6 inc, 8 sc (27)

Info :

Find your center of the triangle and crochet the required number of stitches.

Round 12-13 :

27 sc (27)

Info :

In the next row, the increase should also be in the middle. The increase should be in the center and 2 sc and 1 inc from it to the left and right.

Round 14 :

11 sc, inc, 2 sc, inc, 2 sc, inc, 9 sc (30)

Round 15-16 :

30 sc (30)

Round 17 :

(4 sc, inc) * 6 (36)

Round 18-20 :

36 sc (36)

Round 21 :

(10 sc, dec) * 3 (33)

Round 22 :

33 sc (33)

Round 23 :

(9 sc, dec) * 3 (30)

Round 24-25 :

30 sc (30)

Info :

Fill the fuselage with filler and add it during crocheting.

Round 26 :

(8 sc, dec) * 3 (27)

Round 27-28 :

27 sc (27)

Round 29 :

(7 sc, dec) * 3 (24)

Round 30-31 :

24 sc (24)

Round 32 :

(6 sc, dec) * 3 (21)

Round 33-34 :

21 sc (21)

Round 35 :

19 sc, dec (20)

Round 36 :

9 sc, dec, 9 sc (19)

Round 37 :

17 sc, dec (18)

Round 38 :

8 sc, dec, 8 sc (17)

Round 39 :

17 sc (17)

Round 40 :

15 sc, dec (16)

Round 41 :

16 sc (16)

Round 42 :

14 sc, dec (15)

Round 43 :

6 sc, dec, 7 sc (14)

Round 44 :

12 sc, dec (13)

Round 45 :

5 sc, dec, 6 sc (12)

Round 46 :

10 sc, dec (11)

Round 47 :

4 sc, dec, 5 sc (10)

Round 48 :

8 sc, dec (9)

Round 49 :

7 sc, dec (8)

Round 50 :

6 sc, dec (7)

Round 51 :

5 sc, dec (6) + sl st

Info :

Fasten the thread, cut and tighten the hole.

β€” Tail :

Info :

Use Blue plush yarn. You need to make 4 identical parts. Then we will combine them two pieces into one. You will get 2 strong parts of the V-tail. Crochet in turning rows. Each new row starts with 1 chain.

Foundation :

6 chains

Row 1 :

Starting from the second loop from the hook, crochet 5 sc (5)

Row 2-9 :

Turn, 1 chain, 5 sc (5)

Info :

Fasten the thread to one part and cut it off. On the second, make one chain, do not cut the thread. Fold the two pieces flat and crochet on three sides to connect them into one strong part.

Joining :

Crochet 1 sc in each stitch. In each corner, crochet in one loop (1 sc + 1 hdc + 1 sc). This is necessary so that the angle is more pronounced and does not twist. Fasten the thread at the end with a chain and cut off.

Info :

Make another one part of the same (total 2 finished tail fins).

β€” Wings :

Info :

Use Blue plush yarn. You also need to crochet 4 parts and then connect them two into one, just like the tail.

Foundation :

8 chains

Row 1 :

Starting from the second loop from the hook, crochet 7 sc (7)

Row 2-14 :

Turn, 1 chain, 7 sc (7)

Info :

Fasten the thread to one part and cut off. On the second, make one chain, do not cut the thread. Fold the two pieces flat and crochet on three sides.

Joining :

Crochet 1 sc in each stitch. In each corner, crochet in one loop (1 sc + 1 hdc + 1 sc). Fasten the thread at the end with a chain and cut off.

Info :

Make another one part of the same (total 2 finished wings).

β€” Engines (2 pcs) :

Info :

Use Plush yarn (milky color).

Round 1 :

5 sc in MR (5)

Round 2 :

2 sc, inc, 2 sc (6)

Round 3 :

inc, 5 sc (7)

Round 4 :

3 sc, inc, 3 sc (8)

Round 5 :

7 sc, inc (9)

Round 6 :

4 sc, inc, 4 sc (10)

Round 7-10 :

10 sc (10)

Info :

Fill the part with filler and add it during crocheting.

Round 11 :

8 sc, dec (9)

Round 12 :

7 sc, dec (8)

Round 13 :

6 sc, dec (7)

Round 14 :

5 sc, dec (6)

Round 15 :

4 sc, dec (5)

Info :

Fasten the thread with sl st and cut off. Hide the end of the thread inside the engine.

β€” Propeller Holder :

Info :

Use Cotton yarn or any other yarn of approximately the same yardage (50g/160m).

Round 1 :

5 sc in MR (5)

Round 2 :

4 sc, inc (6)

Round 3 :

5 sc, inc (7)

Round 4 :

6 sc, inc (8)

Round 5 :

(3 sc, inc) * 2 (10)

Round 6 :

(4 sc, inc) * 2 (12)

Round 7 :

(5 sc, inc) * 2 (14)

Info :

Fasten the thread with the sl st, leave a long end for sewing and cut off.

β€” Propellers (3 pcs) :

Info :

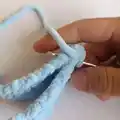
Made on the principle of crocheting a cord.

Step 1 :

First we leave the thread, about 60 cm (23 inches). Then fold it in half to form a thicker double thread.

Step 2 :

Make a chain, but not on the edge, but in the middle of the thread.

Step 3 :

We crochet each stitch according to this principle: There is a loop on the hook, we make the yarn over on the hook from the leaving thread, we crochet sc with a working thread through two loops.

Step 4 :

Then again we make a yarn over from the leaving thread and crochet sc. You need to make 9 such stitches.

Step 5 :

Then we fasten the thread and cut it off.

Assembly :

Place the parts of the propeller in correct position, pull the ends of the threads into the inside of the holder and tie each pair of threads into 2 knots. Cut off long tails, hide short tails inside holder.

β€” Windows :

Info :

Draw a template for windows (Central window 1 pc, side windows 2 pcs each) and cut them out of paper or cardboard. Take thin black or blue felt and cut out all the windows using templates.

Assembly Instructions

  • Find the center of the toy between the increments in the 11th row and follow it to position parts symmetrically.
  • Place the wings between rows 14 and 22 at a distance of 9 sc from the center of the toy (wings are 18 sc from each other); fix with pins and sew with strong thin thread.
  • Fasten the engines with pins at the ends of the wings and sew them around the perimeter with a thin thread matching the plush yarn.
  • Place the tail pieces about 4-5 rows from the edge of the fuselage at an angle to form a V shape, touching in the middle; sew securely.
  • Place the propeller at the center point of the front fuselage between rows 2 and 3; fasten with pins and sew around the entire circumference.
  • Place the windows so that there is approximately the same distance between them; the front window is above row 11. Sew or glue them in place.

Important Notes

  • πŸ’‘Use stitch markers to mark the start of each round, especially on the fuselage where counting is critical for symmetry.
  • πŸ’‘When joining the wing and tail parts, crocheting the perimeter adds stability so no wire or cardboard is needed inside.
  • πŸ’‘Hide all thread tails inside the toy by tying them into knots; this ensures parts are sewn securely and won't tear during play.
  • πŸ’‘If making for a small child, sew the felt windows on securely rather than using glue.

This plush Bonanza Beechcraft V-tail pattern brings the joy of aviation into the world of soft toys! With its huggable size and unique details like the V-tail and rotating prop look, it's sure to be a favorite. Whether for a pilot-in-training or a plane lover, this handmade gift will soar straight into their heart. ✈️🧢☁️

You ask,

we answer.

FAQs

What is the finished size of the plane?

The finished toy measures approximately 30 cm (11.8 inches) in both fuselage length and wing width when using the recommended plush yarn.

Do I need wire to make the wings stand up?

No, the pattern uses a technique where two flat crocheted pieces are joined together for the wings and tail, creating a sturdy double-layer structure that holds its shape without wire.

Can I use cotton yarn instead of plush yarn?

Yes, but the finished size will be significantly smaller. If you use thinner yarn, make sure to use a matching hook size (e.g., 2.5mm for cotton).

Is this pattern suitable for beginners?

This pattern is rated intermediate because it involves specific shaping techniques (triangle start), connecting parts, and detailed assembly, though the stitches used are basic.