🧢 Beautiful ✨ Detailed πŸ’ Adorable

Duck and Goose Trinket Tray + Pin Cushion Amigurumi Pattern

Duck and Goose Trinket Tray + Pin Cushion Amigurumi Pattern
4.3β˜… Rating
2-4 Hours Time Needed
3.9K Made This
βœ‚οΈ

Intermediate Level

Ideal for those with basic crochet experience, featuring slightly more advanced stitches and techniques to expand your skills.

⏱️

Bite-Sized Project

Finishes in 2-4 hoursβ€”perfect for an afternoon of creative relaxation.

🎁

Tiny Treasure

Small, sweet, and gift-worthy creations that fit perfectly in the palm of your hand with detailed charm.

About This Duck and Goose Trinket Tray + Pin Cushion Amigurumi Pattern

This pattern creates a sweet duck and goose set with a shallow trinket tray that can also be used as a pin cushion. The set is small, decorative, and perfect for gifting or desktop organization. You will work all pieces in continuous rounds using US terminology.

Duck and Goose Trinket Tray + Pin Cushion Amigurumi Pattern crochet pattern - detailed view of completed project

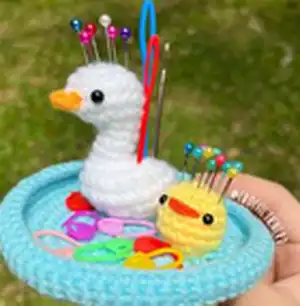
Includes complete rounds for the tray, goose body, goose beak, and mini ducky, plus clear assembly instructions. Suitable for stitch-savvy makers who enjoy quick, detailed projects.

Why You'll Love This Duck and Goose Trinket Tray + Pin Cushion Amigurumi Pattern

I absolutely love this pattern because it transforms simple stitches into a charming little scene that brightens any craft space. The tray provides both function and whimsy, while the tiny duck and goose bring personality with minimal sewing. I enjoy how quick it is to make β€” you can finish both characters and the tray in an afternoon. The pattern is flexible, letting me change colours and make sets for friends and craft fairs.

Duck and Goose Trinket Tray + Pin Cushion Amigurumi Pattern step 1 - construction progress Duck and Goose Trinket Tray + Pin Cushion Amigurumi Pattern step 2 - assembly progress Duck and Goose Trinket Tray + Pin Cushion Amigurumi Pattern step 3 - details and accessories Duck and Goose Trinket Tray + Pin Cushion Amigurumi Pattern step 4 - final assembly and finishing

Switch Things Up

I love customizing this pattern by changing yarn colors to match seasons or holidays; spring pastels or autumn tones give a whole new look.

Try using a bulkier yarn and a larger hook to make a chunky, more tactile tray and larger toys for a cuddly display.

I sometimes switch to finer yarn with a smaller hook to create a tiny keychain-sized version that fits perfectly on a bag.

Replace safety eyes with embroidered or felt eyes for a softer, child-friendly finish and a handmade look.

Embellish the tray rim with a decorative stitch or a contrasting colour round to make it pop visually and match your decor.

Make a themed set by changing beak colours, adding tiny crocheted scarves, or embroidering simple features to change personalities.

I often add a small felt or crocheted flower to the tray base to create a more decorative scene for gifting.

For a posable goose neck, carefully insert thin craft wire into the neck before stuffing to allow gentle posing while remaining safe if secured properly.

Change the number of rounds on the tray base to make a larger or smaller dish β€” just keep stitch counts balanced when increasing rounds.

Experiment with embroidery for eyelashes, freckles, or little smiles to give each character unique expressions and charm.

Combine multiple mini duckies in different colours on one tray for a playful, colorful display or use them as pincushions for different thread colours.

I often gift a set in a small box with coordinating ribbon β€” simple customizations make each project feel special and personal.

Common Mistakes & How to Fix Them

βœ— Forgetting to work in continuous rounds; switch to continuous rounds and do not slip stitch or chain 1 between rounds to maintain proper shaping. βœ— Placing safety eyes too high or too low; insert safety eyes between the rounds specified (goose rounds 4-5, duck rounds 3-4) and check placement before securing. βœ— Under-stuffing or over-stuffing the bodies resulting in poor shaping; stuff gradually while you shape and add small amounts to maintain a smooth form. βœ— Skipping stitch counts after increases or decreases causing uneven shaping; count your stitches at the end of each round to ensure you match the written totals.

Duck and Goose Trinket Tray + Pin Cushion Amigurumi Pattern

Make a charming duck and goose trinket tray that doubles as a pin cushion. This delightful little set is perfect for gifting or keeping on your craft table. Clear, step-by-step rounds and assembly instructions guide you through each small piece. You'll enjoy creating these tiny, lovable characters with simple shaping and minimal sewing.

Intermediate 2-4 Hours

Materials Needed for Duck and Goose Trinket Tray + Pin Cushion Amigurumi Pattern

β€” Main Fabric

  • 01
    Type 4 yarn (worsted/light aran) - Color A: base trinket color (blue)
  • 02
    Type 4 yarn (worsted/light aran) - Color B: goose color (white)
  • 03
    Type 4 yarn (worsted/light aran) - Color C: ducky color (yellow)
  • 04
    Type 4 yarn (worsted/light aran) - Color D: color of beak (orange)

β€” Tools Required

  • 01
    Crochet hook size 3.0mm
  • 02
    Type 4 yarn in required colors
  • 03
    Polyfill for stuffing
  • 04
    Darning needle
  • 05
    Scissors
  • 06
    4.0mm safety eyes OR black felt and fabric glue
  • 07
    Stitch markers (recommended)

Progress Tracker

0% Complete

β€” Base Trinket Tray :

Round 1 :

8 sc into mr (8)

Round 2 :

incr into every st (16)

Round 3 :

(1 sc, 1 incr) x8 (24)

Round 4 :

(2 sc, 1 incr) x8 (32)

Round 5 :

(3 sc, 1 incr) x8 (40)

Round 6 :

(4 sc, 1 incr) x8 (48)

Round 7 :

(5 sc, 1 incr) x8 (56)

Round 8 :

(6 sc, 1 incr) x8 (64)

Round 9 :

BLO sc into every st (64)

Round 10-12 :

sc into every st (64)

Info :

Slip stitch and fasten off, weave in the tail. The 'neater' side of the trinket should be facing the inside, so that the rims of the tray would naturally curve inwards. The base of your trinket dish is now complete.

β€” Goose Body :

Round 1 :

6 sc into mr (6)

Round 2 :

incr into every st (12)

Round 3 :

(1 sc, 1 incr) x6 (18)

Round 4-5 :

sc into every st (18)

Info :

You may now insert the safety eyes between rounds 4-5. The safety eyes should be placed along the side of the goose's head. Begin to stuff the goose's body. Continue stuffing as you decrease.

Round 6 :

3 sc, 6 decr, 3 sc (12)

Round 7 :

2 sc, 4 decr, 2 sc (8)

Round 8-10 :

sc into every st (8)

Round 11 :

2 incr, 4 sc, 2 incr (12)

Round 12 :

3 incr, 6 sc, 3 incr (18)

Round 13 :

4 incr, 11 sc, 3 incr (25)

Round 14 :

6 incr, 14 sc, 5 incr (36)

Round 15 :

sc into every st (36)

Round 16 :

12 sc, 6 decr, 12 sc (30)

Round 17 :

9 sc, 6 decr, 9 sc (24)

Round 18 :

6 sc, 6 decr, 6 sc (18)

Round 19 :

3 sc, 6 decr, 3 sc (12)

Info :

Fasten off, leaving a long tail for sewing. You may need to bend the neck of the goose to create a "2" shape.

β€” Goose Beak :

Row 1 :

ch 4 (4)

Row 2 :

sc in the second st from hook. Sc in the last two st (3)

Info :

Fasten off, leaving a tail for sewing.

β€” Mini Ducky :

Round 1 :

6 sc into mr (6)

Round 2 :

incr into every st (12)

Round 3 :

(3 sc, 1 incr) x3 (15)

Round 4-6 :

sc into every st (15)

Info :

You may now insert the safety eyes between rounds 3-4. Begin to stuff the duck's body. Continue stuffing as you decrease.

Round 7 :

1 sc, 7 dec (8)

Info :

Fasten off, leaving a long tail for sewing

β€” Assembly :

Info :

Sew the goose's beak between rounds 4-5 of the goose's head. Using the long tail of the goose body, sew the goose onto the base trinket dish at the position you'd like.

Info :

Using yarn color D, sew on a beak between rounds 3-4 of the ducky. Using the long tail of the duck's body, sew it onto the base trinket dish at the position you'd like.

Info :

Congrats !! Your duck and goose trinket tray is now complete :')

Assembly Instructions

  • Sew the goose's beak between rounds 4-5 of the goose's head using the tail from the beak piece and a darning needle.
  • Using the long tail from the goose body, position the goose on the base trinket dish and sew it securely to the tray at the desired position.
  • Sew the ducky's beak between rounds 3-4 of the mini ducky using yarn color D and secure with a few tight stitches.
  • Using the long tail from the mini ducky's body, sew the ducky onto the base trinket dish in the position you like and weave in the ends.
  • Ensure both figures are firmly attached and tuck any remaining tails into the bodies or tray, weaving them in neatly.

Important Notes

  • πŸ’‘This pattern is written in US terminology; follow US stitch names for consistency.
  • πŸ’‘Work in continuous rounds; there is no need to slip stitch and chain 1 at the end of every round.
  • πŸ’‘The number in parentheses at the end of each round indicates the total number of stitches for that round.
  • πŸ’‘Place safety eyes before closing the head openings and stuff gradually while shaping to achieve smooth results.

This sweet Duck and Goose Trinket Tray adds a playful touch to your sewing table or gift basket. 🧢 Make a matching set in different colours to brighten a friend’s day. 🎁 Perfect for quick handmade gifts and small decorative displays β€” enjoy stitching and gifting with a smile! ✨

You ask,

we answer.

FAQs

What size will the finished piece be?

The finished trinket tray with the duck and goose will be small, roughly palm-sized, when using type 4 yarn and a 3.0mm hook; exact size will vary with tension and yarn choice.

Can I use different yarn weights for this pattern?

Yes, you can use different yarn weights but this will affect the final size and stitch counts; choose an appropriate hook for your yarn and be prepared to adjust placement when assembling.

Do I need prior crochet experience for this pattern?

This pattern is rated intermediate so basic knowledge of single crochet, increases, decreases, and working in the round is recommended for best results.

How long does this project typically take to complete?

Most crocheters can complete the tray, duck, and goose in about 2-4 hours, though time may vary based on experience and customization.

Can I substitute safety eyes with embroidered eyes?

Yes, you can use embroidered eyes or felt glued with fabric glue instead of safety eyes, especially if making the toy for small children.