🧢 Beautiful ✨ Detailed πŸ’ Adorable

Bunny baby rattle with teether ring Amigurumi Pattern

Bunny baby rattle with teether ring Amigurumi Pattern
4.6β˜… Rating
2-4 Hours Time Needed
4.1K Made This
βœ‚οΈ

Beginner Friendly Level

Perfect for those just starting their crochet journey, with clear instructions and simple techniques

⏱️

Bite-Sized Project

Finishes in 2-4 hoursβ€”perfect for an afternoon of creative relaxation.

🧸

Cute Companion

An adorable friend to cherish, handcrafted with love to bring comfort and joy for years to come.

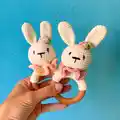
About This Bunny baby rattle with teether ring Amigurumi Pattern

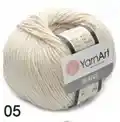
This pattern creates a charming bunny baby rattle with a wooden teether ring, perfect for gifting or keeping. It includes step-by-step written rounds, clear photos, and a linked video tutorial to walk you through the process. The design uses a sport/baby weight yarn and a small 2.00 mm hook to produce a firm, baby-safe finish.

Bunny baby rattle with teether ring Amigurumi Pattern crochet pattern - detailed view of completed project

You will crochet the head, two ears, a wrapped wooden ring body, a ruffled collar, and a small decorative flower. All pieces are sewn securely and the pattern includes safety reminders for making baby toys.

Why You'll Love This Bunny baby rattle with teether ring Amigurumi Pattern

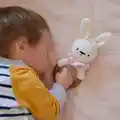
I absolutely love this pattern because it combines simple amigurumi shaping with a practical teether ring, creating something both pretty and useful. I enjoy how quick it is to make β€” you can finish one in an afternoon and gift it the same day. The pattern includes a video link and clear step-by-step photos which make the process relaxing and accessible. I also love the little finishing touches like the ruffled collar and tiny flower that bring so much personality to a small project. Making it feels rewarding and gives a handmade, safe toy perfect for little hands.

Bunny baby rattle with teether ring Amigurumi Pattern step 1 - construction progress Bunny baby rattle with teether ring Amigurumi Pattern step 2 - assembly progress Bunny baby rattle with teether ring Amigurumi Pattern step 3 - details and accessories Bunny baby rattle with teether ring Amigurumi Pattern step 4 - final assembly and finishing

Switch Things Up

I love how easily this pattern adapts to different colors: try soft pastels for a baby girl look or gender-neutral tones for a modern nursery.

To make a smaller or larger rattle, change your yarn weight and hook size; use a finer yarn and smaller hook for a mini keychain version or bulky yarn for a chunky lovey.

I often swap the wooden ring for painted or dyed rings to match a nursery palette, but always ensure the finish is baby-safe and non-toxic.

Try adding a loop and clip to attach the rattle to a stroller or car seat; use a securely sewn fabric or crocheted loop to keep it safe.

You can embroider different facial expressions to change the bunny’s personality β€” a smiling mouth, sleepy eyes, or surprised brows make big differences.

For texture play, use a fuzzy or boucle yarn just for the collar or flower while keeping the head and ears smooth for easier washing.

I sometimes add a small bell or extra rattle inside the head for more sound, but make sure it is well enclosed and tested for safety.

Make matching sets by crocheting several bunnies in alternating colors and grouping them on a ring for a playful gift set.

If you want a fully washable toy, use cotton yarn and replace the wooden ring with a washable plastic teether ring rated for babies.

I also enjoy personalizing the rattle with embroidered initials on the collar or a tiny crocheted bow to make each piece a special keepsake.

Common Mistakes & How to Fix Them

βœ— Skipping stitch counts during increases and decreases can easily throw off shaping; always count stitches at the end of each round to ensure accuracy. βœ— Not stuffing evenly in the head before inserting the rattle ball may cause lumps and misshapen features; stuff gradually and shape as you go for a smooth finish. βœ— Sewing parts loosely will make the toy unsafe for babies; sew all pieces tightly and weave in ends securely to prevent detachment. βœ— Using a looser gauge than recommended produces a floppy cover that won’t hug the wooden ring properly; check your gauge and use a 2.00 mm hook or smaller if needed.

Bunny baby rattle with teether ring Amigurumi Pattern

Make a sweet handmade bunny baby rattle with a wooden teether ring using this friendly amigurumi pattern. You will get clear, step-by-step instructions with pictures and a video link to guide you through head, ears, body, collar and floral decoration. This adorable toy is sized for little hands and finished for baby-safe play.

Beginner Friendly 2-4 Hours

Materials Needed for Bunny baby rattle with teether ring Amigurumi Pattern

β€” Main Fabric

  • 01
    Yarn Art Jeans (color 05) approx. 90 yards
  • 02
    Yarn Art Jeans (any color for decoration) approx. 5 yards
  • 03
    Suggested yarn: Sport/Baby weight (Fine, weight 2)

β€” Tools Required

  • 01
    Crochet hook 2.00 mm
  • 02
    6 cm / 2.5" diameter wooden ring
  • 03
    24 mm / 1" rattle ball
  • 04
    Fiberfill for stuffing
  • 05
    Sewing needle for assembly
  • 06
    Pins for positioning pieces
  • 07
    Scissors

Progress Tracker

0% Complete

β€” Head :

Info :

Crochet by spiral.

Rnd 1 :

6 sc in Magic ring [fig 1] (6)

Rnd 2 :

6 inc (12)

Rnd 3 :

(1 sc, inc) * 6 (18)

Rnd 4 :

(2 sc, inc) * 6 (24)

Rnd 5 :

(3 sc, inc) * 6 (30)

Rnd 6 :

(4 sc, inc) *6 [fig 2] (36)

Rnd 7 :

(5 sc, inc) * 6 (42)

Rnd 8 :

(6 sc, inc) * 6 (48)

Rnd 9-15 :

48 sc [fig 3]

Rnd 16 :

(6 sc, dec) * 6 (42)

Rnd 17 :

(5 sc, dec) * 6 (36)

Rnd 18 :

(4 sc, dec) * 6 (30)

Rnd 19 :

(3 sc, dec) * 6 (24)

Info :

Stuff the head firmly and insert the rattle ball [fig 4]

Rnd 20 :

(2 sc, dec) * 6 (18)

Rnd 21 :

(1 sc, dec) * 6 (12)

Rnd 22 :

(sc) * 6 (6)

Info :

Cut the yarn with long tail [fig 5].

β€” Ears :

Info :

Make 2. Crochet by spiral.

Rnd 1 :

6 sc in Magic ring (6)

Rnd 2 :

6 inc (12)

Rnd 3 :

(2 sc, inc) * 4 (16)

Rnd 4-11 :

16 sc

Rnd 12 :

(6 sc, dec) * 2 (14)

Rnd 13 :

14 sc

Rnd 14 :

(4 sc, dec) * 2 (12)

Rnd 15 :

12 sc

Rnd 16 :

(4 sc, dec) * 2 (10)

Info :

Cut the yarn with long tail approx. 15 cm /6" [fig 6]. Make the second ear.

β€” Body :

Info :

Working in rows. Start with foundation chain.

Info :

NOTE that you may need to increase or decrease the number of rows to match your wooden ring. It should `hug` wooden ring completely.

Info :

Chain 25.

Rows 1-9 :

24 sc, ch 1 and turn [fig 7]

Info :

Cut the yarn leaving a long tail for sewing. Wrap the ring and sew along [fig 8]

β€” Collar :

Info :

Working in rows. Using brown yarn.

Info :

Chain 20

Row 1 :

ch 2, 1 dc in the 20th ch, *2 dc in the next st* till the end, turn [fig 9]

Row 2 :

ch 2, *2 dc in the next st* till the end.

Info :

Cut the yarn leaving a long tail for sewing [fig 10]

β€” Assembling :

Info :

5 ASSEMBLING

Step 1 :

Attach the head to the middle of the body. And sew it, firmly as you can, so it doesn't move when shaking [fig 11]

Step 2 :

Fold the ears in half lengthwise so that a dimple forms at the base. Sew the ears between round 4 and 5. Use the sewing pins to place and fixate the ears. [fig 12]

Step 3 :

Place the collar between the body and head and sew the ends together into a ring. To prevent it from dangling, sew it to the head in several places [fig 13,14].

Step 4 :

Take black yarn and embroider the nose and eyes. Please, refer to the pictures! [fig 15]

Info :

Between the 11th and 12th rows embroider the horizontal line of the nose (the width of the nose is about 4 sc). From the middle down, embroider the nose with a vertical line in 2 rows.

Info :

Embroider the eyes at a distance of 2 sc in the direction of the horizontal line of the nose.

Info :

Make sure the muzzle is symmetrical ☺

β€” Flower :

Info :

Add some personality to your toy. Complete it with a bow or decorate it with a flower.

Info :

Chain 10 [fig 17].

Row 1 :

ch 1, 4 sc in one ch, sl-st, 4 hdc in one ch, sl-st, 4 dc in one ch, sl-st, change color of the yarn: (1 hdc, 2 dc, 2 trc, 2 dc, 1 hdc) in one ch, sl-st, (1 hdc, 2 dc, 2 tr, 2 dc, 1 hdc) in one ch.

Info :

Cut the yarn. Roll up and give the shape of a flower [fig 18-19]. Sew tightly.

Info :

Please sew all pieces tightly because a baby will play with it! Do not leave toys unattended in the crib!

Assembly Instructions

  • Attach the head to the middle of the wrapped wooden ring body and sew it firmly so it doesn’t move when shaking (see fig 11).
  • Fold each ear lengthwise to create a dimple at the base and sew the ears between rounds 4 and 5; use pins to position and secure before stitching (see fig 12).
  • Wrap the crocheted body panel around the wooden ring and sew the edges together, then position the collar between body and head and sew the collar ends together into a ring and tack in several places to prevent dangling (see figs 8,13,14).
  • Embroider the facial features with black yarn between rows 11 and 12 for the horizontal nose line, then add a vertical nose line downwards for two rows and place the eyes 2 sc to either side of the nose; ensure symmetry (see fig 15).
  • Sew the flower or bow decoration tightly to the head or ear, and weave in and secure all yarn tails so no loose ends remain for safety.

Important Notes

  • πŸ’‘Use a 2.00 mm hook to reach the correct gauge; check gauge before starting to ensure the cover hugs the wooden ring properly.
  • πŸ’‘Stuff the head firmly but evenly and insert the rattle ball securely to prevent shifting inside the head.
  • πŸ’‘Sew all parts tightly and weave in ends thoroughly since this toy is intended for babies; do not leave toys unattended in a crib.
  • πŸ’‘If your wrapped body panel is too loose or tight, adjust the number of foundation chains or number of rows to fit the wooden ring snugly.

This bunny baby rattle pattern gives you a sweet, handmade toy perfect for little hands and teething gums. Make one for a new baby, a baby shower gift, or a quick market item that feels special and safe. Sew everything tightly and enjoy adding your own color palette and tiny details to make each bunny unique. 🧢✨🧡

You ask,

we answer.

FAQs

What size will the finished piece be?

The rattle diameter is approximately 2 1/2" (6 cm) and the total height with the ring is about 5 1/2" (14 cm) when using the suggested yarn and hook size.

Can I use different yarn weights for this pattern?

Yes, but different yarn weights will change the final size; if you choose a bulkier yarn you'll need a larger hook and may need to adjust stitch and row counts to maintain the wooden ring fit.

Do I need prior crochet experience for this pattern?

This pattern is beginner friendly (advanced beginner); basic crochet stitches like sc, inc, dec and working in spirals and rows are used, and the photo tutorial and video link will help guide you.

How long does this project typically take to complete?

Most crocheters finish this pattern in 2-4 hours, depending on experience and how much time you spend on embellishments and assembly.