🧶 Beautiful ✨ Detailed 💝 Adorable

Revisto Basket Pattern

Revisto Basket Pattern
4.8★ Rating
2-4 Hours Time Needed
3.1K Made This
✂️

Beginner Friendly Level

Perfect for those just starting their crochet journey, with clear instructions and simple techniques

⏱️

Bite-Sized Project

Finishes in 2-4 hours—perfect for an afternoon of creative relaxation.

🏡

Cozy Accent

A warm touch for your space that transforms ordinary corners into inviting nooks filled with handmade charm.

About This Revisto Basket Pattern

This pattern teaches you how to crochet the Revisto Basket using Hoooked Zpagetti T-yarn. You will create a firm oval base, build up the sides with textured rows and finish integrated handles for a clean professional look. The instructions are clear and include stitch notes to help you get even tension and a neat edge.

Revisto Basket Pattern crochet pattern - detailed view of completed project

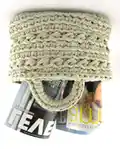
Perfect for storing magazines, yarn, toys or household items, this pattern is both practical and decorative. The recycled Zpagetti yarn makes a chunky, durable basket with a beautiful textured finish.

Why You'll Love This Revisto Basket Pattern

I absolutely love this pattern because it turns a recycled textile yarn into a beautiful and useful home item that you can finish in just a few hours. I enjoy the simple rhythmic stitching that quickly builds a sturdy shape while remaining relaxing to crochet. The decorative skipped-stitch row adds an elegant touch without complicated techniques, so the result looks special even with basic stitches. I also appreciate that the pattern uses one spool of Zpagetti yarn and a large hook, which makes the work quick and satisfying to see grow.

Revisto Basket Pattern step 1 - construction progress Revisto Basket Pattern step 2 - assembly progress Revisto Basket Pattern step 3 - details and accessories Revisto Basket Pattern step 4 - final assembly and finishing

Switch Things Up

I love how easy it is to customize this basket by changing colors; switch to a striped effect by alternating two contrasting Zpagetti colors every two rounds.

I sometimes make the basket larger by starting with a longer initial chain and adding more increase rounds to expand the base size proportionally.

I also experiment with different yarn weights and hooks — using a bulkier textile cord with a larger hook gives a stiffer, larger basket while thinner cords create smaller, more flexible versions.

I often line the basket with fabric for a cleaner interior finish; sew a simple cloth liner and attach it inside with small stitches or fabric adhesive.

I add trims like a crocheted scalloped edge or embroidered initials to personalize baskets as gifts, which makes each piece unique and special.

I sometimes add a non-slip base by gluing a cut piece of felt to the underside so the basket sits stable on hard floors.

I enjoy experimenting with handle styles — try a single wide strap, two smaller loops, or reinforced handles with an extra row of stitching for durability.

I recommend trying different skipped-stitch patterns for the decorative row to create alternate textures; vary the skip length for a different lace effect.

I also use this pattern as a base for coordinating sets — make several baskets in graduated sizes to nest or stack for practical storage solutions.

I find that finishing by weaving ends neatly on the inside and blocking lightly keeps the basket shape crisp; reshape while damp if necessary.

Common Mistakes & How to Fix Them

✗ Skipping the increases on the base corners will make your basket base not flatten correctly; follow the instruction to increase 2 stitches at each side for four full rounds so the bottom reaches approximately 28 cm by 15 cm. ✗ Crocheting through both loops when the instruction says to work in the back loop causes the edge not to rise; remember to insert your hook only in the back loop for the two rows up to create the upright edge. ✗ Not creating the three double crochets in the last chain stitch when starting can leave a noticeable gap at the chain turnaround; make sure to place 3 double crochets in the last stitch so you automatically continue on the other side. ✗ Forgetting to fasten and secure loose threads inside the basket can cause ends to show later; weave in and secure all loose threads neatly on the inside before finishing. ✗ Using inconsistent tension across rounds causes uneven sides and a wobbly basket; maintain even tension and check dimensions frequently to reach the recommended 28 cm x 15 cm base size. ✗ Skipping the decorative skipped-stitch row or doing it incorrectly will alter the look of the top edge; follow the exact skip-and-insert sequence every stitch to achieve the intended decorative border.

Revisto Basket Pattern

Make a stylish, sturdy storage basket using Hoooked Zpagetti T-yarn. This pattern guides you step-by-step through creating a firm base, rising sides and integrated handles so you can craft a practical home accent. Ideal for beginners and crafters who love quick, satisfying projects that transform scrap textiles into useful storage.

Beginner Friendly 2-4 Hours

Materials Needed for Revisto Basket Pattern

— Main Fabric

  • 01
    Hoooked Zpagetti T-yarn (recycled textile yarn), approximately 120 m per spool (one spool used for sample)
  • 02
    Color shown: Natural beige/taupe, approximately 120 m (1 spool)
  • 03
    Zpagetti textile yarn - recycled remnant fabric strands selected and processed in Portugal

— Tools Required

  • 01
    Crochet hook 12 mm (US 16 equivalent)
  • 02
    Slip knot to start
  • 03
    Scissors (for cutting yarn)
  • 04
    Yarn needle (for securing loose ends)

Progress Tracker

0% Complete

— English :

Used stitches :

ch = chain ss = slip stitch dc = double crochet tr = trebles

Info :

Our original Zpagetti T-yarn is handpicked and selected by our own production centre in Portugal. Hoooked Zpagetti textile yarn is fully recycled and made of superior remnants from the European fashion industry and can be washed in the machine on cold temperatures. An important quality of Hoooked Zpagetti is the varying thickness and texture of the threads, that is why it is important to keep measuring the dimensions and the shape of the work for each pattern.

Step 1 :

The bottom of the basket Start by making a slip knot and then crochet 10 chain stitches. Crochet your first row in the chain with double crochets (insert through both loops to create a firm bottom). Create 3 double crochets in the last stitch, by doing so you automatically will get to the other side of the chain. Continue creating double crochets on the other side of the chain. The example is shown in the scheme below. Crochet 4 complete rounds, whereas at each side you continue to increase with 2 stitches. Stop when you reach a length of approximately 28 cm/11 inches and a width of 15cm/5.9 inches. This is the bottom of your basket.

Step 2 :

Two rows up At this point start to crochet 2 rows without increasing. By doing this the edge will rise. Insert your crochet hook only in the back loop instead of both loops.

Step 3 :

A row of skipping and inserting back in the skipped stitch In the third row you create a double crochet in the first stitch, skip one stitch then create a double crochet in the third stitch. Insert back into the second stitch (where an opening is created by the stitch you just skipped) and create a double crochet. Now create a double crochet in the fifth stitch (the fourth stitch is skipped). Now create a double crochet in the fourth stitch (the one you just skipped). Crochet in the seventh stitch (skip the sixth) and so on. Continue this method of skipping and inserting back in the skipped stitch the whole row. This will give a nice decorative edge to the basket.

Step 4 :

And further up Again create 2 rows with double crochets, a row with skipped stitches and inserting back in the skipped stitch, and again 2 rows of double crochets. You have reached a height of approximately 18 cm/7.1 inches.

Step 5 :

The handles In the final round you create a row of single crochets, but in the middle of the row you create a hole by skipping 6 stitches, crochet 16 chain stitches and fasten with a single crochet in the seventh stitch, counted from the beginning of the chain. Repeat with the single crochet and make another hole on the other side of the basket. Create a final row with single crochet, but on the chain stitches of the previous round (the handles) you use double crochets. Fasten off and secure the loose threads on the inside. Done!

Info :

In this table you will find conversion from UK to US crochet terminology: UK = US Double crochet = Single crochet Treble crochet = Double crochet 12 mm crochet hook = 16 crochet hook 60 cm = 23.62 inch

— Dutch :

Gebruikte steken :

l = losse hv = halve vaste v = vaste st = stokjes

Info :

De belangrijkste eigenschap van Hoooked Zpagetti is dat de dikte en de textuur van de draad varieert. Daarom is het van belang bij elk patroon goed te blijven kijken naar de afmetingen en de vorm van de creatie. Het aantal steken per toer is geen vast aantal maar dient bepaald te worden afhankelijk van de gewenste afmetingen van het eindresultaat. Alle Zpagetti Textielgarens zijn gerecyled en gemaakt van superieure restmaterialen uit de Europese fashionindustrie, die door ons eigen productiebcentrum in Portugal worden geselecteerd en verwerkt. Wasbaar in de machine op koudstand.

Stap 1 :

De bodem van de tas Maak een opzetlus en haak een ketting op van 10 lossen. Haak in de ketting je eerste toer met de vaste steek (steek door beide lussen voor een stevige bodem) haak 3 vaste in de laatste steek, zodat je automatisch aan de andere zijde van de ketting geraakt. Haak nu door aan de andere zijde van de ketting met lossen. Dit is schematisch weergegeven met onderstaande afbeeldingen. Haak nu 4 keer helemaal rondom, waarbij je steeds met twee steken meert aan de zijkanten. Stop als je een lengte hebt van ongeveer 28 cm en een breedte van circa 15 cm. Dit is de bodem van je tas.

Stap 2 :

Twee toeren omhoog Haak nu twee toeren omhoog zonder te meerderen. Hierdoor gaat de rand omhoog. Je haakt steeds door de achterste lus in plaats van door beide lussen.

Stap 3 :

Een toer terugsteken In de derde toer maak je een vaste, dan sla je een steek over en maak je een vaste in de derde steek. Dan steek je terug in de tweede steek (waar de opening is gecreeerd doordat je de steek hebt overgeslagen). Haak vervolgens een vaste in de vijfde steek (je laat de vierde dus weer over) en je haakt daarna in de vierde steek (die je zojuist hebt overgeslagen). Haak dan in de zevende steek (sla de 6e over) etc. etc. Haak op deze wijze door steeds over te slaan en terug te steken de hele toer rond. Deze werkwijze geeft een mooi decoratieve rand in de mand.

Stap 4 :

Verder omhoog Haak wederom twee toeren vasten, een toer met terugsteken en weer twee toeren met de vaste steek. Je hebt nu een hoogte bereikt van circa 18 centimeter.

Stap 5 :

De hengsels In de laatste ronde haak je een toer halve vaste in het midden van de toer haak je een uitsparing door 6 steken over te slaan en 16 lossen te haken, voor je vastzet in de 7e steek vanaf het begin van de ketting. Dit herhaal je aan de andere zijde van de mand. Haak nog een toer met de halve vaste steek waarbij je de uitsparingen (de hengsels) nog eens omhaakt met de vaste steek. Hecht af en werk alle draden weg aan de binnenzijde.. Klaar...

— German :

Index :

Luftmaschenanschlag Luftmasche (Lftm) Kettmasche (Km) feste Masche (fM) Stäbchen (Stb)

Info :

Die wichtigste Eigenschaft von Hoooked Zpagetti ist die unterschiedliche Stärke und der Durchmesser des Garnes. Deshalb ist es wichtig, die Größe und Form der gehäkelten Arbeit für jede Anleitung zu prüfen. Zpagetti Textilgarn ist recycelt von europäischen Textilien in unserem eigenen Produktionszentrum in Portugal. Waschanleitung: Kaltwäsche mit ähnlichen Farben.

Schritt 1 :

Boden des Korbes Häkele eine Anfangsschlinge und dann eine Kette von 10 Luftmaschen. Häkeln Sie in dieser Kette die erste Reihe mit festen Maschen (durch beiden Faden stechen für einen festen Boden) häkle 3 feste Maschen in der letzten Masche so dass Sie automatisch an der anderen Seite der Kette kommen. Häkle jetzt weiter mit Luftmaschen an der anderen Seite der Kette. Siehe das Schema hierunter. Häkle jetzt 4 Mal rundum, wobei Sie immer zwei Maschen zunehmen an den Seiten. Höre auf wenn eine Länge von ungefähr 28 cm und eine Breite von ca. 15 cm erreicht worden ist. Sie haben dann den Boden fertig.

Schritt 2 :

Zwei Reihen hoch Häkle jetzt zwei Reihen hoch ohne zu zu nehmen. Hierdurch geht der Rand in der Höhe. Häkle immer durch die hintere Masche und nicht durch beiden Maschen.

Schritt 3 :

Eine zurücksteken In der dritten Reihe häkeln Sie: eine feste Masche, überschlage dann eine Masche und häkle eine feste Masche in der dritten Maschen. Dann stechen Sie zurück in der zweiten Masche (wo Sie eine Öffnung kreiert haben weil eine Masche übershlagen worden ist). Häkle darauf eine feste Masche in der fünften Masche (überschlage die vierte Masche) und häkle danach in der vierten Masche (die Sie gerade überschlagen haben). Häkle dann in der siebte Masche (überschlagen Sie Masche sechs) etc. etc. Häkla so (überschlagen und zurück stechen) die komplette Reihe rund. So kriegt Ihrer Korb einen schönen dekorativen Rand.

Schritt 4 :

Weiter hoch Häkle wieder zwei Reihen Kettmaschen, eine Reihe mit zurücksteken/überschlagen und wieder zwei Reihen mit festen Maschen. Bis zu einer Höhe von ca. 18 Zentimeter.

Schritt 5 :

Henkel In der letzten Reihe häkeln Sie eine Reihe Kettmaschen. In die Mitte der Reihe häkeln Sie eine Öffnung durch 6 Maschen zu überschlagen und 16 Luftmaschen zu häkeln. Die Kette von 16 Luftmaschen befestigen Sie in der 7. Masche vom Anfang der Kette. Wiederholen Sie dies an der anderen Seite des Korbes. Häklen Sie noch eine Reihe Kettmaschen wobei Sie die Henkel des Korbes noch mal komplett umhäkeln mit festen Maschen. Ketten Sie alle Faden schön ab und verarbeiten Sie den Faden an der Innenseite... Fertig!

Assembly Instructions

  • Create the bottom as instructed and verify it measures approximately 28 cm long and 15 cm wide before building up the sides to ensure proper shape.
  • When making the handles, skip 6 stitches and chain 16, then fasten with a single crochet in the 7th stitch from the chain beginning; repeat exactly on the opposite side and then rework the handle openings with single crochet.
  • After finishing the final row (use double crochets on the chain handle stitches), fasten off and weave in and secure all loose ends on the inside of the basket neatly.
  • Pin or shape the basket as needed while finishing the top edge so the handles sit evenly and the decorative skipped-stitch row appears consistent around the rim.
  • If you plan to machine wash, follow the yarn instructions: wash on cold with similar colors and reshape while damp for best results.

Important Notes

  • 💡Work the initial chain first row through both loops to create a firm, stable base for the basket.
  • 💡For the two rows that make the edge rise, insert your hook only in the back loop to create the upright edge.
  • 💡Measure as you go to reach approximately 28 cm length and 15 cm width for the base before continuing with side rows.
  • 💡Zpagetti yarn is washable on cold temperatures; follow care instructions and reshaping recommendations after washing.

This Revisto Basket pattern turns recycled Zpagetti T-yarn into a stylish and sturdy storage solution you can finish quickly.🧶 The chunky texture and practical handles make it a perfect addition to any room for magazines, yarn or toys.🧺 Enjoy making something beautiful and useful from recycled textiles — happy crocheting!✨

You ask,

we answer.

FAQs

What size will the finished piece be?

The finished basket measures approximately 28 cm long by 15 cm wide at the base and about 18 cm tall when following the pattern and using the recommended hook and yarn.

Can I use different yarn weights for this pattern?

Yes, you can use different yarn weights, but the final size and texture will change; if you use thicker or thinner yarn, adjust your hook size and check dimensions frequently.

Do I need prior crochet experience for this pattern?

This pattern is rated beginner friendly, so basic crochet skills such as chain, double crochet and working in back loops are sufficient to complete the basket.

How long does this project typically take to complete?

Most makers finish this basket in 2-4 hours, though time may vary depending on experience level and working pace.