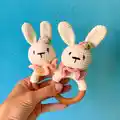
About This Bunny baby rattle with teether ring Amigurumi Pattern
This pattern guides you through making a sweet bunny baby rattle with a wooden teether ring and embroidered face. It includes clear step-by-step rounds, photos and a helpful abbreviation chart so you can follow along easily. The pieces are sewn tightly and designed for little hands to hold and explore.

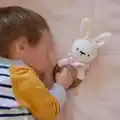
Perfect as a handmade gift or a quick shop item, the rattle combines wooden and yarn textures. Safety tips and assembly instructions are provided to ensure a secure finished toy.
Why You'll Love This Bunny baby rattle with teether ring Amigurumi Pattern
I absolutely love this pattern because it combines simple amigurumi techniques with a practical teether ring, making it both adorable and functional. I enjoy how quickly the pieces come together, so you can finish a sweet handmade gift in an afternoon. The wooden ring adds a lovely natural texture that babies love to hold and chew. I also love the small decorative flower and ruffled collar — they let you add charming color accents and personalize each rattle.
Switch Things Up
I love customizing this bunny by changing the collar and flower colors to match nursery themes; pastel shades give a soft vintage look while bright colors make a playful toy.
I sometimes make minis by using a thinner yarn and a smaller ring, or go chunkier using bulky yarn and a larger ring for an oversized cuddly feel.
I often replace the wooden ring with a silicone teether ring that is baby-safe and chewable for teething infants.
I will occasionally embroider eyelashes or a small smile to change the bunny's expression and personality; tiny changes in the eye placement alter the look dramatically.
I like adding a loop so the rattle can be attached to a stroller or car seat with a clip for on-the-go use.
For market pieces I use neutral colorways and natural wooden rings which appeal to many buyers; for personal gifts I match clothing or nursery decor.
I sometimes crochet a tiny removable scarf or hat for seasonal versions, which makes the rattle feel more like a collectible character.
To make a set, I change only the collar and flower color while keeping the head color consistent, creating a coordinated group of rattles.
I recommend reinforcing sewn areas with a second pass of stitches when making items for babies to ensure longevity and safety.
Experiment with textured stitches for the collar or different flower patterns to give each bunny its own charm and tactile interest.
Common Mistakes & How to Fix Them
✗ Skipping the gauge check can dramatically change the final size of the rattle; measure your gauge and adjust hook size so the head and body fit the wooden ring correctly.
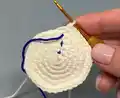
✗ Not stuffing the head firmly enough will cause the head to collapse or feel floppy; stuff gradually and firmly around the rattle ball so the shape remains smooth.
✗ Sewing parts loosely can result in pieces detaching during play; sew the head, ears and collar tightly with strong yarn and secure knots to keep everything fastened.
✗ Placing the ears asymmetrically will make the face look uneven; use pins to position and check symmetry between rounds 4 and 5 before sewing.