🧢 Beautiful ✨ Detailed πŸ’ Adorable

Iris Doll Amigurumi Pattern

Iris Doll Amigurumi Pattern
4.3β˜… Rating
8-10 Hours Time Needed
4.0K Made This
βœ‚οΈ

Intermediate Level

Ideal for those with basic crochet experience, featuring slightly more advanced stitches and techniques to expand your skills.

⏱️

All-Day Adventure

Requires 8-10 hours, ideal for a full day of immersive crocheting.

🧸

Cute Companion

An adorable friend to cherish, handcrafted with love to bring comfort and joy for years to come.

About This Iris Doll Amigurumi Pattern

This pattern teaches you how to crochet Iris Doll, a 29 cm amigurumi with a detailed wig, dress skirt and decorative leaves. It includes complete round-by-round instructions for each piece and helpful assembly notes to make finishing easy. The doll uses small hooks and thin yarns for fine detail and a delicate finish.

Iris Doll Amigurumi Pattern crochet pattern - detailed view of completed project

You will find materials, abbreviations, and step-by-step rounds for head, body, arms, legs, wig, skirt and leaves. The pattern also explains where to attach pieces and how to embroider facial details.

Why You'll Love This Iris Doll Amigurumi Pattern

I absolutely love this pattern because it balances charming detail with clear, methodical instructions that guide you step-by-step. I enjoy the wig technique β€” it creates beautiful textured hair that gives the doll great character. The decorative leaves and skirt let you add a botanical, whimsical touch that makes Iris feel special. Working with wire inside the body and limbs gives the finished doll a nice poseable quality that I find very satisfying.

Iris Doll Amigurumi Pattern step 1 - construction progress Iris Doll Amigurumi Pattern step 2 - assembly progress Iris Doll Amigurumi Pattern step 3 - details and accessories Iris Doll Amigurumi Pattern step 4 - final assembly and finishing

Switch Things Up

I love how easy it is to customize Iris Doll by changing yarn colors; try pastel shades for a softer fairy look or jewel tones for dramatic contrast.

To make a mini keychain version, use thinner thread and a smaller hook and reduce rounds proportionally for a tiny, pocket-size Iris.

I sometimes add little felt accessories like a tiny flower crown or mini bag to give the doll extra personality and charm.

If you want a different hair style, try straight hair by making longer strands and leaving them uncurled, or braid several strands together for pigtails.

For a poseable figure, insert sturdier wire in the limbs and use it to adjust arm and leg positions for display or play.

Swap the leaves for tiny crocheted flowers or hearts to match different themes or seasonsβ€”these simple swaps change the doll's whole feel.

I recommend using embroidery to vary facial expressions; raising or lowering the eyebrows and changing mouth shape creates different moods.

Try adding tiny buttons, ribbon bows, or beads to the skirt edge for delicate embellishments and a unique finishing touch.

If you prefer a soft cuddly doll, choose slightly bulkier yarn and a larger hook; for a detailed collectible, use fine yarn and maintain tighter tension.

I often make a set of outfits (a removable dress, a jacket, or tiny shoes) so the doll can be customized and dressed up for different occasions.

Common Mistakes & How to Fix Them

βœ— Not using the recommended small hooks causes loose stitches and a floppy doll; use 1.50 mm for body and 1.75 mm for wig as indicated to maintain correct size and detail. βœ— Skipping stitch counts during increases and decreases leads to uneven shaping; count stitches at the end of each round and mark your start stitch with a stitch marker. βœ— Understuffing or overstuffing limbs and head creates misshapen pieces; stuff gradually, shaping as you go to achieve smooth contours and consistent firmness. βœ— Forgetting to leave long yarn tails for sewing makes finishing awkward; always leave long tails when the pattern instructs to sew parts together securely. βœ— Placing safety eyes without checking spacing can distort facial placement; insert safety eyes between rounds 19 and 20 and leave about 10 single crochet between them for the correct look.

Iris Doll Amigurumi Pattern

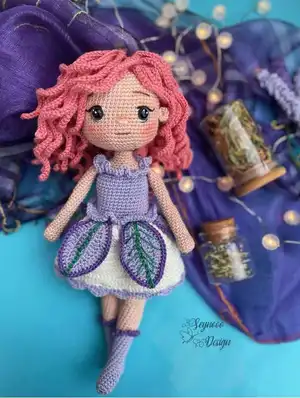
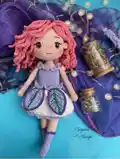
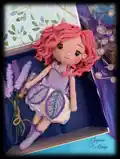
Make your own Iris Doll with this detailed crochet pattern. You will work through clear step-by-step rounds for the head, body, arms, legs, wig, skirt and decorative leaves. The pattern includes materials, tools, abbreviations and assembly tips so you can finish a beautiful 29 cm doll. Warm, playful and full of small details to personalize as you go.

Intermediate 8-10 Hours

Materials Needed for Iris Doll Amigurumi Pattern

β€” Main Fabric

  • 01
    Etrofil Gurme nude colour 72040 (skin tone) - small amount for head, arms and legs
  • 02
    Alize Diva white 62 - skirt and underwear details (small amount)
  • 03
    Alize Diva purple 622 - bodice and skirt edge (small amount)
  • 04
    Alize Diva lilac 158 - legs and accents (small amount)
  • 05
    Yarnart Jeans pink 20 - hair/wig (one skein or enough for wig and strands)
  • 06
    Small amount of green yarn for leaf embroidery
  • 07
    Small amounts of white, brown and black thread for face embroidery
  • 08
    Fiberfill stuffing - enough to firmly fill head, body and limbs
  • 09
    Wire for body & neck part (about 40 cm long)
  • 10
    8 mm blue safety eyes (2 pieces)

β€” Tools Required

  • 01
    Crochet hook size 1.50 mm (for body, limbs, head, skirt and small details)
  • 02
    Crochet hook size 1.75 mm (for wig/hair)
  • 03
    8 mm safety eyes (2 pieces)
  • 04
    Scissors
  • 05
    Tapestry/yarn needle for sewing pieces and embroidery
  • 06
    Stitch markers
  • 07
    Polyester stuffing (fiberfill)
  • 08
    Thin wire for posable body and neck (about 40 cm)
  • 09
    Embroidery needle
  • 10
    Pins for positioning parts while sewing

Progress Tracker

0% Complete

β€” Info :

Info :

Use 1.50 mm crochet hook while crocheting the doll except hair/wig. (according to the recommended yarns)

β€” Arms :

Info :

*** Stuff the arms very slightly.You can insert wire inside the arms.

Round 1 :

6 sc in mr with nude colour yarn (6)

Round 2 :

6 inc (12)

Round 3-5 :

12 sc (3 rows) (12)

Round 6 :

2*(4 sc, dec) (10)

Round 7-33 :

10 sc (27 rows) (10)

Info :

*** Cut your yarn and fasten off.

β€” Legs :

Info :

*** You can insert wire inside the legs. Stuff the legs firmly as you go. The places of increases and decreases are indicated.

Round 1 :

6 sc in mr with lilac colour yarn (6)

Round 2 :

6 inc (12)

Round 3-7 :

12 sc (5 rows) (12)

Round 8 :

For the heel ch 1 and turn, only crochet 5 sc

Round 9 :

Ch 1 and turn, 5 sc

Round 10 :

12 sc (heel 5 sc + foot 7 sc) (12)

Round 11-12 :

12 sc (2 rows) (12)

Round 13 :

1 dec (side), 4 sc, 1 dec (side), 4 sc (10)

Round 14 :

10 sc (10)

Round 15 :

2 sc, inc (back/middle), 7 sc (11)

Round 16 :

11 sc (11)

Round 17 :

3 sc, inc (back/middle), 7 sc (12)

Round 18 :

12 sc (12)

Round 19 :

4 sc, inc (back/middle), 7 sc (13)

Round 20 :

13 sc (13)

Round 21 :

5 sc, inc (back/middle), 7 sc (14)

Round 22 :

14 sc (14)

Round 23 :

6 sc, inc (back/middle), 7 sc (15)

Round 24 :

BLO 15 sc with nude colour yarn (15)

Round 25 :

7 sc, inc (back/middle), 7 sc (16)

Round 26-34 :

16 sc (9 rows) (16)

Round 35 :

4 inc (front/knee), 12 sc (20)

Round 36 :

20 sc (20)

Round 37 :

12 sc, 2 dec (back/middle), 4 sc (18)

Round 38-54 :

18 sc (17 rows) (18)

Round 55 :

Crochet only 5 sc and finish the first leg (inside/middle)

Info :

*** You've finished the first leg. Cut your yarn and fasten off. Crochet the second leg in the same way and continue to body.

Info :

*** Attach your purple yarn to the 24th row of the legs and crochet 15*(ch 4, slst to the next st). Complete the row.

β€” Body :

Info :

*** Stuff the body firmly while crocheting. Place the wire inside body & neck part.

Round 1 :

Ch 3 and join two legs with white yarn. (Your joining stitch should be on the back side of the doll) 18 sc from lef leg, 3 sc on ch 3, 18 sc from right leg, 3 sc on ch 3 (42)

Round 2 :

42 sc (42)

Round 3 :

BLO 6*(6 sc, inc) (48)

Round 4-9 :

48 sc (6 rows) (48)

Round 10 :

6*(6 sc, dec) (42)

Round 11-12 :

42 sc (2 rows) (42)

Round 13 :

BLO 42 sc (42)

Round 14 :

6*(5 sc, dec) with lilac yarn (36)

Round 15 :

BLO 36 sc (36)

Round 16-25 :

36 sc (10 rows) (36)

Info :

*** After this row, continue crocheting by joining arms to the body.

Round 26 :

10 sc from body, 5 sc arm+body (together), 13 sc body, 5 sc arm+body (together), 3 sc body (36)

Round 27 :

10 sc body, 5 sc only arm, 13 sc body, 5 sc only arm, 3 sc body (36)

Round 28 :

BLO 6*(4 sc, dec) with nude colour yarn (30)

Round 29 :

6*(3 sc, dec) (24)

Round 30 :

6*(2 sc, dec) (18)

Round 31 :

3*(4 sc, dec) (15)

Round 32-34 :

15 sc (3 rows) (15)

Info :

*** You've finished the body. Leave enough long yarn tail to sew and fasten off.

Info :

*** Attach your white yarn to the 3rd row of the body and crochet 48*(ch 4, 1 slst to the next st). Complete underwear details.

β€” Head :

Info :

*** Insert the safety eyes between round 19 and 20 leaving a space of 10 sc between them. Stuff the head firmly as you go.

Round 1 :

6 sc in mr with nude colour yarn (6)

Round 2 :

6 inc (12)

Round 3 :

6*(sc, inc) (18)

Round 4 :

6*(2 sc, inc) (24)

Round 5 :

6*(3 sc, inc) (30)

Round 6 :

6*(4 sc, inc) (36)

Round 7 :

6*(5 sc, inc) (42)

Round 8 :

6*(6 sc, inc) (48)

Round 9 :

6*(7 sc, inc) (54)

Round 10 :

6*(8 sc, inc) (60)

Round 11-21 :

60 sc (11 rows) (60)

Round 22 :

4*(14 sc, inc) (64)

Round 23-26 :

64 sc (4 rows) (64)

Round 27 :

8*(6 sc, dec) (56)

Round 28 :

8*(5 sc, dec) (48)

Round 29 :

8*(4 sc, dec) (40)

Round 30 :

8*(3 sc, dec) (32)

Round 31 :

8*(2 sc, dec) (24)

Round 32 :

6*(2 sc, dec) (18)

Round 33 :

3*(4 sc, dec) (15)

Info :

*** Leave enough long yarn tail to sew.

Info :

*** Embroider the eyebrows and eyelash with brown and black embroidery thread. Embroider nose in the middle of the eyes with nude colour yarn.

β€” Ears :

Round 1 :

7 hdc, slst in mr with nude colour yarn

Info :

*** Leave enough long yarn tail to sew. After placing the wig on the head, sew the ears. Leave 6 sc between ears and eyes.

β€” Hair / Wig :

Info :

*** Use 1.75 mm crochet hook for the wig. Crochet all the rows in BLO stitches.

Round 1 :

6 sc in mr with pink yarn (6)

Round 2 :

BLO 6 inc (12)

Round 3 :

BLO 6*(sc, inc) (18)

Round 4 :

BLO 6*(2 sc, inc) (24)

Round 5 :

BLO 6*(3 sc, inc) (30)

Round 6 :

BLO 6*(4 sc, inc) (36)

Round 7 :

BLO 6*(5 sc, inc) (42)

Round 8 :

BLO 6*(6 sc, inc) (48)

Info :

*** You've finished the wig. Continue to crochet hair strands without cutting your pink yarn.

Info :

*** For the first row; (8th row of the wig) ch 45, from the 2nd sc 44 slst, skip 1 sc, 1 slst to the next sc. You've made the first hair strand. Complete the row in the same way. (24 hair strands in total)

Info :

*** Skip 1 row and continue to crocheting hair strands to the 6th row of the wig. Ch 47, from the 2nd sc 46 slst, skip 1 sc, 1 slst to the next sc. Complete the row in the same way. (18 hair strands in total)

Info :

*** Skip 1 row and continue to crocheting hair strands to the 4th row of the wig. Ch 49, from the 2nd sc 48 slst, skip 1 sc, 1 slst to the next sc. Complete the row in the same way. (12 hair strands in total)

Info :

*** Skip 1 row and continue to crocheting hair strands to the 2nd row of the wig. Ch 51, from the 2nd sc 50 slst, skip 1 sc, 1 slst to the next sc. Complete the row in the same way. (6 hair strands in total)

Info :

*** Sew the wig 11 rows above the eyes.

β€” Skirt :

Round 1 :

Attach your white yarn to the 13th row of the body and crochet 42 dc inc, slslt (84)

Round 2-11 :

Ch 1, 84 dc, slst (10 rows) (84)

Round 12 :

Attach your lilac yarn for the last row of skirt. 1 sc, skip 2 sc, into the same sc (3 dc, ch 1, 3 dc), ... complete the row in the same way.

β€” Leaves :

Info :

*** Crochet 6 pieces and leave enough long yarn tail to sew. Increases will be crocheted in the same st.

Round 1 :

With lilac yarn ch 15, from the 2nd sc 1 sc, 2 hdc, 3 dc, 4 trc, 2 dc, 1 hdc, inc to the last sc, on the opposite side 2 sc, 1 hdc, 2 dc, 4 trc, 2 dc, 1 hdc, 1 sc, slst

Round 2 :

Ch 1, 1 sc, inc, hdc inc, hdc, dc, dc inc, trc, trc inc, 2 trc, dc inc, hdc, hdc inc, 1 sc, inc, inc, hdc inc, hdc, 2 dc, dc inc, dc, dc inc, dc, hdc inc, hdc, inc, 1 sc, slst

Round 3 :

With purple yarn crochet 1 single crochet around the piece.

Info :

*** You may embroider the leaves with green yarn.

Info :

*** Place the leaves onto the body as shown in the picture. (just above the skirt) (2 pieces on the front, 2 pieces on the back, 2 pieces on the sides) Sew the leaves to the body only from the ends.

Info :

*** Attach your lilac yarn to the 15th row of the body to complete the skirt detail and crochet 36 dc inc, slst. (just above the leaves). Fasten off.

Info :

*** Attach your lilac yarn 28th row of the body to complete arm detail and 30 dc inc, slst. Fasten off.

Assembly Instructions

  • Insert wire inside the body and neck part before finishing the top of the body and neck to allow posability; secure wire ends so they are enclosed and will not poke through the stitches.
  • Sew the head to the body using the long yarn tail left after finishing the head; align the neck and secure with tight whipstitches so the head sits centered on the body.
  • Attach the arms to the body by joining them where instructed in round 26 of the body; sew firmly with matching yarn and anchor stitches at the tops for a secure hold.
  • Sew the ears after placing and sewing the wig onto the head; leave 6 sc between ears and eyes and stitch ears to the head using the long tails left for sewing.
  • Place and sew the leaves to the body only from the ends, positioning two on front, two on back and two on the sides just above the skirt for correct placement.
  • Attach safety eyes between rounds 19 and 20 on the head with about 10 sc between them; embroider eyebrows, eyelashes and nose after eyes are secured.

Important Notes

  • πŸ’‘This pattern is for personal use only; sharing information from this pattern is prohibited without permission.
  • πŸ’‘The size of the finished toy is about 29 cm when using the recommended yarn and hook sizes.
  • πŸ’‘Use stitch markers to keep track of your rounds and placement, especially during increases and decreases.
  • πŸ’‘Stuff the body and limbs firmly while crocheting and shape gradually to avoid lumps and maintain smooth contours.
  • πŸ’‘Leave long yarn tails when instructed to make sewing parts together easier and more secure.

You did it β€” Iris Doll is finished and ready to bring a smile! This pattern leads you through every round and detail so you can create a beautiful 29 cm amigurumi companion. Share your finished doll with others or keep her as a special handmade keepsake. 🧢✨😊

You ask,

we answer.

FAQs

What size will the finished piece be?

The finished amigurumi measures approximately 29 cm tall when using the recommended yarn and hook sizes.

Can I use different yarn weights for this pattern?

Yes, you can use different yarn weights, but the final size will change; choose an appropriate hook and expect differences in stitch density and overall proportions.

Do I need prior crochet experience for this pattern?

This pattern is rated intermediate, so familiarity with single crochet, increases, decreases, BLO, and basic shaping is recommended.

How long does this project typically take to complete?

Most crocheters finish this project in about 8-10 hours depending on experience, customization and how many details (leaves, embroidery, wig) you add.

Can I make the wig in a different style?

Yes, you can change the wig color, length of strands or curl method; the pattern uses a crocheted wig base with crocheted hair strands that you can adapt.