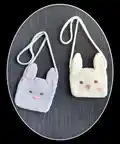
About This Bunny Bag Pattern
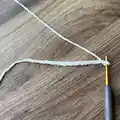
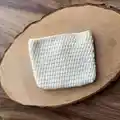
This pattern creates a cute bunny crossbody bag with tall ears, embroidered nose, and yarn-sewn eyes. It is worked mainly in half double crochet rounds and constructed flat, then folded and seamed to form the bag. The strap is made with a simple cord technique for a neat, durable finish. Photos and a linked video support the cord-making steps.

Perfect for gift-making or a fun accessory for kids, the bag measures approximately 11cm x 13cm with the recommended yarn. The pattern includes instructions for the body, tiny closure flap, ears, eyes, nose, strap, and assembly.
Why You'll Love This Bunny Bag Pattern
I absolutely love this pattern because it turns simple stitches into an irresistibly cute accessory that anyone can make. I enjoy how quickly the little bag comes together, yet how charming the finished piece looks with the ears and embroidered nose. The cord strap technique is one of my favorite neat tricks — it makes a tidy, professional-looking strap without extra hardware. I also love that you can personalize it with different colors or blush on the cheeks to add character.
Switch Things Up
I love changing colors to make different personalities—try pastel pink or mint for a softer look or bright tones for a playful bag.
I sometimes use sport or DK weight yarn with a smaller hook to create a tighter, slightly smaller bag for mini keychain versions.
For a chunkier, cuddle-friendly bag, I use worsted weight yarn and a larger hook to get a bold textured finish.
I often swap the wooden button for a decorative metal or novelty button to match outfits or themes.
Try embroidering different facial expressions: a smile, wink, or sleepy eyes change the bag's character completely.
You can add felt inner ears or applique hearts on the front for extra decoration and durability.
If you want a crossbody for adults, simply lengthen the strap to your preferred measurement and adjust attachment points for balance.
I recommend using a removable blush for cheeks if you want to wash the bag later—apply lightly and test first.
Mix yarn textures—cotton body with a chenille inner ear—for tactile contrast and a premium feel.
I also like to make matching mini accessories like a key pouch or coin purse using the same body pattern but reduced chains for a coordinated set.
Common Mistakes & How to Fix Them
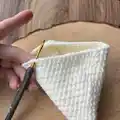
✗ Skipping the slip stitch at the end of rounds causes uneven edges and misaligned rows; always finish each round with a slst and begin the next round with ch2 as instructed.
✗ Not counting chains correctly on the first foundation row can lead to incorrect stitch counts later; carefully count the initial Ch22 and begin working from the 3rd chain as shown.
✗ Sewing ears without matching the front and back loops will create flared or twisted ears; sew the back of the ear to the back loop and the front of the ear to the front loop as instructed for neat attachment.
✗ Failing to leave a long yarn tail when fastening off makes sewing pieces difficult; fasten off with a slst and cut a long tail for sewing so you have enough yarn to join parts securely.
✗ Making the strap too short or uneven will affect fit and balance; measure as you crochet and continue the cord until you reach the recommended length of 85cm before fastening off.
✗ Over-tight tension when making cord stitches can curl or stiffen the strap; maintain an even, slightly relaxed tension and check the cord against the photos to match the look and flexibility.