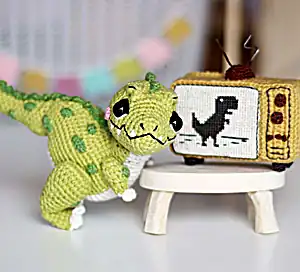
Create your own adorable Tyrannosaurus Oliver with this comprehensive crochet pattern! This friendly green dinosaur features charming spots, expressive eyes, and comes with a bonus retro TV set. Perfect for dinosaur lovers of all ages, Oliver is crocheted using simple techniques that result in a cuddly companion. The pattern includes detailed instructions for the main dinosaur plus a special cross-stitch TV bonus project.
Progress Tracker
0% Complete
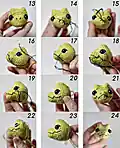
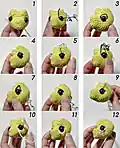
— HEAD :
Round 1 :
7 loops, turning, 6sc (starting from the 2nd loop from the hook), 6sc (from the back of the chain) (12l)
Round 2 :
[sc, inc]х6 (18l)
Round 5 :
[2sc, inc]х6 (24l)
Round 8 :
3sc, [inc]х18, 3sc (42l)
Round 9 :
18sc, 4dc in the next loop, [dec]х4, 4dc in the next loop, 14sc (44l)
Round 10 :
19sc, [2dc in the next loop]x2, sc, 4 sl st, sc, [2dc in the next loop]x2, 15sc (48l)
Round 11-13 :
24sc, 4 sl st, 20sc (48l)
Round 14 :
18sc, [dec]х3, 4sc, [dec]х3, 14sc (42l)
Round 16 :
[5sc, dec]х6 (36l)
Round 17 :
[4sc, dec]х6 (30l)
Round 18 :
[3sc, dec]х6 (24l)
Info :
Insert safety eyes between rounds 7 and 8, embroider features with mouline threads
Info :
Insert cotter pin, start stuffing with synthepus
Round 21 :
[2sc, dec]х6 (18l)
Round 22 :
[sc, dec]х6 (12l)
— CHEEKS :
Round 1 :
2 loops, 6sc in 2nd loop from hook (amigurumi ring), sl st in 1st sc (6l)
— CREST ON HEAD :
Round 1 :
27 loops, turning, sl st, [sl st; {sl st, dc, sl st}; sl st]x8, sl st
— NECK AND BODY :
Round 1 :
2 loops, 8sc in 2nd loop from hook (amigurumi ring) (8l)
Info :
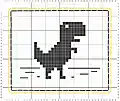
Use jacquard technique with yarn A and yarn B for white breast pattern
Round 3 :
[3sc, inc]х2 (Yarn B); [3sc, inc]х2 (Yarn A) (20l)
Round 4 :
only through back loops 10sc (Yarn B); 10sc (Yarn A) (20l)
Round 5 :
[4sc, inc]х2 (Yarn B); [4sc, inc]х2 (Yarn A) (24l)
Info :
Insert cotter pin in middle of neck, attach disk and wrap ends
— TAIL :
Round 1 :
2 loops, 4sc in 2nd loop from hook (amigurumi ring) (4l)
Round 2 :
[inc]х2, dec (5l)
Round 3 :
sc, [inc]х2, dec (6l)
— LEGS :
Round 1 :
9 loops, turning, 8 sl st, 8 sl st (from back of chain) (16l)
Round 2 :
[7sc, inc]х2 (18l)
— HANDS :
Round 1 :
2 loops, 6sc in 2nd loop from hook (amigurumi ring) (6l)
Round 2 :
[inc, sc]х3 (9l)
— SPOTS :
Small (8 pieces) :
3 loops, turning, 2sc, 2sc from back, sl st in 1st sc (4l)
Medium (6 pieces) :
4 loops, turning, 3sc, 3sc from back, sl st in 1st sc (6l)
Large (4 pieces) :
5 loops, turning, 4sc, 4sc from back, sl st in 1st sc (8l)
This charming Tyrannosaurus Oliver pattern brings the king of dinosaurs to life in the most adorable way possible! With his friendly smile, spotted green skin, and moveable head, Oliver is ready to become someone's favorite prehistoric companion. The included retro TV bonus project adds an extra touch of whimsy that makes this pattern truly special. Perfect for intermediate crocheters looking for a fun challenge! 🦕 Happy crocheting! 🧶✨