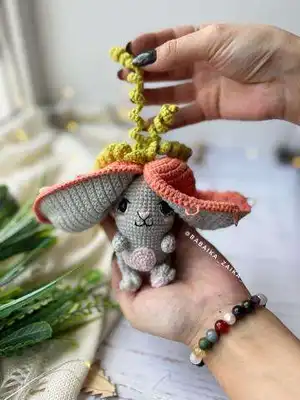
Make a charming Bunny-Carrot amigurumi with this full crochet pattern. You will create a tiny bunny nestled inside a crochet carrot using sport weight yarn, simple amigurumi shaping and sweet embroidered details. The pattern includes step-by-step rounds, wiring-free attachment methods, and clear assembly photos to guide you. Perfect for gifting or seasonal decor, this lovable mini project is both playful and detailed.
Progress Tracker
0% Complete
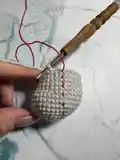
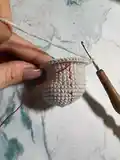
— Body :
Info :
Place row marker here.
Round 3 :
(1sc, inc) *6 (18)
Round 4 :
(2sc, inc) *6 (24)
Round 5 :
(3sc, inc) *6 (30)
Round 6 :
(4sc, inc) *6 (36)
Round 7 :
(5sc, inc) *6 (42)
Round 8.-10. :
42sc (3 rounds) (42)
Round 11 :
(2sc, dec) *6, 18sc (36)
Round 12.-16. :
36sc (5 rounds) (36)
Info :
Stuff with fiberfill in the process.
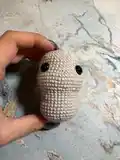
— Head :
Round 17 :
(1sc, inc) *18 (54)
Round 18.-21. :
54sc (4 rounds) (54)
Round 22 :
(7sc, dec) *6 (48)
Round 23 :
(6sc, dec) *6 (42)
Round 24.-28. :
42sc (5 rounds) (42)
Info :
Insert the eyes between rounds 23-24 at a distance of 10-12 sc.
Round 29 :
(5sc, dec) *6 (36)
Round 30 :
(4sc, dec) *6 (30)
Round 31 :
(3sc, dec) *6 (24)
Info :
Stuff the head with fiberfill.
Round 32 :
(2sc, dec) *6 (18)
Round 33 :
(1sc, dec) *6 (12)
Info :
Fasten off, cut the yarn, weave in the ends.
— Face Embroidery :
Info :
Embroider the nose with pink thread.
Info :
Embroider the whites of the eyes with white thread.
Info :
Embroider the upper eyelids and the outline of the nose with black thread.
Info :
Embroider the cheeks with pink thread.
Info :
Embroider the mouth with black thread.
— Tummy :
Info :
Place row marker here.
Round 3 :
(1sc, inc) *6 (18)
Info :
Leave a long tail for sewing.
Info :
Pin the tummy in the center of the body with pins. Sew the tummy to the body.
— Legs (make 2) :
Round 1 :
Chain 6. Start in the second chain from the hook: inc, 3sc, 3sc in the last chain, 4sc (12)
Info :
Place row marker here.
Round 2 :
Change color to Gray. 2inc, 3sc, 3inc, 3sc, inc (18)
Round 3 :
8sc, (4-dc Bobble st, sc) *3, 4sc (18)
Info :
Stuff with fiberfill in the process.
Round 4 :
4sc, 6dec, 2sc (12)
Round 5 :
(2sc, dec) *3 (9)
Round 6 :
(1sc, dec) *3 (6)
Round 7.-11. :
6sc (5 rounds) (6)
Info :
Fasten off, cut the yarn, weave in the yarn ends.
Info :
Fasten the legs with a thread mount. Attach the legs using a long needle and thread (look at the pictures in the pattern for placement).
— Arms (make 2) :
Info :
Place row marker here.
Round 2 :
(1sc, inc) *3 (9)
Info :
Stuff with fiberfill in the process.
Round 4 :
(1sc, dec) *3 (6)
Round 5.-8. :
6sc (4 rounds) (6)
Info :
Fasten off, cut the yarn, weave in the yarn ends.
Info :
Fasten the arms with a thread mount. Attach the arms using a long needle and thread (refer to pictures for exact positioning).
— Tail :
Info :
Place row marker here.
Info :
Stuff with fiberfill. Leave a long tail for sewing.
Info :
Sew the tail to the body.
— Ears (make 2) :
Info :
Crochet 2 pieces in Gray and 2 pieces in Orange color. Work in rows.
Round 1 :
4sc in MR, turn (4)
Round 2 :
ch1, 4inc, turn (8)
Round 3 :
ch1, (1sc, inc) *4, turn (12)
Round 4 :
ch1, (2sc, inc) *4, turn (16)
Round 5 :
ch1, (3sc, inc) *4, turn (20)
Round 6 :
ch1, 20sc, turn (20)
Round 7 :
ch1, (4sc, inc) *4, turn (24)
Round 8 :
ch1, 24sc, turn (24)
Round 9 :
ch1, (5sc, inc) *4, turn (28)
Round 10.-28. :
ch1, 28sc, turn (19 rows) (28)
Round 29 :
ch1, (5sc, dec) *4, turn (24)
Round 30 :
ch1, 24sc, turn (24)
Round 31 :
ch1, (4sc, dec) *4, turn (20)
Round 32 :
ch1, 20sc, turn (20)
Round 33 :
ch1, (3sc, dec) *4, turn (16)
Round 34 :
ch1, 16sc, turn (16)
Round 35 :
ch1, (2sc, dec) *4, turn (12)
Round 36 :
ch1, 12sc, turn (12)
Round 37 :
ch1, (1sc, dec) *4, turn (8)
Round 38 :
ch1, 4dec, turn (4)
Info :
Cut and fasten the yarn for Gray piece. Continue crocheting on the Orange part.
— Connecting Gray and Orange parts :
Info :
Crochet with Orange yarn through both pieces (do not turn):
Round 1 :
sl st, ch1, 84 sc (84)
Info :
Cut the yarn, weave in the ends.
— Ear Finishing and Sewing :
Info :
Embroider the stripes on the orange part with a black thread.
Info :
Sew the ears to the head: attach the ear exactly to the center of the head, while making sure that the bunny is exactly half closed with the ear. Sew the ears in the center of the head.
Info :
Close the bunny in the ears. Align the halves and fix them with pins. Pull one ear slightly over the other.
Info :
Sew buttons at an equal distance along the edge of first ear.
Info :
Make loops on the edge of the second ear, opposite the buttons.
— Greens :
Info :
With Light Green yarn.
Round 1 :
ch31, from the second chain: 30inc (60)
Round 2 :
ch41, from the second chain: 40inc (80)
Round 3 :
ch51, from the second chain: 50inc (100)
Round 4 :
ch41, from the second chain: 40inc (80)
Round 5 :
ch31, from the second chain: 30inc (60)
Info :
Leave a long tail for sewing.
Info :
Sew the greens to the junction of the orange parts.
— Final :
Info :
Attach legs, arms, tummy, tail, ears and greens as shown in the photos. Fasten all pieces securely and weave in ends.
This tiny Bunny-Carrot was designed to bring smiles and a bit of seasonal charm to your handmade collection. Whether you gift it or keep it on a shelf, the sweet embroidered face and cozy carrot shell make it irresistibly lovable. Enjoy every stitch as you bring this mini character to life — small projects, big joy! 🧶🐇✨