🧢 Beautiful ✨ Detailed πŸ’ Adorable

Bunny Hand Puppet Amigurumi Pattern

Bunny Hand Puppet Amigurumi Pattern
4.2β˜… Rating
2-3 Hours Time Needed
3.8K Made This
βœ‚οΈ

Intermediate Level

Ideal for those with basic crochet experience, featuring slightly more advanced stitches and techniques to expand your skills.

⏱️

Bite-Sized Project

Finishes in 2-4 hoursβ€”perfect for an afternoon of creative relaxation.

🧸

Cute Companion

An adorable friend to cherish, handcrafted with love to bring comfort and joy for years to come.

About This Bunny Hand Puppet Amigurumi Pattern

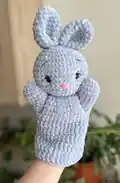
This pattern creates a plush bunny hand puppet crocheted mostly in single crochet using super bulky plush yarn for a soft finish. The pattern includes full round-by-round instructions for the head, ears, arms, and body plus finishing techniques for indented eyes and embroidered facial details. You will learn how to attach arms seamlessly and shape ears for a polished look. Photo references and video links in the instructions help you master any tricky steps.

Bunny Hand Puppet Amigurumi Pattern crochet pattern - detailed view of completed project

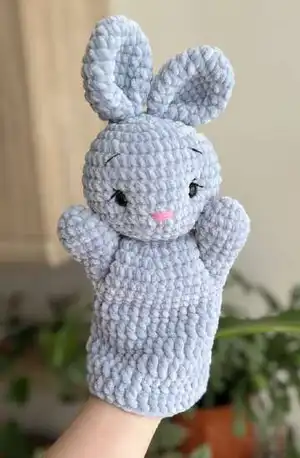
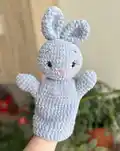
Designed with a roomy puppet body, it fits most adult hands and makes an engaging toy for storytelling and play. The plush yarn gives a cozy texture and quick build time so you can make several in different colors.

Why You'll Love This Bunny Hand Puppet Amigurumi Pattern

I absolutely love this pattern because it turns simple stitches into a charming, tactile puppet that children and adults both enjoy. I enjoyed designing the soft plush texture so the puppet feels delightful to hold and play with. I especially love the small details like the indented eyes and embroidered nose which give the bunny personality. This pattern is gratifyingly fast to make, and I feel proud each time I finish a neat, expressive face.

Bunny Hand Puppet Amigurumi Pattern step 1 - construction progress Bunny Hand Puppet Amigurumi Pattern step 2 - assembly progress Bunny Hand Puppet Amigurumi Pattern step 3 - details and accessories Bunny Hand Puppet Amigurumi Pattern step 4 - final assembly and finishing

Switch Things Up

I love customizing this pattern by changing yarn colors to create different characters; try pastel pinks, mint greens, or warm browns to transform the bunny.

I sometimes swap the plush yarn for a worsted weight yarn and a smaller hook to make a smaller, firmer puppet perfect for little hands.

I often embroider different facial expressions; move the eyes or alter the eyebrow shapes to make sleepy, happy, or surprised bunnies.

I add tiny crocheted scarves, bows, or felt accessories to give each puppet personality and seasonal flair.

For a washable puppet, consider using cotton yarn for the body and machine-safe safety eyes that have sturdy backs.

I like to make matching sets by changing only the nose and eye colors so siblings have coordinating puppets that look related.

If you want a posable puppet, insert a small bendable wire in the ears or an arm core before finishing to allow shaping.

To make a tiny keychain puppet, use fingering weight yarn and a 2.5–3.5 mm hook and reduce stitch counts proportionally.

I sometimes add surface crochet details or simple embroidery to create patterns on the body like stripes or hearts for customization.

When gifting, I attach a small loop at the top of the head so the puppet can hang as a decoration when not in play, making it both cute and practical.

Common Mistakes & How to Fix Them
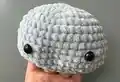
βœ— Skipping placement of safety eyes can make expressions look off; insert eyes between rounds 10 and 11 and keep 9 sc between them for correct spacing.
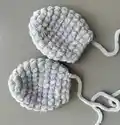
 βœ— Forgetting to leave sewing tails on ears and body makes assembly difficult; leave a long tail when instructed and use it to sew pieces firmly in place. βœ— Overstuffing the head causes bulging and distortion; stuff gradually with fiber filler and stop when the head is evenly firm without stretching stitches. βœ— Ignoring stitch counts after increases and decreases will cause mismatched shaping; count stitches after each round and correct mistakes before continuing. βœ— Not using the same hook and yarn tension changes finished size and fit; use a 4.5 mm hook with the recommended plush yarn and maintain consistent tension throughout.

Bunny Hand Puppet Amigurumi Pattern

Make a soft, cuddly bunny hand puppet using plush yarn and simple amigurumi techniques. This pattern guides you step-by-step through the head, ears, arms, and body with clear rounds and helpful photo references. You can customize colors and facial details to make a unique companion or gift. Perfect for creating a cute puppet to delight kids and craft-lovers alike.

Intermediate 2-3 Hours

Materials Needed for Bunny Hand Puppet Amigurumi Pattern

β€” Main Fabric

  • 01
    Super bulky plush yarn - Himalaya Dolphin Baby (120 m / 100 g) or similar - Gray color (1 skein, No 80351)
  • 02
    Sport cotton yarn - Yarn Art Jeans (160 m - 50 g) or (175 yd - 1.76 oz) for embroidery and details
  • 03
    Black cotton yarn for embroidered eyebrows and eyelashes (small amount)
  • 04
    Pink cotton yarn for embroidered nose (small amount)
  • 05
    Gray cotton yarn for sewing pieces and indents (small amount)
  • 06
    Fiber filler (polyester stuffing) for head stuffing
  • 07
    Plastic safety eyes 8 mm (1 pair)

β€” Tools Required

  • 01
    Crochet hook size 4.5 mm
  • 02
    Large sewing/embroidery needle
  • 03
    Yarn needle for sewing pieces
  • 04
    Stitch markers (knitting markers)
  • 05
    Scissors
  • 06
    Polyester stuffing (fiber filler)
  • 07
    Plastic safety eyes 8 mm (1 pair)

Progress Tracker

0% Complete

β€” Head :

Round 1 :

7 sc in MR (7)

Round 2 :

inc * 7 (14)

Round 3 :

inc * 14 (28)

Round 4 :

(3 sc, inc) * 7 (35)

Round 5 :

(4 sc, inc) * 7 (42)

Round 6 :

(13 sc, inc) * 3 (45)

Round 7-11 :

45 sc (5 rounds)

Round 12 :

(13 sc, dec) * 3 (42)

Round 13 :

(4 sc, dec) * 7 (35)

Round 14 :

(3 sc, dec) * 7 (28)

Info :

Insert safe plastic eyes. Fix eyes between 10 and 11 rounds from the head's top. The distance between the eyes is 9 sc.

Info :

Stuff the head with fiber filler.

Round 15 :

(2 sc, dec) * 7 (21)

Round 16 :

(1 sc, dec) * 7 (14)

Round 17 :

dec * 7 (7)

Info :

Draw the yarn through 7 loops and tighten. Cut and secure the yarn.

Info :

HOW TO CLOSE A HOLE IN AMIGURUMI https://youtu.be/DdqCijfLtXA

β€” Ears :

Info :

Use the gray plush yarn and crochet hook 4.5 mm. Make 2 details.

Round 1 :

7 sc in MR (7)

Round 2 :

inc * 7 (14)

Round 3 :

sc (14)

Round 4 :

(1 sc, inc) * 7 (21)

Round 5-8 :

21 sc (4 rounds)

Round 9 :

(1 sc, dec) * 7 (14)

Round 10 :

14 sc, sl st

Info :

Leave the tail for sewing. Cut the yarn. Don't stuff the piece.

Info :

Fold in half and then quadruple and sew on top of the head at a distance of 1-2 cm from each other.

Info :

HOW TO INDENT AMIGURUMI EYES https://youtu.be/ta3HI1hU8SY

Info :

Use the gray cotton yarn. Take the thread. Pull it through the back of the head and pull it out above the left eye. Leave the tail on back head's part.

Info :

Pass the needle from below under the left eye and pull out under the right eye. Make sure that the yarn falls from the inside of the left eye.

Info :

Next, pass the needle from above the right eye, making sure that the thread lies on the inside of the eye. And pull out the needle in the same place behind the head.

Info :

Tighten both threads so that the eyes are sunken. Tie a knot, hide the tail inside the head.

β€” Embroidery :

Info :

Use the pink yarn and a large needle. Embroider nose as shown on photos.

Info :

Use the thin black yarn and a large needle. Embroider eyelashes as shown on photos. Embroider eyebrows as shown on photos.

β€” Arms :

Info :

Use the gray plush yarn. Crochet hook 4.5 mm. Make 2 pieces. Don't stuff.

Round 1 :

6 sc in MR (6)

Round 2 :

inc * 6 (12)

Round 3 :

(2 sc, inc) * 4 (16)

Round 4-5 :

16 sc (2 rounds)

Round 6 :

(2 sc, dec) * 4 (12)

Round 7-9 :

12 sc (3 rounds)

Info :

Make sl st, cut the yarn. Don't stuff. Make 2 pieces.

β€” Body :

Info :

Use the gray plush yarn. Crochet hook 4.5 mm. Leave the tail for sewing, begin crochet without sl st. Make 24 ch, sl st in the first loop. Make a circle.

Round 1 :

24 sc

Round 2 :

(3 sc, inc) * 6 (30)

Round 3 :

(4 sc, inc) * 6 (36)

Round 4 :

(5 sc, inc) * 6 (42)

Info :

HOW TO ATTACH ARM TO BODY https://youtu.be/Bq3PAUiOh2M

Round 5 :

crochet together with arm - 7 sc, 13 sc only on the body, 7 sc together with another arm, 15 sc only on the body (42)

Info :

Crochet sc2tog on both sleeves sides to avoid holes. HOW TO CROCHET SC2TOG https://youtu.be/tZqQHv2NJhM

Round 6 :

sc2tog, crochet only on the arm - 4 sc, sc2tog, 12 sc only on the body, sc2tog, 4 sc only on the another arm, sc2tog, 14 sc only on the body (38)

Round 7 :

dec, 2 sc, dec, 12 sc, dec, 2 sc, dec, 14 sc (34)

Round 8 :

34 sc, ch

Round 9-14 :

34 dc (6 rounds)

Info :

Sew the body to the head as shown in the photos.

Info :

CONGRATULATIONS! Your hand puppet is readyβœ”

Assembly Instructions

  • Insert and fix safety eyes between rounds 10 and 11 of the head, spacing them 9 single crochet stitches apart before stuffing the head.
  • Fold each ear in half, fold twice (quadruple) as shown, then sew ears on top of the head about 1-2 cm apart using the long tail left from the ear; hide the yarn tails inside the head.
  • Attach arms during round 5 of the body: crochet together with the arm for 7 sc, continue specified body stitches, crochet together with the second arm where indicated and finish the round; secure with sewing when needed.
  • Sew the finished body opening to the head securely using a yarn needle and the tail from the body, matching rounds and keeping edges even for a neat join.
  • Embroider nose with pink yarn and eyelash/eyebrow details with thin black yarn using a large needle; indent eyes using gray cotton yarn technique and hide tails inside the head.

Important Notes

  • πŸ’‘Use stitch markers to mark the beginning of each round to maintain correct stitch counts and shaping.
  • πŸ’‘Leave sewing tails on the ears and body as instructed to avoid running out of yarn when assembling pieces.
  • πŸ’‘Stuff the head firmly but evenly and avoid overstuffing to keep the natural shape and prevent distortion.
  • πŸ’‘When attaching arms to the body, follow the crochet-together instructions in round 5 to achieve a seamless join without gaps.

This sweet Bunny Hand Puppet pattern makes a soft, lovable friend perfect for playtime and storytelling. 🧢 The plush yarn gives a cuddly texture and the pattern includes step-by-step rounds, assembly notes, and video links to guide you. 🐰 Make one as a quick gift or create a whole set of woodland puppets to charm loved ones! ✨

You ask,

we answer.

FAQs

What size will the finished piece be?

The finished hand puppet measures approximately 28 cm (11") tall when using the recommended super bulky plush yarn and a 4.5 mm hook.

Can I use different yarn weights for this pattern?

Yes, you can change yarn weight and hook size to alter finished size, but be aware that lighter yarn will create a smaller puppet and bulkier yarn will make a larger, thicker puppet.

Do I need prior crochet experience for this pattern?

This pattern is rated intermediate; basic knowledge of single crochet, increases, decreases, and working in the round is recommended for best results.

How long does this project typically take to complete?

Most crocheters complete this project in 2-3 hours, though the time may vary based on experience level, yarn chosen, and how much time you spend on embroidery and assembly.