🧢 Beautiful ✨ Detailed πŸ’ Adorable

Bunny Hand Puppet Amigurumi Pattern

Bunny Hand Puppet Amigurumi Pattern
4.5β˜… Rating
5-7 Hours Time Needed
1.5K Made This
βœ‚οΈ

Intermediate Level

Ideal for those with basic crochet experience, featuring slightly more advanced stitches and techniques to expand your skills.

⏱️

Weekend Treat

Takes 5-7 hours, making it an enjoyable project to finish over a couple of days.

🧸

Cute Companion

An adorable friend to cherish, handcrafted with love to bring comfort and joy for years to come.

About This Bunny Hand Puppet Amigurumi Pattern

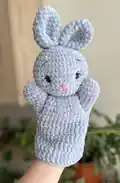
This pattern creates a sweet bunny hand puppet worked in super-bulky plush yarn for a soft, squishy finish. You will crochet the head, ears, arms and tube-like body, then attach and embroider features for a finished puppet. The design includes detailed step-by-step rounds and helpful finishing techniques so you can follow along with confidence.

Bunny Hand Puppet Amigurumi Pattern crochet pattern - detailed view of completed project

Perfect for gifting or play, the puppet measures about 28 cm (11") tall using the recommended yarn and hook. The pattern uses basic amigurumi stitches with clear instructions for assembly and embroidery details.

Why You'll Love This Bunny Hand Puppet Amigurumi Pattern

I absolutely love this pattern because it turns simple stitches into a lovable character with very little fuss. The plush yarn makes the puppet irresistibly soft and perfect for small hands to play with. I enjoy the satisfying shaping in the head and ears and how a few embroidery stitches can create a sweet expression. It is a great project to expand your amigurumi skills while still being relaxing and fun to make.

Bunny Hand Puppet Amigurumi Pattern step 1 - construction progress Bunny Hand Puppet Amigurumi Pattern step 2 - assembly progress Bunny Hand Puppet Amigurumi Pattern step 3 - details and accessories Bunny Hand Puppet Amigurumi Pattern step 4 - final assembly and finishing

Switch Things Up

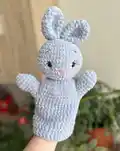
I love changing yarn colors to create different personalities for this puppet β€” try pastel grays, soft blues, or warm browns to suit the recipient.

I sometimes replace the plush yarn with a bulky acrylic for a firmer puppet and a different texture; adjust the hook size accordingly.

I often make mini versions by using thinner yarn and a smaller hook to create keychain-sized or pocket pals.

I like to add accessories like a tiny crocheted scarf, bow, or felt mouth to change the look and theme of the puppet.

Try swapping the plastic eyes for embroidered eyes for a baby-safe version and a softer face expression.

I sometimes embroider different eyebrow shapes or mouth positions to give the bunny a playful or sleepy expression.

For a poseable puppet, I add a thin piece of wire inside the ears or arms, wrapped securely with yarn, to hold shapes.

I recommend experimenting with different fiber fillers β€” polyester for plushness or small amounts of wool for weight and shape retention.

Try color-blocking the body by changing yarn color after a few rounds to create a sweater or dress effect on the puppet.

I like to personalize puppets by stitching initials or a small heart inside the body seam before closing to create a secret keepsake.

Common Mistakes & How to Fix Them

βœ— Skipping stitch markers when joining rounds can lead to losing the start position; place a marker at the first stitch of each round to stay on track.
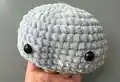
 βœ— Stuffing the head too loosely will make shaping difficult; stuff gradually and firmly to achieve a smooth round shape before closing. βœ— Placing safety eyes without measuring can make the face look uneven; measure between rounds 10 and 11 and space eyes 9 sc apart for correct placement. βœ— Not leaving sewing tails on ears and body makes assembly harder; always leave long tails for sewing and shaping to secure parts cleanly. βœ— Pulling your yarn too tight during decreases causes visible gaps; maintain consistent, even tension and use sc2tog on sleeve joins to avoid holes.

Bunny Hand Puppet Amigurumi Pattern

Make a soft, cuddly bunny hand puppet using plush yarn and simple amigurumi techniques. This pattern guides you through every round, stitch, and finishing step so you can create a charming puppet for play or gifts. You will learn how to shape the head, ears, arms and body and add embroidered features for personality. Enjoy a rewarding crochet project that yields a wearable toy full of character.

Intermediate 5-7 Hours

Materials Needed for Bunny Hand Puppet Amigurumi Pattern

β€” Main Fabric

  • 01
    Super bulky yarn - Himalaya Dolphin Baby (120 m - 100 g) or (131 yd - 3.52 oz), gray color (1 skein, No 80351)
  • 02
    Sport cotton yarn - Yarn Art Jeans (160 m - 50 g) or (175 yd - 1.76 oz) - black color for embroidery eyebrows and eyelashes
  • 03
    Sport cotton yarn - Yarn Art Jeans - pink color for embroidery nose
  • 04
    Sport cotton yarn - Yarn Art Jeans - gray color yarn for sewing pieces and indenting eyes
  • 05
    Fiber filler - for stuffing the head
  • 06
    Plastic safety eyes 8 mm (1 pair)

β€” Tools Required

  • 01
    Crochet hook 4.5 mm
  • 02
    Large needle (for embroidery and sewing)
  • 03
    Knitting markers (stitch markers)

Progress Tracker

0% Complete

β€” Head :

Info :

Use the gray plush yarn, hook 4.5 mm.

Round 1 :

7 sc in MR (7)

Round 2 :

inc * 7 (14)

Round 3 :

inc * 14 (28)

Round 4 :

(3 sc, inc) * 7 (35)

Round 5 :

(4 sc, inc) * 7 (42)

Round 6 :

(13 sc, inc) * 3 (45)

Round 7-11 :

45 sc (5 rounds)

Round 12 :

(13 sc, dec) * 3 (42)

Round 13 :

(4 sc, dec) * 7 (35)

Round 14 :

(3 sc, dec) * 7 (28)

Info :

Insert safe plastic eyes. Fix eyes between 10 and 11 rounds from the head's top. The distance between the eyes is 9 sc.

Info :

Stuff the head with fiber filler.

Round 15 :

(2 sc, dec) * 7 (21)

Round 16 :

(1 sc, dec) * 7 (14)

Round 17 :

dec * 7 (7)

Info :

Draw the yarn through 7 loops and tighten. Cut and secure the yarn.

Info :

HOW TO CLOSE A HOLE IN AMIGURUMI https://youtu.be/DdqCijfLtXA

β€” Ears :

Info :

EARS (2 details). Use the gray plush yarn and crochet hook 4.5 mm.

Round 1 :

7 sc in MR (7)

Round 2 :

inc * 7 (14)

Round 3 :

sc (14)

Round 4 :

(1 sc, inc) * 7 (21)

Round 5-8 :

21 sc (4 rounds)

Round 9 :

(1 sc, dec) * 7 (14)

Round 10 :

14 sc, sl st

Info :

Leave the tail for sewing. Cut the yarn. Don't stuff the piece. Make 2 details.

Info :

Fold in half and then quadruple and sew on top of the head at a distance of 1-2 cm from each other.

β€” Eyes & Embroidery :

Info :

HOW TO INDENT AMIGURUMI EYES https://youtu.be/ta3Hl1hU8SY

Info :

Use the gray cotton yarn. Take the thread. Pull it through the back of the head and pull it out above the left eye. Leave the tail on back head's part.

Info :

Pass the needle from below under the left eye and pull out under the right eye. Make sure that the yarn falls from the inside of the left eye.

Info :

Next, pass the needle from above the right eye, making sure that the thread lies on the inside of the eye. And pull out the needle in the same place behind the head.

Info :

Tighten both threads so that the eyes are sunken. Tie a knot, hide the tail inside the head.

Info :

EMBROIDERY. Use the pink yarn and a large needle. Embroider nose as shown on photos.

Info :

Use the thin black yarn and a large needle. Embroider eyelashes as shown on photos. Embroider eyebrows as shown on photos.

β€” Arms :

Info :

Use the gray plush yarn. Crochet hook 4.5 mm.

Round 1 :

6 sc in MR (6)

Round 2 :

inc * 6 (12)

Round 3 :

(2 sc, inc) * 4 (16)

Round 4-5 :

16 sc (2 rounds)

Round 6 :

(2 sc, dec) * 4 (12)

Round 7-9 :

12 sc (3 rounds)

Info :

Make sl st, cut the yarn. Don't stuff. Make 2 pieces.

β€” Body :

Info :

Use the gray plush yarn. Crochet hook 4.5 mm. Leave the tail for sewing, begin crochet without sl st. Make 24 ch, sl st in the first loop. Make a circle.

Round 1 :

24 sc

Round 2 :

(3 sc, inc) * 6 (30)

Round 3 :

(4 sc, inc) * 6 (36)

Round 4 :

(5 sc, ins) * 6 (42)

Info :

HOW TO ATTACH ARM TO BODY https://youtu.be/Bq3PAUiOh2M

Round 5 :

crochet together with arm - 7 sc, 13 sc only on the body, 7 sc together with another arm, 15 sc only on the body (42)

Info :

Crochet sc2tog on both sleeves sides to avoid holes.

Info :

HOW TO CROCHET SC2TOG https://youtu.be/tZqOHv2NJhM

Round 6 :

sc2tog, crochet only on the arm - 4 sc, sc2tog, 12 sc only on the body, sc2tog, 4 sc only on the another arm, sc2tog, 14 sc only on the body (38)

Round 7 :

dec, 2 sc, dec, 12 sc, dec, 2 sc, dec, 14 sc (34)

Round 8 :

34 sc, ch

Round 9-14 :

34 dc (6 rounds)

Info :

Sew the body to the head as shown in the photos.

β€” Finishing :

Info :

CONGRATULATIONS! Your hand puppet is readyβœ”

Assembly Instructions

  • Insert safety eyes between rounds 10 and 11 of the head, spacing them 9 single crochet stitches apart before stuffing the head.
  • Fold each ear in half, then fold again (quadruple) and sew two ears onto the top of the head about 1-2 cm apart using the long tail left from the ear pieces.
  • Attach the arms to the body during Round 5 by crocheting together: work 7 sc with the arm, work 13 sc only on the body, crochet 7 sc together with the second arm, then work 15 sc only on the body so total equals 42.
  • Use sc2tog at the sleeve joins (Round 6) and follow shaping rounds 6-8 to close sleeve joins and avoid holes between arm and body.
  • Embroider the nose with pink yarn and add eyelashes and eyebrows with thin black yarn using a large needle, following the photo references for placement.
  • Sew the finished body opening securely to the bottom of the head following the photo tutorial to create a neat seam and hide yarn tails.

Important Notes

  • πŸ’‘Place stitch markers at the start of each round to keep track of round beginnings and increases or decreases.
  • πŸ’‘Stuff the head firmly and evenly before closing to maintain a smooth round shape and avoid lumps.
  • πŸ’‘Leave long tails for sewing on ears and joining body to head so you have enough yarn to secure pieces without knotting externally.
  • πŸ’‘Do not stuff the ears or arms; these pieces are left unstuffed to sit flat and be lightweight.
  • πŸ’‘Use sc2tog on sleeve joins and work decreases carefully to avoid creating holes where pieces join.

This sweet Bunny Hand Puppet pattern is a delightful project that makes a wonderful gift or playtime companion. The plush yarn gives a cozy, tactile feel while the embroidered face adds personality and charm. Enjoy stitching every round and watching the puppet come to lifeβ€”happy crocheting! 🧢🐰

You ask,

we answer.

FAQs

What size will the finished piece be?

The finished hand puppet measures approximately 28 cm (11") tall when using the recommended super bulky plush yarn and a 4.5 mm hook.

Can I use different yarn weights for this pattern?

Yes, you can change yarn weight, but the final size and texture will change; use an appropriate hook for your chosen yarn and adjust stitch counts if needed.

Do I need prior crochet experience for this pattern?

This pattern is rated intermediate; basic familiarity with single crochet, increases, decreases, and working in the round is recommended.

How long does this project typically take to complete?

Most crocheters finish this puppet in about 5-7 hours, depending on experience and how much time is spent on embroidery and finishing.