🧢 Beautiful ✨ Detailed πŸ’ Adorable

Ava the Butterfly Amigurumi Pattern

Ava the Butterfly Amigurumi Pattern
4.6β˜… Rating
3-4 Hours Time Needed
1.5K Made This
βœ‚οΈ

Beginner Friendly Level

Perfect for those just starting their sewing journey, with clear instructions and simple techniques

⏱️

Weekend Treat

Takes 5-7 hours, making it an enjoyable project to finish over a couple of days.

🧸

Cute Companion

An adorable friend to cherish, handcrafted with love to bring comfort and joy for years to come.

About This Ava the Butterfly Amigurumi Pattern

This Ava the Butterfly pattern is designed for easy crafting and fun times. It combines crochet techniques with colorful yarn to create a playful, whimsical character. Perfect for beginners, you'll enjoy every stitch as you watch Ava come to life!

Ava the Butterfly Amigurumi Pattern crochet pattern - detailed view of completed project

Add a touch of whimsy to your life with this joyful project.

Why You'll Love This Ava the Butterfly Amigurumi Pattern

I absolutely love creating this butterfly because it brings a sense of joy and color to any room. The pattern is easy to follow, making it perfect for both seasoned crocheters and beginners alike. Plus, who wouldn't want a cute butterfly to brighten their day?

Ava the Butterfly Amigurumi Pattern step 1 - construction progress Ava the Butterfly Amigurumi Pattern step 2 - assembly progress Ava the Butterfly Amigurumi Pattern step 3 - details and accessories Ava the Butterfly Amigurumi Pattern step 4 - final assembly and finishing

Switch Things Up

I had such a fantastic time creating Ava the Butterfly! It's a quick and enjoyable project that brightens up any space.

Every stitch filled with joy as I watched her come to life with vibrant colors and playful design.

Plus, it’s perfect for gifting! I know you’ll love how she turns out, and I can’t wait to see your creations!

Common Mistakes & How to Fix Them

βœ— Forgetting to stuff as you go can leave your plush feeling empty; stuff firmly throughout the process. βœ— Not using stitch markers might result in losing your place; always mark the beginning of each round for better accuracy. βœ— Skipping gauge check can lead to a size that is too big or small; take time to measure your stitches before starting. βœ— Not securing the yarn ends can cause unraveling over time; make sure to weave in all ends securely at the end.

Ava the Butterfly Amigurumi Pattern

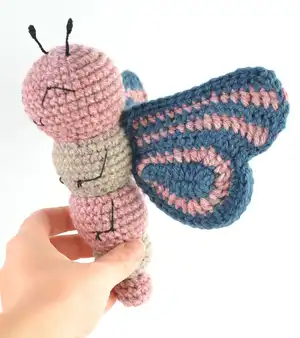
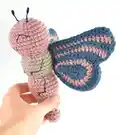
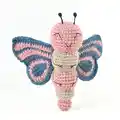
Create your own charming Ava the Butterfly with this delightful crochet pattern! Perfectly suited for crochet enthusiasts, this easy project allows for a fun and relaxing crafting experience. Follow along with clear instructions to bring Ava to life, complete with colorful wings and a playful design. Whether for a gift or your personal collection, this butterfly will add a lovely touch to any space!

Beginner Friendly 3-4 Hours

Materials Needed for Ava the Butterfly Amigurumi Pattern

β€” Main Fabric

  • 01
    Lion Brand Wool-Ease, 1 ball Rose Heather (A)
  • 02
    1 ball Oatmeal (B)
  • 03
    1 ball Denim (C)
  • 04
    Fiberfill stuffing

β€” Tools Required

  • 01
    Crochet hook size F-5 (3.75 mm)
  • 02
    Steel crochet hook size 1.25 mm (for antennae)
  • 03
    Lion Brand stitch markers
  • 04
    Lion Brand large-eyed blunt needle
  • 05
    Black embroidery floss or cotton crochet thread size 10 (for details)

Progress Tracker

0% Complete

β€” BODY :

First Section (Head)

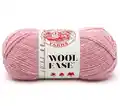
With larger hook and A, make a magic ring.

Rnd 1 (RS) :

Work 8 sc in ring; do not join, work in continuous rnds (spiral). Gently but firmly, pull tail to tighten center of ring. Place a marker in last st made to indicate end of rnd. Move marker up as each rnd is completed.

Rnd 2 :

Work 2 sc in each st around – you will have 16 sc in this rnd.

Rnd 3 :

* Sc in next st, 2 sc in next st; rep from * around – 24 sc.

Rnd 4 :

* Sc in next 2 sts, 2 sc in next st; rep from * around – 32 sc.

Rnd 5 :

Sc in each st around.

Rnd 11 :

* Sc in next 2 sts, sc2tog; rep from * around – 24 sc.

Rnd 12 :

* Sc in next st, sc2tog; rep from * around; change to B in last st – 16 sc.

Second Section

With B, working in front loops only, * sc in next st, 2 sc in next st; rep from * around – 24 sc.

Rnd 14 :

* Sc in next 3 sts, 2 sc in next st; rep from * around – 30 sc.

Rnd 15-10 :

Sc in each st around.

Rnd 21 :

With A, working in front loops only, * sc in next 5 sts, 2 sc in next st; rep from * around – 28 sc.

Rnd 22 :

* Sc in next 2 sts, sc in next st; rep from * around – 28 sc.

WINGS (make 2)

Panel 1 Lower Section

Rnd 1 (RS) :

Sc in 2nd ch from hook, sc in next 2 ch, hdc in next ch, (hdc, dc) in next ch, 2 dc in next ch, 4 dc in next ch; working along opposite side of beg ch-8, 2 dc in next ch, (hdc, dc) in next ch, hdc in next ch, sc in next 3 ch; join with sl st in first sc and change to A – 20 sts.

Add two sets of stitches together with slip stitches across Panels.

Hold panels I and II together with sts and rows matching. Working through both thicknesses, sl st evenly spaced all the way around outer edges of Wing; join with sl st in first sl st.

ANTENNAE (make 2)

With smaller hook and black embroidery floss, make a magic ring.

Rnd 1:

Work 6 sc in ring. Gently but firmly, pull tail to tighten center of ring and then ch 8. Fasten off, leaving a long tail for sewing Antennae to Body.

FINISHING

Using photograph as a guide and yarn tails still attached to pieces whenever possible, assemble the Butterfly as follows: Sew Wings to back of Body, between Rnds 12 and 19, and about 6 sts apart.

Assembly Instructions

  • Sew Wings to back of Body between Rnds 12 and 19, and about 6 sts apart.
  • Embroider straight st legs between Rnds 14 and 19, and 2 legs between Rnds 21 and 26.
  • Sew Antennae to top of head between Rnds 1 and 2. Weave in ends.

Important Notes

  • πŸ’‘Ensure your pieces are securely sewn together to prevent any pieces from coming apart.
  • πŸ’‘Use stitch markers throughout to maintain your rounds accurately, especially during color changes.
  • πŸ’‘For best results, check your tension to ensure an even finish and proper shape in your butterfly.
  • πŸ’‘When embroidering, use bright and fun colors to enhance your butterfly’s personality.

Bring Ava the Butterfly to life with this charming crochet pattern! Perfect for beginners and a delightful addition to any collection. πŸ¦‹βœ¨ Happy crafting!

You ask,

we answer.

FAQs

What is the finished size of the Ava the Butterfly?

The finished butterfly measures approximately 7 inches tall, making it a perfect size for cuddling or display.

Can I use different yarn types for this pattern?

Yes, you can use various yarn types, but note that it will affect the overall size and texture of your butterfly.

Is this pattern suitable for children?

Yes, this butterfly can be a wonderful toy for children, but ensure all parts are securely sewn.

What if I am a beginner?

This pattern is designed for beginners with clear instructions, so you'll be able to follow along and succeed!