๐Ÿงถ Beautiful โœจ Detailed ๐Ÿ’ Adorable

Cute Bunny Amigurumi Pattern

Cute Bunny Amigurumi Pattern
4.5โ˜… Rating
5-7 Hours Time Needed
2.7K Made This
โœ‚๏ธ

Intermediate Level

Ideal for those with basic crochet experience, featuring slightly more advanced stitches and techniques to expand your skills.

โฑ๏ธ

Weekend Treat

Takes 5-7 hours, making it an enjoyable project to finish over a couple of days.

๐Ÿฅ

Charming Critter

Delightful animal designs with sweet details that capture the essence of your favorite woodland and farmyard friends.

About This Cute Bunny Amigurumi Pattern

This pattern creates an adorable sitting bunny amigurumi complete with outfit and a crochet carrot accessory. It guides you through head, body, arms, legs, ears, clothing and small details round by round. The design focuses on neat shaping and simple garment construction so you can personalise colors and accessories. Ideal for making a handmade gift or a treasured toy.

Cute Bunny Amigurumi Pattern crochet pattern - detailed view of completed project

Includes step-by-step rounds, materials list and clear joining instructions for easy assembly. Photos show placement and finishing tips to help you achieve a polished look.

Why You'll Love This Cute Bunny Amigurumi Pattern

I absolutely love this pattern because it brings together a classic amigurumi shape with charming little details like the jumpsuit and carrot. I enjoy the way the shaping creates a sweet face and cuddly body that feels professional when finished. The pattern lets me play with colour combinations for outfits and tiny accessories, which keeps each make fresh and unique. I find the assembly steps satisfying โ€” attaching sleeves and ears transforms the pieces into a lovable character.

Cute Bunny Amigurumi Pattern step 1 - construction progress Cute Bunny Amigurumi Pattern step 2 - assembly progress Cute Bunny Amigurumi Pattern step 3 - details and accessories Cute Bunny Amigurumi Pattern step 4 - final assembly and finishing

Switch Things Up

I love customizing this bunny by changing outfit colors and adding tiny accessories; you can easily create different personalities this way.

I often swap the Lilac and Green for pastel or bright shades to match nursery themes or seasonal colours.

I sometimes make the carrot larger or smaller by adjusting the rounds slightly to create a matching set of veggies.

I recommend changing yarn weight and hook size if you want a larger cuddly version or a tiny keychain-sized bunny.

I also like to embroider different facial expressions; moving the eyes or mouth alters the bunny's mood instantly.

I sometimes add felt appliques or tiny crocheted bows to the jumpsuit for extra charm and texture.

I will occasionally use safety joints or wire in the limbs if I want a posable toy for display purposes.

I encourage trying contrasting mattress stitch or whipstitch finishes on the jumpsuit edges to vary the look and durability.

I sometimes replace safety eyes with embroidered eyes for baby-safe toys or for a softer vintage aesthetic.

I enjoy creating themed bunnies by combining yarn colors to match holidays or special occasions; small changes can make each bunny unique.

Common Mistakes & How to Fix Them

โœ— Skipping stitch markers during round joins leads to lost stitch counts; use a marker at the start of each round to maintain accurate counts. โœ— Forgetting to stuff gradually results in lumps or bulges; stuff the head and body firmly and slowly, shaping as you go for a smooth finish. โœ— Not placing safety eyes at the correct rounds will misplace facial features; place the safety eyes between Rnd-13-14 with 8 sc between them to match the pattern. โœ— Pulling yarn too tight when sewing pieces flattens shaping; use a gentle tension and secure with small stitches so the toy keeps its rounded form. โœ— Ignoring the instruction to sink the needle into both layers when finishing sleeves can leave gaps; always sink the needle through both layers and fasten off neatly for a clean edge.

Cute Bunny Amigurumi Pattern

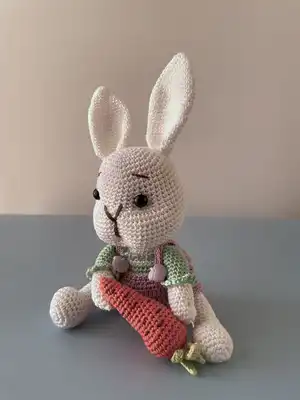
Make a charming crocheted bunny with this detailed amigurumi pattern. You will enjoy creating the soft head, body, limbs, ears, clothes and a little carrot accessory while learning neat finishing techniques. The pattern includes full round-by-round instructions and assembly notes so you can follow along easily and personalise the bunny to your taste. Perfect for gifting or decorating nurseries and playrooms.

Intermediate 5-7 Hours

Materials Needed for Cute Bunny Amigurumi Pattern

โ€” Main Fabric

  • 01
    Yarn - Main Color: White
  • 02
    Main Color A: Green
  • 03
    Main Color B: Lilac
  • 04
    Main Color C: Orange

โ€” Tools Required

  • 01
    Crochet hook size 2.5 mm (or a size that fits your yarn)
  • 02
    Scissors
  • 03
    Stuffing (polyester fiberfill)
  • 04
    Tapestry needle for sewing and weaving ends
  • 05
    Stitch markers
  • 06
    Pins for assembly
  • 07
    Safety eyes (as shown in photos)

Progress Tracker

0% Complete

โ€” Head & Body :

Round 1 :

Rnd 1-6 sc in a mr

Round 2 :

Rnd 2-6 sc inc(12)

Round 3 :

Rnd 3-(6 times)1 sc into sc next inc(18)

Round 4 :

Rnd 4-(6 times)2 sc into sc next inc(24)

Round 5 :

Rnd 5-(6 times)3 sc into sc next inc(30)

Round 6 :

Rnd 6-(6 times)4 sc into sc next inc(36)

Round 7 :

Rnd 7-(6 times)5 sc into sc next inc(42)

Round 8 :

Rnd 8-(6 times)6 sc into sc next inc(48)

Round 9-16 :

Rnd 9-16-(8 ring)sc into sc(48)

Round 17-18 :

Rnd 17-18 sc into sc(12 sc inc)18 sc into sc(60 sc)

Round 18-23 :

Rnd 18-23-(6 ring)sc into sc(60)

Info :

Place the safe eyes between Rnd-13-14. There should be 8 sc between them

Round 24 :

Rnd 24-(6 times)9 sc into sc nest dec(54)

Round 25 :

Rnd 25-(6 times)8 sc into sc next dec(48)

Round 26 :

Rnd 26-(6 times)7 sc into sc next dec(42)

Round 27 :

Rnd 27-(6 times)6 sc into sc next dec(36)

Round 28 :

Rnd 28-(6 times)5 sc into sc next dec(30)

Info :

Stuff the head tightly. keep filling as you go

Round 29 :

Rnd 29-(6 times)4 sc into sc nest dec(24)

Round 30-33 :

Rnd 30-33-(4 ring)sc into sc(24)

Round 34 :

Rnd 34-(6 times)3 sc into sc next inc(30)

Round 35 :

Rnd 35-(6 times)4 sc into sc next inc(36)

Round 36 :

Rnd 36-in flo sc into sc(36) where the collar is

Round 37 :

Rnd 37-(6 times)5 sc into sc next inc(42)

Round 38 :

Rnd 38-(6 times)6 sc into sc next inc(48)

Round 39 :

Rnd 39-(6 times)7 sc into sc next inc(54)

Info :

A color-

Round 40-46 :

Rnd 40-46-(7 ring)sc into sc(54)

Info :

Main color-

Round 47-54 :

Rnd 47-54-(8 ring)sc into sc(54)

Round 55 :

Rnd 55-In flo sc into sc(54)

Round 56 :

Rnd 56-(6 times)7 sc into sc next dec(48)

Round 57 :

Rnd 57-(6 times)6 sc into sc next dec(42)

Round 58 :

Rnd 58-(6 times)5 sc into sc next dec(36)

Round 59 :

Rnd 59-(6 times)4 sc into sc next dec(30)

Info :

Stuff the body tightly. keep filling as you go

Round 60 :

Rnd 60-(6 times)3 sc into sc next dec(24)

Round 61 :

Rnd 61-(6 times)2 sc into sc next dec(18)

Round 62 :

Rnd 62-(6 times)1 sc into sc next dec(12)

Round 63 :

Rnd 63-6 sc dec(6)fo.

โ€” Arms :

Item Name (P1) :

MAKE 2 - MAIN COLOR

Round 1 :

Rnd 1-6 sc in a mr

Round 2 :

Rnd 2-6 sc inc(12)

Round 3 :

Rnd 3-(2 times)5 sc into sc next inc(14)

Round 4-8 :

Rnd 4-8-(5 ring)sc into sc(14)

Info :

A color-

Round 9 :

Rnd 9-in flo sc into sc(14) fill the sleeves

Round 10-18 :

Rnd 10-18-(9 ring)sc into sc(14)

Round 19 :

Rnd 19-Straighten it. sink the needle into both layers. 7 sc fo. Leave a long thread end to sew on.

โ€” Legs :

Item Name (P1) :

MAKE 2 - MAIN COLOR

Round 1 :

Rnd 1-6 sc in a mr

Round 2 :

Rnd 2-6 sc inc(12)

Round 3 :

Rnd 3-(6 times)1 sc into sc next inc(18)

Round 4-5 :

Rnd 4-5(2 ring)sc into sc(18)

Round 6-7 :

Rnd 6-7 sc into sc(4 sc inc)7 sc into sc(22)

Round 7-8 :

Rnd 7-8-(2 ring)sc into sc(22)

Round 9 :

Rnd 9-7 sc into sc(4 sc dec)7 sc into sc(18)

Info :

Stuff the legs. keep filling as you go

Round 10 :

Rnd 10-6 sc into sc(4 sc dec)6 sc into sc(14)

Round 11-24 :

Rnd 11-24-((14 ring)sc into sc(14)

Round 25 :

Rnd 25-Straighten it. sink the needle into both layers. 6 sc fo. Leave a long thread end to sew on.

โ€” Ears :

Item Name (P1) :

MAKE 2 - MAIN COLOR

Round 1 :

Rnd 1-6 sc in a mr

Round 2 :

Rnd 2-2 sc inc(8)

Round 3 :

Rnd 3-2 sc inc(10)

Round 4 :

Rnd 4-2 sc inc(12)

Round 5 :

Rnd 5-2 sc inc(14)

Round 6 :

Rnd 6-2 sc inc(16)

Round 7 :

Rnd 7-2 sc inc(18)

Round 8 :

Rnd 8-2 sc inc(20)

Round 9 :

Rnd 9-2 sc inc(22)

Round 10 :

Rnd 10-2 sc inc(24)

Round 11 :

Rnd 11-2 sc inc(26)

Round 12-23 :

Rnd 12-23-(12 ring)sc into sc(26)

Round 24 :

Rnd 24-2 sc dec(24)

Round 25 :

Rnd 25-2 sc dec(22)

Round 26 :

Rnd 26-2 sc dec(20)

Round 27 :

Rnd 27-2 sc dec(18)fo.

Info :

Leave a long thread to sew on.

โ€” Clothes :

Round 1 :

Rnd 1-8 sc in a mr

Round 2 :

Rnd2-8 sc inc(16)

Round 3 :

Rnd 3-(8 times)1 sc into sc next inc(24)

Round 4 :

Rnd 4-(8 times)2 sc into sc next inc(32)

Round 5 :

Rnd 5-(8 times)3 sc into sc next inc(40)

Round 6 :

Rnd 6-(8 times)4 sc into sc next inc(48)

Round 7 :

Rnd 7-(8 times)5 sc into sc next inc(56)

Round 8 :

Rnd 8-(8 times)6 sc into cr next inc(64 cr)

Round 9 :

Rnd 9-cr into cr(64)

Round 10 :

Rnd 10-10 ch.10 cr leave blank (22 cr)10 ch. 10 cr leave blank (22 cr)

Round 11 :

Rnd 11-10 ch into cr (22 cr into cr)10 ch into cr(22 cr into cr)(64 cr)

Round 12 :

Rnd 12-cr into cr(64)

Round 13 :

Rnd 13-cr into sc(64 sc)

Round 14 :

Rnd 14-(21 times)1 sc into sc next dec(42)

Round 15 :

Rnd 15- sc into sc(42)

Info :

LEG DETAIL - (3 ring)sc into sc(22)fo. clean the tip of the thread.

โ€” Jumpsuit Hanger :

Item Name (P1) :

MAKE 2

Round 1 :

Rnd 1-25 ch.

Round 2 :

Rnd 2-25 ch into sc(24)fo.Leave a long thread to sew

โ€” Carrot :

Round 1 :

Rnd 1-8 sc in a mr

Round 2 :

Rnd 2-8 sc inc(16)

Round 3 :

Rnd 3-(8 times)1 sc into sc next inc(24)

Round 4-6 :

Rnd 4-6-(3 ring)sc into sc(24)

Round 7 :

Rnd 7-2 sc dec(22)

Round 8 :

Rnd 8-2 sc dec(20)

Round 9 :

Rnd 9-2 sc dec(18)

Round 10 :

Rnd 10-2 sc dec(16)

Info :

Fill the carrot. keep filling as you go

Round 11 :

Rnd 11-sc into sc(16)

Round 12 :

Rnd 12-2 sc dec (14)

Round 13 :

Rnd 13-2 sc dec(12)

Round 14 :

Rnd 14-2 sc dec(10)

Round 15 :

Rnd 15-2 sc dec(8)

Round 16 :

Rnd 16-2 sc dec(6)fo.clean the tip of the thread.

Info :

LEAVES - GREEN

Round 1 (Leaves) :

Rnd 1-(5 times)1 sc into 7 ch.ch into 6 sc fo.

โ€” Joining Parts :

Info :

Sew sleeves to both sides, Rnd 36

Info :

Sew the legs to both sides between Rnd 50-55. Sleeve detail-rnd-9-In blo sc into 3 ch.

Info :

Sew the ears to both sides Rnd-5.
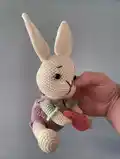
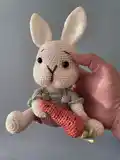
โ€” Final Photos :

Info :

Refer to the final photos for placement and finishing details.

Assembly Instructions

  • Place and attach safety eyes between rounds 13-14 with 8 single crochets between them before closing the head.
  • Sew sleeves to both sides at Round 36, aligning sleeve edge with the body and securing with whipstitch.
  • Sew the legs to both sides between Rnd 50-55, spacing them evenly and sewing firmly to the body for stability.
  • Sew the ears to both sides at Round 5, matching left and right for symmetry and reinforcing the base with several stitches.
  • Attach jumpsuit hanger straps and sew the leg detail to the clothing as shown, leaving long threads to secure and hide ends.

Important Notes

  • ๐Ÿ’กPlace safety eyes before closing the head โ€“ between rounds 13 and 14 with 8 stitches between them for correct placement.
  • ๐Ÿ’กStuff pieces gradually and firmly as you work to preserve the shape; overstuffing can distort the silhouette.
  • ๐Ÿ’กUse stitch markers to mark the beginning of rounds and any increases or decreases to keep counts accurate.
  • ๐Ÿ’กSink the needle into both layers when finishing sleeves and leg tops to create a neat, closed edge that will not unravel.

This sweet bunny amigurumi pattern is perfect for thoughtful handmade gifts and nursery decor.๐Ÿงถ The step-by-step rounds and assembly tips make finishing neat and enjoyable.๐Ÿงต Mix and match the main colors to personalise your little companion and bring a smile to someone's face.โœจ

You ask,

we answer.

FAQs

What size will the finished piece be?

The finished amigurumi measures around 20 cm in circumference and about 10 cm in length as stated in the pattern.

Can I use a different hook size or yarn weight?

Yes, you can change yarn weight and hook size, but the final size will vary; adjust hook to match your chosen yarn and keep tension consistent.

Do I need experience for this pattern?

This pattern is rated intermediate, so basic knowledge of single crochet, increases and decreases is recommended for best results.

How long does this project typically take?

Most crocheters finish this pattern in about 5-7 hours, depending on experience and how much time is spent on assembly and finishing.