🧢 Beautiful ✨ Detailed πŸ’ Adorable

Buzz Lightyear Amigurumi Pattern

Buzz Lightyear Amigurumi Pattern
4.2β˜… Rating
5-7 Hours Time Needed
3.0K Made This
βœ‚οΈ

Intermediate Level

Ideal for those with basic crochet experience, featuring slightly more advanced stitches and techniques to expand your skills.

⏱️

Weekend Treat

Takes 5-7 hours, making it an enjoyable project to finish over a couple of days.

🧸

Cute Companion

An adorable friend to cherish, handcrafted with love to bring comfort and joy for years to come.

About This Buzz Lightyear Amigurumi Pattern

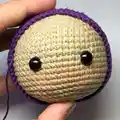
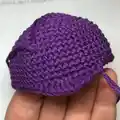
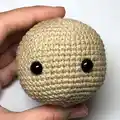
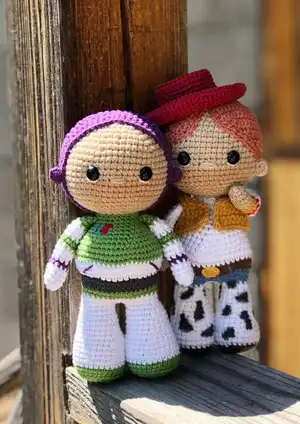
This pattern guides you through crocheting a full Buzz Lightyear amigurumi with detailed rounds for each piece. You will create the head, purple head detail, ears, legs, body, hands and embroidered emblem. Photos accompany steps for clarity and the pattern uses accessible stitches with color change notes.

Buzz Lightyear Amigurumi Pattern crochet pattern - detailed view of completed project

Perfect for crafters wanting a character-rich project, it includes tool and materials lists and clear abbreviations. Follow each round exactly to achieve the correct shaping and proportions.

Why You'll Love This Buzz Lightyear Amigurumi Pattern

I absolutely love this pattern because it brings a playful, recognizable character to life with simple shapes and thoughtful details. I enjoy how the color changes and small embroidered emblem let you add personality without complicated techniques. The pattern balances clear structure with creative finishing, so you get professional-looking results. It makes a wonderful gift or keepsake that shows off handmade charm.

Buzz Lightyear Amigurumi Pattern step 1 - construction progress Buzz Lightyear Amigurumi Pattern step 2 - assembly progress Buzz Lightyear Amigurumi Pattern step 3 - details and accessories Buzz Lightyear Amigurumi Pattern step 4 - final assembly and finishing

Switch Things Up

I love making variations of this Buzz Lightyear by changing colors and small details to create unique characters.

I sometimes swap the green for teal or mint to give a fresh, modern look while keeping the same stitch counts and shaping.

If you want a mini keychain version use thinner yarn and a smaller hook; for a larger cuddle toy use bulky yarn and a bigger hook.

I add felt or embroidered badges instead of embroidered thread for easier, cleaner emblem details when gifting to children.

I often experiment with different eye styles β€” safety eyes, embroidered eyes, or French knots β€” to change the facial expression and personality.

Try adding wire in the arms for posable limbs, or make alternate hand shapes to hold tiny props or accessories.

Mixing yarn textures like cotton for the body and a fluffier yarn for accents can make interesting contrasts and a tactile toy.

To create a set, change hair or helmet colors and make matching companions with coordinated outfits and accessories.

I recommend practicing the emblem embroidery on a scrap first so you can get neat, repeatable stitches before embroidering the final piece.

Don’t be afraid to customize the proportions slightly β€” adding a few rounds to the body or shortening the legs gives a different silhouette while using the same techniques.

Common Mistakes & How to Fix Them

βœ— Skipping stitch markers during rounds can cause you to lose the start point and miscount rounds; place a marker at the beginning of each round to stay oriented. βœ— Forgetting to leave long tails for sewing will make assembly difficult and require redoing pieces; always leave a generous tail when instructed for sewing parts together. βœ— Not stuffing gradually leads to lumps or under-stuffed sections which distort shape; stuff in small amounts while shaping to maintain a smooth finish and correct proportions. βœ— Changing colors without fastening off or weaving in tails can create messy joins; carry color where appropriate or weave in ends securely to keep clean color changes. βœ— Rushing the decreases often creates holes or uneven shaping; count stitches after each decrease round and make decreases evenly spaced to maintain smooth shaping.

Buzz Lightyear Amigurumi Pattern

Make your own adorable Buzz Lightyear amigurumi with this detailed crochet pattern. You will follow step-by-step instructions for the head, body, legs, arms and tiny details so your character looks just right. The pattern includes material and tool lists, abbreviations, and clear assembly guidance to help you complete a charming handmade toy. Perfect for gifting or adding to your collection of handmade characters.

Intermediate 5-7 Hours

Materials Needed for Buzz Lightyear Amigurumi Pattern

β€” Main Fabric

  • 01
    Alize Cotton Gold - 126 (main skin color)
  • 02
    Alize Cotton Gold - 152 (green color)
  • 03
    Alize Cotton Gold - 55 (purple color)
  • 04
    Drops Love You 7 - 10 (white color)
  • 05
    Drops I Love You 7 - 04 (grey/other accent color)
  • 06
    Fiber filling / polyester stuffing (sufficient amount for head, body and limbs)

β€” Tools Required

  • 01
    Crochet hook size No.2 (approximately 2 mm)
  • 02
    Tapestry needle for sewing
  • 03
    Plastic safety eyes diameter 7-8 mm (2 pieces)
  • 04
    Scissors
  • 05
    Stitch markers (recommended)
  • 06
    Polyester stuffing (fiber filling)

Progress Tracker

0% Complete

β€” Materials and tools :

Info :

Alize Cotton Gold - 126. Alize Cotton Gold - 152. Alize Cotton Gold - 55. Drops Love you 7 - 10. Drops I Love You 7 - 04. Fiber filling. Hook size β„–2. Tapestry needle for sewing. Scissors. The plastic eyes diameter 7-8 mm.

β€” Abbreviations :

Infos :

SC - single crochet. MR - magic ring. CH - chain. INC - increase. DEC - decrease. BLO - back loops only. DC - double crochet. HDC - half double crochet.

β€” Head :

Round 1 :

6 sc in mr

Round 2 :

6 inc (12)

Round 3 :

(1 sc, inc) x 6 (18)

Round 4 :

(2 sc, inc) x 6 (24)

Round 5 :

(3 sc, inc) x 6 (30)

Round 6 :

(4 sc, inc) x 6 (36)

Round 7 :

(5 sc, inc) x 6 (42)

Round 8 :

(6 sc, inc) x 6 (48)

Round 9 :

(7 sc, inc) x 6 (54)

Round 10-19 :

54 sc

Info :

Between the 15-16 rows insert safety eyes, 7-8 mm in diameter.

Round 20 :

(7 sc, dec) x 6 (48)

Round 21 :

(6 sc, dec) x 6 (42)

Info :

Stuff

Round 22 :

(5 sc, dec) x 6 (36)

Round 23 :

(4 sc, dec) x 6 (30)

Round 24 :

(3 sc, dec) x 6 (24)

Round 25 :

(2 sc, dec) x 6 (18)

Round 26 :

(1 sc, dec) x 6 (12)

Info :

Stuff

β€” Detail for head :

Info :

Start working with purple yarn color

Round 1 :

6 sc in mr

Round 2 :

6 inc (12)

Round 3 :

(1 sc, inc) x 6 (18)

Round 4 :

(2 sc, inc) x 6 (24)

Round 5 :

(3 sc, inc) x 6 (30)

Round 6 :

(4 sc, inc) x 6 (36)

Round 7 :

(5 sc, inc) x 6 (42)

Round 8 :

(6 sc, inc) x 6 (48)

Round 9 :

(7 sc, inc) x 6 (54)

Round 10-16 :

54 sc

Round 17 :

(hdc, 2 dc, 2 inc (dc), 2 dc, hdc, 2 sc) x 2, 34 sc (58)

Round 18 :

(hdc, dc x 8, hdc, 2 sc) x 2, 34 sc (58)

Round 19 :

22 hdc, 36 sc (58)

Round 20 :

58 sc

Info :

Leave a long tail for sewing

Info :

Sew the detail on the head

β€” Ears (x2) :

Info :

Start working with purple color

Round 1 :

6 sc in mr

Info :

Leave a long tail for sewing

β€” Start forming head :

Info :

Between the 16-17 rows sew on ears. Distance from ears to eyes 5-6 sc.

Item Name (P1) :

Embroider nose.

Info :

Start forming eyes: Embroider eyes: insert the white threaded needle on bottom of the eye and thread it to the bottom as shown in the picture. Bring the thread out near the second eye and repeat the same steps.

Info :

Toned cheeks

β€” Legs (x2) :

Info :

Start working with green color

Round 1 :

6 sc in mr

Round 2 :

6 inc (12)

Round 3 :

(1 sc, inc) x 6 (18)

Round 4 :

(2 sc, inc) x 6 (24)

Round 5 :

(3 sc, inc) x 6 (30)

Round 6 :

BLO 30 sc

Round 7 :

30 sc

Round 8 :

Change yarn color to the white color: 30 sc

Round 9 :

(8 sc, dec) x 3 (27)

Round 10-11 :

27 sc

Round 12 :

(7 sc, dec) x 3 (24)

Round 13 :

24 sc

Round 14 :

(6 sc, dec) x 3 (21)

Round 15-16 :

21 sc

Round 17 :

(5 sc, dec) x 3 (18)

Round 18 :

18 sc

Round 19 :

(4 sc, dec) x 3 (15)

Info :

Stuff

Info :

Crochet second leg the some way and continue crocheting the body.

Info :

Do not cut off the thread on the second leg and continue crocheting the body. The gap between the legs should be 3 ch.

Round 1 :

15 sc on the leg, 3 sc on the chain, 15 sc on the leg, 3 sc on the chain (36)

Round 2 :

36 sc

Round 3 :

Change yarn color to the green color: 36 sc

Round 4 :

36 sc

Round 5 :

Change yarn color to the grey color: 36 sc

Round 6-7 :

36 sc

Round 8 :

Change yarn color to the white color: BLO (5 sc, inc) x 6 (42)

Round 9 :

(6 sc, inc) x 6 (48)

Round 10 :

(7 sc, inc) x 6 (54)

Round 11 :

Change yarn color to the green color: 54 sc

Round 12-13 :

54 sc

Round 14 :

(7 sc, dec) x 6 (48)

Round 15 :

(6 sc, dec) x 6 (42)

Round 16 :

(5 sc, dec) x 6 (36)

Round 17 :

(4 sc, dec) x 6 (30)

Info :

Stuff

Round 18 :

30 sc

Round 19 :

(3 sc, dec) x 6 (24)

Round 20-21 :

24 sc

Info :

Stuff

Info :

Leave a long tail for sewing

Info :

Sew the head to the body

Info :

Embroider emblem with blue and red thread

β€” Hands :

Info :

Start working with white color

Round 1 :

6 sc in mr

Round 2 :

(1 sc, inc) x 3 (9)

Round 3-5 :

9 sc

Round 6 :

Change yarn color to the purple color: 9 sc

Round 7 :

Change yarn color to the white color: 9 sc

Round 8-9 :

9 sc

Round 10 :

Change yarn color to the green color: 9 sc

Round 11 :

9 sc

Round 12 :

Change yarn color to the white color: 9 sc

Round 13-14 :

9 sc

Round 15 :

Change yarn color to the green color: 9 sc

Round 16-17 :

9 sc

Info :

Stuff

Info :

Sew the hands to the body.

β€” Assembly :

Info :

Attach ears to the head between rounds 16-17, distance from ears to eyes 5-6 sc.

Info :

Insert safety eyes between rounds 15-16, use 7-8 mm eyes and secure firmly.

Info :

Sew the purple head detail onto the head leaving the seam neat and use the long tail for sewing.

Info :

Sew the head to the body and embroider the blue and red emblem on the chest as shown in pictures.

Assembly Instructions

  • Insert safety eyes between rounds 15-16 of the head, using 7-8 mm diameter eyes and secure the safety backs tightly.
  • Sew purple head detail onto the main head using the long tail left for sewing, aligning the edge evenly around the face before securing.
  • Attach ears between rounds 16-17 of the head, spacing them so there are 5-6 single crochet stitches between each ear and the nearest eye.
  • Sew the head to the top opening of the body, matching the edges and using a whipstitch or mattress stitch for a secure seam.
  • Sew the hands to the body on either side at the level shown in the photos, positioning them symmetrically and tacking before finishing.
  • Embroider the small emblem on the chest with blue and red thread following the reference photos, securing thread tails neatly inside.

Important Notes

  • πŸ’‘Leave a long tail on pieces where the pattern instructs to do so; this makes sewing details and assembly much easier.
  • πŸ’‘Stuff parts gradually and firmly, especially the head and body, to avoid lumps and maintain smooth shaping throughout assembly.
  • πŸ’‘Use safety eyes with caution and fasten their backs securely; for childrens toys consider embroidering eyes instead for safety.
  • πŸ’‘Keep consistent tension throughout to ensure matching sizes for both legs and symmetrical body shaping.
  • πŸ’‘Pin or baste pieces in place before final sewing to check alignment and symmetry, especially the head detail and ears.

This Buzz Lightyear amigurumi pattern brings playful, nostalgic fun to your crochet projects. It combines clear shaping with cute embroidered details so your character looks just right. Perfect as a handmade gift or a cherished shelf companion, this pattern makes a memorable keepsake. 🧢✨🧡

You ask,

we answer.

FAQs

What size will the finished piece be?

The finished amigurumi measures approximately 20-25 cm tall when using the recommended yarns and hook size, though exact size will vary with tension and yarn choice.

Can I use different yarn weights for this pattern?

Yes, you can use different yarn weights but this will change the final size; adjust your hook size accordingly and expect to modify stuffing and eye size for proportion.

Do I need prior crochet experience for this pattern?

This pattern is rated intermediate and requires familiarity with basic amigurumi techniques, increases, decreases, and color changes for best results.

How long does this project typically take to complete?

Most crafters complete this project in 5-7 hours, depending on experience, speed, and how much time you spend on embroidery and assembly.

What size safety eyes should I use?

The pattern recommends plastic safety eyes with a diameter of 7-8 mm, inserted between rounds 15-16 of the head.