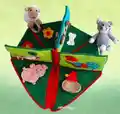
Make a charming interactive quiet book filled with farm animal pages and small play pieces. This pattern guides you through crochet charts, intarsia colorwork, and simple 3D toy pieces so you can create a tactile book for toddlers. Perfect as a handmade gift or a keepsake, the finished book is compact, washable, and packed with sensory details to engage little hands.
Progress Tracker
0% Complete
— Tips :
Infos :
Each page is worked separately and at the end the pages are joined together to form the quiet book.
Infos :
I recommend using the intarsia crochet method. This technique allows us to use two or more different colors in each row. It's actually a lot less complicated than it looks. Just follow these simple rules: The most important thing: 1 square on the chart is 1 sc! When you work the right side of your page all tails should be on the wrong side of your work and you should read the chart from right to left. When you work the wrong side of your page all tails should be on the wrong side of your work, in front of you and you should read the chart from left to right.
Infos :
To make a neat color change: As you make the last stitch in the old color, pause before the last step of that stitch. For the final 'yarn over and draw through all loops on the hook', substitute the new yarn, so you draw the new yarn through your loops. This gives a cleaner edge to the color change.
Infos :
How to work invisible decrease – insert the hook into front loop of first stitch, insert the hook into front loop of next stitch, yarn over and pull through first two loops on hook. Now you have two loops left on hook – yarn over and draw through both loops.
— Page 1 - Mouse :
Info :
Color key: Powder 143, Grey 21, Acid 612, Crayon blue 611
Row 1 :
Start in acid (color 612) and ch 41. sc in the 2nd ch from the hook, sc in next 39 ch [40]
Row 2 :
turn, 1 lifting ch, sc in all 40 st [40]
Row 3 :
turn, 1 lifting ch, 19 sc (acid), 1 sc (powder), 20 sc (acid) [40] (It's the right side of your work).
Row 4 :
turn, 1 lifting ch and continue according to the chart from left to right, fasten off after Row 40.
Item Name (Eye – black (color 60)) :
Start 6 sc in a magic ring, sl st, fasten off, leaving a tail for sewing.
Item Name (Nose – powder (color 143)) :
Start 6 sc in a magic ring, sl st, fasten off, leaving a tail for sewing.
Item Name (Front paw – powder (color 143)) :
Rnd 1: ch 4. Rnd 2: 3 sc in the 2nd ch from the hook, sc in next ch, 3 sc in the last ch, turn and continue working on the other side of the chain, sc in next st, sl st [8] Fasten off, leaving a tail for sewing.
Item Name (Hind paw – powder (color 143)) :
Rnd 1: ch 5. Rnd 2: 3 sc in the 2nd ch from the hook, sc in next 2 ch, 3 sc in the last ch, turn and continue working on the other side of the chain, sc in next 2 st, sl st [10] Fasten off, leaving a tail for sewing.
Item Name (First ear – grey (color 21)) :
Rnd 1: start 6 sc in a magic ring [6]. Rnd 2: inc 2 times, (2 hdc in next st) repeat 2 times, inc 2 times, sl st [12] Fasten off, leaving a tail for sewing.
Item Name (Second ear – powder (color 143)) :
Rnd 1: start 6 sc in a magic ring [6]. Rnd 2 [Grey]: inc 2 times, (2 hdc in next st) repeat 2 times, inc 2 times, sl st [12] Fasten off, leaving a tail for sewing.
Item Name (Cheese – yellow (color 216)) :
Row 1: ch 4. Row 2: sc in the 2nd ch from the hook, sc in next 2 ch [3]. Row 3: turn, 1 lifting ch, inc, sc in next 2 st [4]. Row 4: turn, 1 lifting ch, inc, sc in next 3 st [5]. Row 5: turn, 1 lifting ch, inc, sc in next 4 st [6]. Row 6: turn, 1 lifting ch, inc, sc in next 5 st [7]. Row 7: turn, 1 lifting ch, inc, sc in next 6 st [8]. Row 8: turn, 1 lifting ch, inc, sc in next 7 st [9]. Row 9: turn, 1 lifting ch, inc, sc in next 8 st [10]. Row 10: turn, 1 lifting ch, inc, sc in next 9 st [11]. Row 11: turn, 1 lifting ch, sc in all 11 st [11]. Row 12: turn, 1 lifting ch, sc2tog, sc in next 7 st, sc2tog [9]. Row 13: turn, 1 lifting ch, sc2tog, sc in next 5 st, sc2tog [7]. Rnd 14: turn, 1 lifting ch, sc across the whole shape, sl st, fasten off, leaving a tail for sewing. [TIP: You must work 2 sc in 1 st in the corners]
Info :
Sewing the parts on the page: 1. Eye, Nose, Ears (the colored ear only at the base) – photo 1; 2. Paws, Cheese – photo 2; 3. Use tangerine (color 352) to make surface slip stitches and French knots on the cheese - from photo 3 to photo 10; 4. Use powder (color 143) and surface slip stitches to express the texture of the tail and make it pop up – photo 11; 5. Use grey and surface slip stitches for the paw – photo 12.
Info :
TIPS: How to Make Surface Slip Stitches: 1. Insert your hook through your work. 2. Pull up a loop. 3. Insert your hook into the next 'hole'. 4. Yarn over, pull through your work and then pull through the loop on your hook, completing your slip stitch.
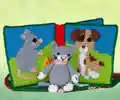
— Page 2 - Dog :
Info :
Color key: Acid 612, Camel 368, Crayon blue 611, Chestnut 179, White 55
Row 1 :
Start in acid (color 612) and ch 41. sc in the 2nd ch from the hook, sc in next 39 ch [40]
Row 2 - 5 :
turn, 1 lifting ch, sc in all 40 st [40]
Row 6 :
turn, 1 lifting ch, 17 sc (acid), 3 sc (white), 3 sc (camel), 7 sc (white), 10 sc (acid) [40] (It's the wrong side of your work).
Row 7 :
turn, 1 lifting ch and continue according to the chart from right to left, fasten off after Row 40.
Item Name (Muzzle – white (color 55)) :
Rnd 1: ch 5. Rnd 2: 3 sc in the 2nd ch from the hook, sc in next 2 ch, 3 sc in the last ch, turn and continue working on the other side of the chain, sc in next 2 st [10]. Rnd 3: (inc 3 times, sc in next 2 st) repeat 2 times, sl st [16]. Fasten off, leaving a tail for sewing.
Item Name (Front paws – white (color 55) – 2 pieces) :
Rnd 1: ch 4. Rnd 2: 3 sc in the 2nd ch from the hook, sc in next ch, 3 sc in the last ch, turn and continue working on the other side of the chain, sc in next st, sl st [8]. Fasten off, leaving a tail for sewing.
Item Name (Hind paw – white (color 55)) :
Rnd 1: ch 5. Rnd 2: 3 sc in the 2nd ch from the hook, sc in next 2 ch, 4 hdc in the last ch, turn and continue working on the other side of the chain, sc in next 2 st, sl st [11]. Fasten off, leaving a tail for sewing.
Item Name (Eyes – black (color 60) – 2 pieces) :
Start 6 sc in a magic ring, sl st, fasten off, leaving a tail for sewing.
Item Name (Nose – chestnut (color 179)) :
Start 3 sc in a magic ring, fasten off, leaving a tail for sewing.
Item Name (Ears – chestnut (color 179) – 2 pieces) :
Rnd 1: ch 10. Rnd 2: 3 sc in the 2nd ch from the hook, sc in next 3 ch, hdc in next 3 ch, dc in next ch, 5 dc in last ch, turn and continue working on the other side of the chain, dc in next st, hdc in next 3 st, sc in next 3 st [22]. Rnd 3: inc, sc in next st, inc, sc in next 6 st, hdc in next 2 st, 3 hdc in next st, hdc in next st, 3 hdc in next st, hdc in next 2 st, sc in next 6 st, sl st, fasten off, leaving a tail for sewing.
Item Name (Tail – chestnut (color 179)) :
Row 1: ch 8. Row 2: sl st in the 2nd ch from the hook, inc 3 times, sc in next 3 ch, fasten off, leaving a tail for sewing.
Info :
Sewing the parts on the page: 1. Muzzle, Nose, Eyes – photo 1; 2. Ears (only at the base) – photo 2; 3. Paws, Tail (only at the base) – photo 3.
— Page 3 - Horse :
Info :
Color key: Acid 612, Camel 368, Green 118, Crayon blue 611, Chestnut 179
Row 1 :
Start in green (color 118) and ch 41. sc in the 2nd ch from the hook, sc in next 39 ch [40]
Row 2 :
turn, 1 lifting ch, sc in all 40 st [40]
Row 3 :
turn, 1 lifting ch, 39 sc (green), 1 sc (acid) [40] (It's the right side of your work).
Row 4 :
turn, 1 lifting ch and continue according to the chart from left to right, fasten off after Row 40.
Item Name (Head – camel (color 368)) :
Row 1: start 4 sc in a magic ring [4]. Row 2: turn, 1 lifting ch, sc in all 4 st [4]. Row 3 [chestnut]: turn, 1 lifting ch, sc in all 4 st [4]. Row 4: turn, 1 lifting ch, inc, sc in next 2 st, inc [6]. Row 5: turn, 1 lifting ch, sc in all 6 st [6]. Row 6: turn, 1 lifting ch, inc, sc in next 5 st [7]. Row 7: turn, 1 lifting ch, inc, sc in next 6 st [8]. Row 8: turn, 1 lifting ch, inc, sc in next 7 st [9]. Row 9: turn, 1 lifting ch, inc, sc in next 8 st [10]. Row 10: turn, 1 lifting ch, sc2tog, sc in next 6 st, sc2tog [8]. Row 11: turn, 1 lifting ch, sc2tog, sc in next 4 st, sc2tog, ch 4, sl st in the 2nd ch from the hook, sc in next 2 ch, sl st in the base, fasten off, leaving a tail for sewing.
Item Name (Mane – camel (color 368)) :
Row 1: ch 31. Row 2: sc in the 2nd ch from the hook, sc in next 17 ch, (2 sc in next ch) repeat 12 times, fasten off, leaving a tail for sewing.
Item Name (Eye – black (color 60)) :
Start 2 sc in a magic ring, fasten off, leaving a tail for sewing.
Item Name (Hooves – black (color 60) – 4 pieces) :
Start 3 sc in a magic ring, fasten off, leaving a tail for sewing.
Item Name (Ear – chestnut (color 179)) :
Row 1: ch 4. Row 2: sl st in the 2nd ch from the hook, sc in next ch, hdc in next ch, fasten off, leaving a tail for sewing.
Info :
Sewing the parts on the page: 1. Head – photo 1; 2. Mane – photo 2; 3. Eye, Ear - photo 3; 4. Hooves – photo 4; 5. Use camel and surface slip stitches for the tail (2 rows) – photo 5.
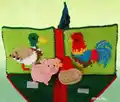
— Page 4 - Cow :
Info :
Color key: Powder 143, Acid 612, Camel 368, Green 118, Crayon blue 611, Chestnut 179
Row 1 :
Start in green (color 118) and ch 41. sc in the 2nd ch from the hook, sc in next 39 ch [40]
Row 2 - 3 :
turn, 1 lifting ch, sc in all 40 st [40]
Row 4 :
turn, 1 lifting ch, 15 sc (green), 2 sc (acid), 11 sc (green), 4 sc (acid), 8 sc (green) [40] (It's the wrong side of your work).
Row 5 :
turn, 1 lifting ch and continue according to the chart from right to left, fasten off after Row 40.
Item Name (Head – camel (color 368)) :
Rnd 1: start 6 sc in a magic ring [6]. Rnd 2: inc 6 times [12]. Rnd 3: (sc, inc) repeat 6 times [18]. Rnd 4: [camel] (sc in next 2 st, inc) repeat 2 times, [chestnut] sc in next 2 st, inc, [camel] (sc in next 2 st, inc) repeat 3 times [24]. Rnd 5: [camel] sc in next 3 st, inc, sc in next 3 st, [chestnut] inc, sc in next 3 st, inc, [camel] sc in next 2 st, [chestnut] sc, inc, sc in next 2 st, [camel] sc, inc, sc in next 3 st, inc [30]. Rnd 6: [camel] sc in next 3 st, sl st, fasten off, leaving a tail for sewing.
Item Name (Hooves – black (color 60) – 4 pieces) :
Start 3 sc in a magic ring, fasten off, leaving a tail for sewing.
Item Name (Eyes – black (color 60) – 2 pieces) :
Start 2 sc in a magic ring, fasten off, leaving a tail for sewing.
Item Name (Horns – chestnut (color 179) – 2 pieces) :
Row 1: ch 5. Row 2: sl st in the 2nd ch from the hook, (2 sc in next ch) repeat 2 times, 2 hdc in next ch, fasten off, leaving a tail for sewing.
Item Name (Ears – camel (color 368) – 2 pieces) :
Row 1: ch 4. Row 2: sc in the 2nd ch from the hook, hdc in next 2 ch, fasten off, leaving a tail for sewing.
Item Name (Muzzle – powder (color 143)) :
Rnd 1: ch 5. Rnd 2: 3 sc in the 2nd ch from the hook, sc in next 2 ch, 3 sc in the last ch, turn and continue working on the other side of the chain, sc in next 2 st [10]. Rnd 3: (inc 3 times, sc in next 2 st) repeat 2 times, sl st [16] Fasten off, leaving a tail for sewing.
Info :
Sewing the parts on the page: 1. Head – photo 1; 2. Muzzle, Eyes – photo 2; 3. Horns (only at the base) – photo 3; 4. Ears (only at the base) – photo 4; 5. Hooves – photo 5; 6. Use camel and surface slip stitches for the tail – photo 6.
— Page 5 - Duck :
Info :
Color key: White 55, Acid 612, Tangerine 352, Camel 368, Green 118, Chestnut 179, Black 60
Row 1 :
Start in acid (color 612) and ch 41. sc in the 2nd ch from the hook, sc in next 39 ch [40]
Row 2 - 4 :
turn, 1 lifting ch, sc in all 40 st [40]
Row 5 :
turn, 1 lifting ch, 20 sc (acid), 6 sc (tangerine), 14 sc (acid) [40] (It's the right side of your work).
Row 6 :
turn, 1 lifting ch and continue according to the chart from left to right, fasten off after Row 40.
Item Name (Head – green (color 118)) :
Rnd 1: start 6 sc in a magic ring [6]. Rnd 2: inc 6 times [12]. Rnd 3: (sc, inc) repeat 6 times [18]. Rnd 4: (sc, inc, sc) repeat 6 times [24]. Row 5: sc in next 2 st, sl st, fasten off, leaving a tail for sewing.
Item Name (Beak – yellow (color 216)) :
Rnd 1: ch 8. Rnd 2: sl st in the 2nd ch from the hook, sc in next 2 ch, hdc in next 2 ch, dc, 2 dc in the last ch, ch 3, sl st in the same ch, 3 sc in the same ch, sc in next 4 st, sl st, fasten off, leaving a tail for sewing.
Item Name (Eye – black (color 60)) :
Start 2 sc in a magic ring, fasten off, leaving a tail for sewing.
Item Name (Feathers – camel (color 368) – 4 pieces) :
Row 1: ch 8. Row 2: sc in the 2nd ch from the hook, hdc, dc, tr, dc, hdc, sc, fasten off, leaving a tail for sewing.
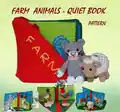
This Farm Animals quiet book pattern is a delightful mix of charted colorwork and small toy assembly, perfect for gifting to curious toddlers. The finished book is compact, washable, and packed with tactile details to explore. With clear charts and step-by-step photos, you will enjoy bringing every page to life. 🧶📚😊