🧢 Beautiful ✨ Detailed πŸ’ Adorable

By Your Side Basket Bag Pattern

By Your Side Basket Bag Pattern
4.0β˜… Rating
5-7 Hours Time Needed
2.6K Made This
βœ‚οΈ

Intermediate Level

Ideal for those with basic crochet experience, featuring slightly more advanced stitches and techniques to expand your skills.

⏱️

Weekend Treat

Takes 5-7 hours, making it an enjoyable project to finish over a couple of days.

✨

Stylish Touch

An elegant detail to elevate any look, combining traditional techniques with contemporary design sensibilities.

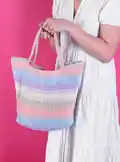
About This By Your Side Basket Bag Pattern

This pattern creates a roomy, striped basket-style tote crocheted in Paintbox Yarns Recycled Crafty Pots. It features simple single (double) crochet rounds worked flat around a rectangular base with integrated handles. Perfect for market trips, beach days, or everyday carry, the bag combines functionality with pretty color transitions.

By Your Side Basket Bag Pattern crochet pattern - detailed view of completed project

The instructions use US terminology with UK equivalents given in brackets, and the pattern includes full round-by-round shaping for the base and body. You'll finish by weaving in ends and blocking the bag to shape for a neat result.

Why You'll Love This By Your Side Basket Bag Pattern

I absolutely love this pattern because it turns recycled-style yarn into a beautiful, practical tote that you can use every day. I enjoy how the simple repeating rounds create a satisfying rhythm while the stripes add instant visual interest. The integrated handles are neat and sturdy, so the bag feels durable yet soft. It is versatile to customize with your favorite colorways and makes a thoughtful, handmade gift.

By Your Side Basket Bag Pattern step 1 - construction progress By Your Side Basket Bag Pattern step 2 - assembly progress By Your Side Basket Bag Pattern step 3 - details and accessories By Your Side Basket Bag Pattern step 4 - final assembly and finishing

Switch Things Up

I love customizing this bag by changing the stripe sequence to suit my wardrobe, using bold color blocks for a statement look.

I sometimes swap the recommended yarn for a slightly bulkier recycled cotton and use a larger hook to make a chunkier, more structured tote.

To create a smaller version perfect for a child or a mini bag, I use a lighter weight yarn and a smaller hook, adjusting stitch counts to maintain proportions.

I also add a lining for extra durability; I machine-stitch a fabric lining and hand-sew it inside for a tidy finish that prevents items catching on the crochet fabric.

For extra security, I sew on a magnetic snap or a button closure at the top center to keep belongings safe while carrying the bag.

If I want longer shoulder straps, I simply extend the ch 50 handle chains when creating the handle openings and join as instructed for a comfortable fit.

I like to embellish with a small crocheted flower or an embroidered initial on one side to make each bag unique and gift-ready.

Try adding a base insert or lightweight cardboard covered in fabric to the bottom to keep the bag upright and more structured for grocery runs.

Experiment with texture by alternating rows of front loop only single crochet (flo) as shown in round 10 to add a subtle ridge to the surface.

I often make a matching pouch using the same yarn leftovers to keep small items tidy inside the tote, using the same base shaping but working fewer rounds for a compact pouch.

Common Mistakes & How to Fix Them

βœ— Skipping stitch markers during the base increases can distort the shape; place lockable stitch markers exactly as instructed to mark increases and move them up each round. βœ— Not counting stitches after increases will cause uneven rounds and incorrect shaping; count your stitches at the end of each round to confirm the stitch total. βœ— Crocheting with inconsistent tension makes the bag edges ripple or sag; maintain an even, moderate tension and check gauge before starting to ensure correct sizing. βœ— Failing to secure handle joins properly can cause the straps to pull away under weight; when joining the handle chain back to the base, remove markers as you work and make a secure slip stitch join at the original handle bottom.

By Your Side Basket Bag Pattern

This colorful, striped basket bag is a stylish, sustainable tote worked in Paintbox Yarns Recycled Crafty Pots. You can make it for everyday use or as a thoughtful handmade gift. The pattern uses simple stitches and clear shaping instructions so you can enjoy a fun, rewarding crochet project.

Intermediate 5-7 Hours

Materials Needed for By Your Side Basket Bag Pattern

β€” Main Fabric

  • 01
    Paintbox Yarns Recycled Crafty Pots - 8ΒΎoz/250g balls (2 balls recommended) in Neapolitan colorway

β€” Tools Required

  • 01
    H-8 (5mm) crochet hook
  • 02
    Darning needle
  • 03
    2 lockable stitch markers
  • 04
    3 buttons size 1/2in/1.5cm

Progress Tracker

0% Complete

β€” Sizes :

Info :

Height 12Β½in/32cm. Width at widest point 17ΒΎin/45cm.

β€” You Will Need :

Infos :

Paintbox Yarns is exclusively available at lovecrafts.com. 8ΒΎoz/250g balls of Paintbox Yarns Recycled Crafty Pots: 2 balls in Neapolitan. 3 buttons size Β½in/1.5cm. H-8 (5mm) crochet hook. Darning needle. 2 lockable stitch markers.

β€” Gauge (Tension) :

Info :

14 sts and 15 rows to 4in/10cm in single (double) crochet stitch using H-8 (5mm) crochet hook.

β€” Good To Know :

Infos :

Paintbox Yarns cannot accept responsibility for the finished item if any yarn other than the recommended yarn is used. Yarn quantities are based on average requirements and are therefore approximate. Instructions are written using US terminology with UK terminology given in italics in round brackets ( ) afterwards. Where the figure 0 appears, no stitches, times or rows are worked for this size. Stripes may vary from those shown.

β€” Abbreviations :

Infos :

cm centimetres. ch chain. flo front loop only. g grams. in inches. mm millimetres. oz ounces. PM place marker. rep repeat. sc(dc) single (double) crochet. sl st slip stitch. st/s stitche/s.

β€” Base :

Round 1 :

Using H-8 (5mm) hook ch 13. 1st round 1 sc(dc) in second ch from hook, and in each ch to last ch, 3 sc(dc) in last ch (PM in second of these 3 sts), turn, work back along other side of foundation chain, working 11 sc(dc), 3 sc(dc) in last ch (PM in second of these 3 sts), sl st to join. | 26 sts.

Round 2 :

2nd round Ch 1 (does not count as a st), *1 sc(dc) in every st to 1 st before marker, 2 sc(dc) in next st, 3 sc(dc) in marked st, 2 sc(dc) in next st, PM in centre st of three-st increase; rep from * to complete the increases, 1 sc(dc) in each st to end of round seam, sl st to join. | 34 sts.

Round 3-9 :

Rep 2nd round a further 7 times, increasing 8 sts per round. | 90 sts.

Round 10 :

10th round Ch 1, 1 sc(dc) flo in each st around, keeping markers in place, sl st to join.

Round 11-18 :

11th - 18th rounds Ch 1, sc(dc) around, move markers up in place each round, sl st to join.

Round 19 :

19th round Ch 1, *sc(dc) to 1 st before marker, 2 sc(dc) in this st, 1 sc(dc) in marked st, PM in new st, 2 sc(dc) in st after marker; rep from * once more, sc(dc) to end of round seam, sl st to join. | 94 sts.

Round 20-22 :

20th – 22nd rounds Ch 1, sc(dc) around, move markers up in place each round, sl st to join.

Round Repeat :

Rep 19th - 22nd rounds 7 more times, increasing 4 sts in every repeat. | 122 sts.

Round Next :

Next round Ch 1, *sc(dc) to 1 st before marker, 2 sc(dc) in this st, 1 sc(dc) in marked st, PM in this new st, 2 sc(dc) in st after marker; rep from * once more, sc(dc) to end of round seam, sl st to join. | 126 sts.

Round Following :

Next round Ch 1, sc(dc) around, move markers up in place each round, sl st to join.

Info :

"Seam" should now be 26 sts away from closest marker.

Round Handle :

Next round Turn, sl st in next 10 sts, turn, ch 50, skip next 29 sts, 1 sc(dc) in following st and all sts to marker, remove marker, 18 sc(dc), ch 50, skip next 29 sts, 1 sc(dc) in following st and next 34 sts, removing markers as you go, sl st at bottom of original handle to join. | 168 sts.

Round Final :

Next 4 rounds Ch 1, sc(dc) around, sl st to join at seam. Break yarn and secure.

β€” To Finish :

Info :

Weave in all loose ends and block bag to shape to finish.

Assembly Instructions

  • Weave in all loose ends securely using a darning needle and trim any excess yarn to finish neatly.
  • Block the bag to shape by dampening lightly and pinning to the desired dimensions, allowing it to dry flat to hold its shape.
  • Form the handles by working the chain sections as instructed, then join the ends with slip stitch at the bottom of the original handle to secure them firmly.
  • Use the lockable stitch markers as you work to mark the increase points and move them up each round so the base and sides maintain correct shaping.

Important Notes

  • πŸ’‘Use stitch markers to keep track of increases and move them up each round to avoid losing your place.
  • πŸ’‘Check your gauge before beginning to ensure the finished bag measures correctly and the fabric drape is as expected.
  • πŸ’‘Weave in ends as you go to avoid bulky seams and make final finishing faster and tidier.

This By Your Side Basket Bag is designed to be a practical, everyday tote that shows off beautiful recycled-style yarn colorways. The integrated handles and striped body give a polished, modern look while staying wonderfully soft and functional. Enjoy making this versatile bag for yourself or as a thoughtful handmade gift. πŸ§ΆπŸ‘œ

You ask,

we answer.

FAQs

What size will the finished piece be?

The finished bag measures approximately 12Β½in/32cm in height and 17ΒΎin/45cm at the widest point when made with the recommended yarn and 5mm hook.

Can I use different yarn weights for this pattern?

Yes, you can use different yarn weights, but this will affect the final size and fabric drape; adjust your hook and check gauge to match the pattern measurements.

Do I need prior crochet experience for this pattern?

This pattern is rated intermediate, so familiarity with single crochet, increases, slip stitch joins, and working in rounds is recommended.

How long does this project typically take to complete?

Most crocheters complete this project in 5-7 hours, though time may vary based on experience level and the speed at which you work.