🧢 Beautiful ✨ Detailed πŸ’ Adorable

Cactus Amigurumi Pattern

Cactus Amigurumi Pattern
4.7β˜… Rating
2-3 Hours Time Needed
4.2K Made This
βœ‚οΈ

Beginner Friendly Level

Perfect for those just starting their crochet journey, with clear instructions and simple techniques

⏱️

Bite-Sized Project

Finishes in 2-4 hoursβ€”perfect for an afternoon of creative relaxation.

🎁

Tiny Treasure

Small, sweet, and gift-worthy creations that fit perfectly in the palm of your hand with detailed charm.

About This Cactus Amigurumi Pattern

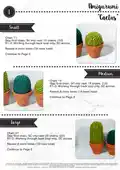
This pattern creates three small potted cacti β€” small, medium and large β€” worked in worsted weight yarn with simple single crochet rows. It is designed to be quick and satisfying, producing cute desk-sized plants that sit perfectly in tiny pots. The design uses back-loop-only rows for a ribbed cactus texture and easy finishing techniques to close and shape the top.

Cactus Amigurumi Pattern crochet pattern - detailed view of completed project

Perfect for beginners looking for a small, finishing-friendly project to practice tension and finishing. No complex increases or decreases β€” just chain, single crochet and simple finishing steps.

Why You'll Love This Cactus Amigurumi Pattern

I absolutely love this pattern because it turns simple stitches into a tiny, delightful home decor trio that anyone can make. The shapes are forgiving and finish up quickly, so you get a satisfying result in just a few hours. I enjoy how versatile the pattern is β€” a change of yarn or height instantly makes a new personality for each cactus. It also makes a lovely handmade gift that's inexpensive to make and always appreciated.

Cactus Amigurumi Pattern step 1 - construction progress Cactus Amigurumi Pattern step 2 - assembly progress Cactus Amigurumi Pattern step 3 - details and accessories Cactus Amigurumi Pattern step 4 - final assembly and finishing

Switch Things Up

I love changing the color palette to give each cactus its own personality β€” try mint, olive, or teal for a modern look.

To make a larger version, use a thicker yarn and larger hook and increase the chain lengths by the same increments.

For tiny keychain cacti, use finer yarn and a smaller hook, then attach a keyring before stuffing and closing.

I sometimes add embroidered spines with a contrasting yarn to create a cute textured effect that looks hand-drawn.

Try sewing on tiny felt flowers or crocheting mini flowers to glue to the top for seasonal variations.

Use different pot styles like painted terracotta or vintage teacups to change the presentation and make them gift-ready.

Make a set of cacti in graduated sizes by slightly varying the number of repeat rows for each one to create a cohesive grouping.

I often add a small weight (like a coin wrapped in tape) to the bottom so the cactus sits more stably in its pot.

To achieve posable segments, consider adding craft wire inside before stuffing, especially for taller designs.

I encourage experimenting with boucle or textured yarns for a fluffy, whimsical cactus that feels soft and different.

For a minimalist look, use monochrome yarn and subtle embroidered details rather than bold flowers or extras.

Common Mistakes & How to Fix Them

βœ— Skipping the back loop instruction will remove the ribbed texture and change the cactus shape; work through the back loop only where instructed to keep the correct texture and form. βœ— Leaving gaps by using a larger hook can show stuffing through the stitches; use the recommended hook or tighter tension to ensure the stuffing is hidden. βœ— Forgetting to stuff before closing makes shaping difficult and uneven; stuff gradually and shape as you pull the tail to close the top for a smooth finish. βœ— Not sewing the chain row and final row securely can cause the cactus to open at the seam; sew the chain row and the 20th row firmly through indicated loops to create a neat seam.

Cactus Amigurumi Pattern

Make a trio of adorable potted cacti with this easy amigurumi pattern. You will love how quickly these little plants come together and how perfect they are for gifts or desk decor. The pattern uses basic stitches and clear finishing steps so you can create a charming set in a single afternoon. Grab your worsted-weight yarn and a small pot and let's crochet!

Beginner Friendly 2-3 Hours

Materials Needed for Cactus Amigurumi Pattern

β€” Main Fabric

  • 01
    Worsted weight yarn (I use Caron Simply Soft in Heather)

β€” Tools Required

  • 01
    Crochet hook size D/3.25 mm
  • 02
    Polyester fiberfill
  • 03
    Darning needle
  • 04
    Scissors
  • 05
    Small pots (optional) for display

Progress Tracker

0% Complete

β€” Notes :

Info :

Note: Hook size is not as important as much as having your stitches tight so as to not show the stuffing inside. You don't want your stuffing to escape once you filled your amigurumi.

Info :

If you change your yarn size, be sure to adjust your eyes and embroidery accordingly.

β€” Small :

Round 1 :

Chain 11

Round 2 :

Skip first chain, SC into next 10 chains. (10)

Round 3 :

R1-2: Working through back loop only, SC across.

Round 4 :

Repeat 8 more times (18 rows total)

Info :

Continue to Page 2

β€” Medium :

Round 1 :

Chain 16

Round 2 :

Skip first chain, SC into next 15 chains. (15)

Round 3 :

R1-2: Working through back loop only, SC across.

Round 4 :

Repeat 8 more times (18 rows total)

Info :

Continue to Page 2

β€” Large :

Round 1 :

Chain 21

Round 2 :

Skip first chain, SC into next 20 chains. (20)

Round 3 :

R1-2: Working through back loop only, SC across.

Round 4 :

Repeat 8 more times (18 rows total)

Info :

Continue to Page 2

β€” Finishing :

Round 1 :

1. Sew up the chain row and the 20th row, through back loops only on 18th row.

Round 2 :

2. Place darning needle through the top stitch of every other row and pull tail through these stitches 2-3 times.

Round 3 :

3. Stuff

Round 4 :

4. Repeat assembly step 2.

Info :

Place flower on top of cactus, and place bottom into a small pot.

Assembly Instructions

  • Sew up the chain row and the 20th row; work through the back loops only on the 18th row to create a neat seam.
  • Use a darning needle to pass the tail through the top stitch of every other row and pull through 2-3 times to close the top securely.
  • Stuff the cactus firmly but gradually to shape before completing the final closure so you can control the roundness.
  • Place a small flower on the top for decoration and set the finished cactus into a small terracotta pot for display.

Important Notes

  • πŸ’‘Hook size is less important than maintaining tight stitches so stuffing does not show; tighten your tension if needed.
  • πŸ’‘If you change yarn size, adjust any eyes or embroidery and test gauge to ensure the cactus fits its pot.
  • πŸ’‘Stuff gradually and evenly to avoid lumps; overstuffing can distort the final shape and under-stuffing will flatten the cactus.

This little cactus trio makes a delightful and low-maintenance gift or desktop companion. They are quick to crochet, endlessly customizable, and brighten any shelf or windowsill. Make a set in different greens or add tiny flowers for personality and cheer. 🌡🧢

You ask,

we answer.

FAQs

What size will the finished piece be?

The finished cactus sizes vary by chain length: small (chain 11), medium (chain 16), and large (chain 21); final height will depend on yarn and tension but each fits a small pot.

Can I use different yarn weights for this pattern?

Yes, you can use different yarn weights but this will change the final size; if you use a different weight, adjust your hook and any embellishments like flowers or embroidery accordingly.

Do I need prior crochet experience for this pattern?

This pattern is beginner friendly and uses basic stitches like chain and single crochet, but familiarity with working through back loops and finishing techniques is helpful.

How long does this project typically take to complete?

Most crocheters finish one cactus in about 2-3 hours depending on experience and the size chosen; making the full trio can be completed in a single afternoon.