🧢 Beautiful ✨ Detailed πŸ’ Adorable

Capybara in a tub Amigurumi Pattern

Capybara in a tub Amigurumi Pattern
4.1β˜… Rating
5-7 Hours Time Needed
2.7K Made This
βœ‚οΈ

Intermediate Level

Ideal for those with basic crochet experience, featuring slightly more advanced stitches and techniques to expand your skills.

⏱️

Weekend Treat

Takes 5-7 hours, making it an enjoyable project to finish over a couple of days.

🧸

Cute Companion

An adorable friend to cherish, handcrafted with love to bring comfort and joy for years to come.

About This Capybara in a tub Amigurumi Pattern

This pattern guides you through crocheting a small capybara sitting in a tub of water with tiny oranges on top. You will work in rounds and simple rows to build the head, muzzle, ears, water disc, oranges, and a ribbed wooden tub. Photographs and clear step-by-step instructions help you follow each stage as you assemble the finished scene.

Capybara in a tub Amigurumi Pattern crochet pattern - detailed view of completed project

Sized at about 9 cm tall when using the recommended YarnArt Begonia yarn and a 1.5 mm hook. All components are stitched together and finished with simple embroidery details.

Why You'll Love This Capybara in a tub Amigurumi Pattern

I absolutely love this pattern because it captures a tiny scene with so much personality in a compact project. I enjoy how the textured tub and flat water disc combine with the capybara shape to create a playful vignette. I also appreciate that the pattern uses small, repeatable rounds so you can see steady progress as you work. Making the little oranges and the ribbed hoops adds delightful finishing touches that make the piece feel complete and handmade.

Capybara in a tub Amigurumi Pattern step 1 - construction progress Capybara in a tub Amigurumi Pattern step 2 - assembly progress Capybara in a tub Amigurumi Pattern step 3 - details and accessories Capybara in a tub Amigurumi Pattern step 4 - final assembly and finishing

Switch Things Up

I love how easy it is to customize this capybara by swapping yarn colors; try soft pastels for a whimsical look or natural browns for realism.

I often change yarn weight and hook size to make a mini keychain version or a larger cuddly toy; adjusting the hook will change the final size significantly.

I like adding embroidered features like a smile or different eyelid shapes to change the expression of the capybara.

Try making the water disc in variegated or sparkly yarn for a playful effect and to make the oranges pop visually.

You can replace the cardboard base with a thin felt circle for a softer interior or with a round plastic disc for extra stiffness.

I sometimes stitch on tiny beads or French knot details to decorate the tub rim or the orange leaves.

If you want a poseable capybara, consider inserting a small wire armature into the body before stuffing to adjust the head angle.

Mix different yarn textures for the tub and capybara body to create contrast β€” smooth yarn for water and rustic yarn for the wooden tub.

I recommend experimenting with placement of the oranges and how many you add; a trio gives a balanced look while a single orange feels minimal and cute.

Feel free to create a whole set by crocheting multiple capybaras with different accessories like tiny towels, hats, or floating rings to tell a story with your collection.

Common Mistakes & How to Fix Them

βœ— Crocheting too loosely will create visible holes and a floppy shape; maintain tight, consistent tension and use the recommended 1.5 mm hook for best results. βœ— Skipping stitch counts when following increases and decreases leads to distorted shaping; count your stitches after each round to ensure the correct stitch total. βœ— Stuffing unevenly results in lumps or a misshapen tub and capybara; stuff gradually and evenly, adding small amounts of stuffing while shaping the piece. βœ— Sewing parts without pinning first can cause misaligned placement; pin or baste pieces in place, check symmetry, then sew securely using matching yarn and a yarn needle.

Capybara in a tub Amigurumi Pattern

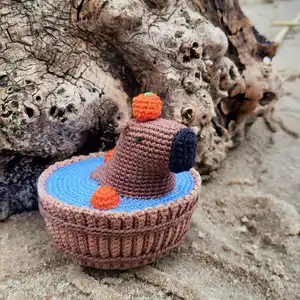
Make a charming Capybara relaxing in a tub with this friendly crochet pattern. You will create a small stuffed capybara, a round water detail, tiny oranges, and a ribbed wooden tub using simple amigurumi techniques. This pattern is full of photos and clear step-by-step rounds so you can follow along easily and enjoy the process. Perfect as a sweet handmade gift or a cute desk companion.

Intermediate 5-7 Hours

Materials Needed for Capybara in a tub Amigurumi Pattern

β€” Main Fabric

  • 01
    YarnArt Begonia (169 m/50 gr) used for all parts
  • 02
    Brown yarn - main body color (small amount, recommended YarnArt Begonia)
  • 03
    Orange yarn - for oranges and orange halves (small amount)
  • 04
    Beige yarn - for wooden tub (small amount)
  • 05
    Blue yarn - for water disc (small amount)
  • 06
    Black yarn - for muzzle and embroidered eyes (small amount)
  • 07
    Green yarn - small amount for embroidering orange leaf
  • 08
    Piece of cardboard - cut to fit tub bottom

β€” Tools Required

  • 01
    Hook 1,5 mm
  • 02
    Stuffing material
  • 03
    Needle
  • 04
    Piece of cardboard

Progress Tracker

0% Complete

β€” Head :

Info :

Brown color, hook 1,5 mm.

Round 1 :

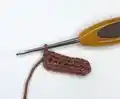
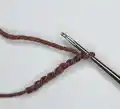
1row: 8 ch st, inc in the second stitch from the hook in the back loop (photo 1, 2), in the back loops of the chain: 5sc, 4sc in the last loop of the chain, keep crocheting on the other side of the chain (photo 3): 5sc, inc (photo 4) (18)

Round 2 :

2row: (incx2, 5sc, incx2)x2 (26)

Round 3 :

3row: (1sc, incx2, 7sc, incx2, 1sc)x2 (34)

Round 4 :

4row: 34sc (34)

Round 5 :

5row: 2sc, inc, 28sc, inc, 2sc (36)

Round 6-8 :

6-8rows: 36sc (36)

Round 9 :

9row: 2sc, incx2, 28sc, incx2, 2sc (40)

Round 10 :

10row: 40sc (40)

Round 11 :

11row: 16sc, invdecx4, 16sc (36)

Round 12 :

12row: 1sc, inc, 14sc, invdecx2, 14sc, inc, 1sc (36)

Round 13 :

13row: 3sc, inc, 12sc, invdecx2, 12sc, inc, 3sc (36)

Round 14 :

14row: 4ch st, inc in the second stitch from the hook in the back loop, in the back loops of the chain: 2sc, keep crocheting on the body: 2sc, inc, 30sc, inc, 2sc, on the other side of the chain: 2sc, inc (46)

Info :

Move the marker thread in the next stitch from the hook.

Round 15 :

15row: inc, 3sc, invdec, 34sc, invdec, 3sc, inc (46)

Round 16 :

16row: incx2, 2sc, invdecx2, 30sc, invdecx2, 2sc, incx2 (46)

Round 17 :

17row: (1sc, inc)x2, 2sc, invdec, 30sc, invdec, 2sc, (inc, 1sc)x2 (48)

Round 18 :

18row: 2sc, inc, 42sc, inc, 2sc

Info :

1sl st Fasten off and cut the yarn, leave a long end for sewing.

β€” Muzzle :

Info :

Black color, hook 1,5 mm.

Round 1 :

1row: 6ch st, inc in the second stitch from the hook in the back loop, in the back loops of the chain: 3sc, in the last loop of the chain: incx2, on the other side of the chain: (3sc, inc) (14)

Round 2 :

2row: (1sc, inc, 3sc, inc, 1sc)x2 (18)

Round 3 :

3row: 1sl st, inc, 5hdc, inc, 2sc, inc, 5hdc, inc, 1sl st (22)

Info :

Fasten off and cut the yarn, leave a long end for sewing.

β€” Ears :

Info :

Attach the thread between 4th and 5th rows as shown in the photo.

Infos :

Then in one stitch make: 1ch st, 1hdc, 1ch st, 1sl st. Fasten off and cut the yarn, hide the end of the yarn. The second ear make in the same way.

β€” Water :

Info :

Blue yarn, hook 1,5 mm.

Round 1 :

1row: 6sc in MR (6)

Round 2 :

2row: incx6 (12)

Round 3 :

3row: (1sc, inc)x6 (18)

Round 4 :

4row: (1sc, inc, 1sc)x6 (24)

Round 5 :

5row: (3sc, inc)x6 (30)

Round 6 :

6row: (2sc, inc, 2sc)x6 (36)

Round 7 :

7row: (5sc, inc)x6 (42)

Round 8 :

8row: (3sc, inc, 3sc)x6 (48)

Round 9 :

9row: (7sc, inc)x6 (54)

Round 10 :

10row: (4sc, inc, 4sc)x6 (60)

Round 11 :

11row: (9sc, inc)x6 (66)

Round 12 :

12row: (5sc, inc, 5sc)x6 (72)

Round 13 :

13row: (11sc, inc)x6 (78)

Round 14 :

14row: (6sc, inc, 6sc)x6 (84)

Round 15 :

15row: (13sc, inc)x6 (90)

Round 16 :

16row: (7sc, inc, 7sc)x6 (96)

Info :

Fasten off and cut the yarn, leave a long end for sewing.

β€” Wooden tub :

Info :

Beige yarn, hook 1,5 mm.

Round 1 :

1row: 15ch st, 1sc in the second stitch from the hook, 13sc (4)

Round 2-90 :

2-90rows: (in back loops only) 1ch st, turn, 14sc (14)

Round 91 :

91row: (work on the long side of the detail) 1ch st, (4sc, invdec, 4sc)x9, 1sl st in the beginning of the row

Round 92 :

92row: (in back loops only) (7sc, invdec)x9 (72)

Round 93 :

93row: (3sc, invdec, 3sc)x9 (63)

Round 94 :

94row: (5sc, invdec)x9 (54)

Round 95 :

95row: (7sc, invdec)x6 (48)

Round 96 :

96row: (3sc, invdec, 3sc)x6 (42)

Round 97 :

97row: (5sc, invdec)x6 (36)

Round 98 :

98row: (2sc, invdec, 2sc)x6 (30)

Round 99 :

99row: (4sc, invdec, 4sc)x3 (27)

Round 100 :

100row: (7sc, invdec)x3 (24)

Round 101 :

101row: (1sc, invdec, 1sc)x6 (18)

Round 102 :

102row: invdecx9 (9)

Info :

Pull the hole closed. Fasten off and cut the yarn, hide end of the yarn. Sew the open sides of the tub.

Info :

Cut a circle out of the cardboard. Diameter of the circle should be a bit smaller than bottom part. Glue it to the wrong side of the detail.

β€” Tub hoops :

Info :

Brown yarn, hook 1,5 mm.

Upper hoop :

1row: 2ch st, 1sc in the second stitch from the hook

Upper hoop :

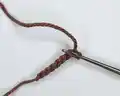
2-103rows: 1sc in the bottom part of the sc of the previous row: insert hook into the bottom part of the previous sc (photo 1), yarn over and pull up a loop (two loops on the hook) (photo 2). Yarn over and pull through two loops to finish off the single crochet (photo 3).

Info :

Fasten off and cut the yarn, leave a long end for sewing.

Bottom hoop :

1row: 2ch st, 1sc in the second stitch from the hook.

Bottom hoop :

2-92rows: 1sc in the bottom part of the sc of the previous row.

Info :

Fasten off and cut the yarn, leave a long end for sewing.

β€” Orange :

Info :

Orange color, hook 1,5 mm.

Round 1 :

1row: 6sc in MR (6)

Round 2 :

2row: incx6 (12)

Round 3-6 :

3-6rows: 12sc (12)

Info :

Stuff the orange with stuffing material.

Round 7 :

7row: invdecx6 (6)

Info :

Fasten off and cut the yarn, leave a long end for sewing. Embroider leaf on the orange with green yarn.

β€” Orange halves :

Info :

Orange yarn, hook 1,5 mm.

Item Name (P1) :

Bigger half (2 pcs). 1row: 6sc in MR (6)

Round 2 :

2row: incx6 (12)

Round 3 :

3row: 12sc (12)

Info :

Fasten off and cut the yarn, leave a long end for sewing. Embroider leaf on one of the orange halves with green yarn.

Item Name (P1) :

Smaller half (1 pc). 1row: 6sc in MR (6)

Round 2 :

2row: (1sc, inc)x3 (9)

Round 3 :

3row: 9sc (9)

Info :

Fasten off and cut the yarn, leave a long end for sewing.

β€” Assembly :

Info :

With black yarn make eyes a French knot stitch between 5th and 6th rows. The distance from the ear is 3 sc. With brown yarn make eyelids above eyes. Stuff the capybara with stuffing material. Sew the muzzle to the head.

Info :

Cut a circle out of the cardboard. Diameter of the circle should be a bit smaller than detail. Glue it to the wrong side of the detail.

Info :

Sew the capybara to the water detail as shown in the photo. Add stuffing material if needed.

Info :

Sew the orange to the head. Stuff orange halves with stuffing material and sew them near the capybara as shown in the photo.

Info :

Stuff the tub with stuffing material and sew the water detail to the tub. Edge of the water is below the edge of the tub.

Info :

Sew hoops to the tub.

Assembly Instructions

  • With black yarn make eyes as a French knot stitch between 5th and 6th rows, spacing them 3 sc from the ear; embroider eyelids with brown yarn and sew the muzzle to the head.
  • Cut a circle from cardboard slightly smaller than the tub bottom and glue it to the wrong side of the water detail to add firmness.
  • Sew the capybara to the water detail as shown in the photos, add a bit of stuffing if needed to shape the base before attaching.
  • Sew the small orange to the head and sew the orange halves near the capybara on the water detail after stuffing them.
  • Stuff the wooden tub evenly and sew the water detail into the tub so the edge of the water sits below the top edge of the tub.
  • Sew the upper and bottom hoops around the tub for the ribbed wooden look, then hide and weave in all ends.

Important Notes

  • πŸ’‘Need to crochet with tight stitches to be sure that there won't be any holes; if there are tiny holes, use a smaller size hook.
  • πŸ’‘Most of all details are crocheted in a spiral without slip stitch and lifting loops to avoid seams; use a marker to avoid losing the beginning of the row.
  • πŸ’‘All details must be finished with slip stitch to avoid uneven edges.

This adorable Capybara in a tub is a tiny scene full of charm and personality. Handmade details like the little oranges and ribbed wooden tub make it a delightful gift or display piece. Enjoy stitching each small part and assembling them into a cozy, one-of-a-kind companion. 🧢🧑

You ask,

we answer.

FAQs

What size will the finished piece be?

The finished toy is about 9 cm (~3 1/2 inches) tall when using the recommended YarnArt Begonia yarn and a 1.5 mm hook.

Can I use different yarn weights for this pattern?

Yes, you can use different yarn weights but the final size will change; use an appropriate hook for your chosen yarn and expect a larger or smaller finished piece.

Do I need prior crochet experience for this pattern?

This pattern is rated intermediate, so basic knowledge of single crochet, increases, decreases, and working in spirals is recommended.

How long does this project typically take to complete?

Most crocheters complete this project in 5-7 hours, depending on experience and how quickly you assemble and embroider the small details.