🧢 Beautiful ✨ Detailed πŸ’ Adorable

Cherry Blossom Pattern

Cherry Blossom Pattern
4.1β˜… Rating
5-7 Hours Time Needed
3.6K Made This
βœ‚οΈ

Intermediate Level

Ideal for those with basic crochet experience, featuring slightly more advanced stitches and techniques to expand your skills.

⏱️

Weekend Treat

Takes 5-7 hours, making it an enjoyable project to finish over a couple of days.

🏑

Cozy Accent

A warm touch for your space that transforms ordinary corners into inviting nooks filled with handmade charm.

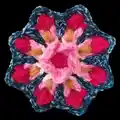
About This Cherry Blossom Pattern

This pattern creates a richly textured Cherry Blossom mandala square worked in DK weight yarn with multiple color changes and decorative puff and petal stitches. You will make layered petals, puff clusters and chains to form a dimensional floral motif that blocks to a 33 x 33 cm square after finishing. The pattern includes written instructions and video references for each round to help you follow along with confidence.

Cherry Blossom Pattern crochet pattern - detailed view of completed project

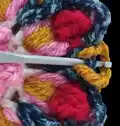
Designed for DK yarn (Stylecraft Special and Batik), the pattern is written in US terms and shows exact stitch replacements for the first stitch of each round. Detailed photos accompany the rounds so you can check your shaping as you work.

Why You'll Love This Cherry Blossom Pattern

I absolutely love this pattern because it layers texture and color in a way that feels both delicate and bold. The combination of puff stitches and petals creates a tactile blossom that really pops when blocked. I enjoy how each round builds on the last, revealing new details as you go β€” it makes the project feel like a series of small victories. I also appreciate that the pattern comes with video support and clear photos, which makes learning the special stitches much more approachable.

Cherry Blossom Pattern step 1 - construction progress Cherry Blossom Pattern step 2 - assembly progress Cherry Blossom Pattern step 3 - details and accessories Cherry Blossom Pattern step 4 - final assembly and finishing

Switch Things Up

I love changing the color play in this pattern to create different moods β€” try a soft pastel palette for a spring look or saturated jewel tones for a bold accent.

You can make the motif bigger or smaller by swapping yarn weight and hook size; bulky yarn with a larger hook will give you a chunky, cozy square while fingering weight and a smaller hook will produce a delicate mini motif.

I often substitute the Batik color for a variegated yarn to create subtle streaks across the puffs β€” it adds depth without extra work.

Try swapping the order of color rounds (for example, use Indigo earlier) to change how the petals contrast with the background for a fresh visual effect.

For texture lovers, experiment with different puff sizes (puff3 vs puff4) or replace some puffs with popcorns to vary the relief across the square.

I sometimes embroider a tiny French knot or two in the centre for extra definition and a handmade touch that personalizes the motif.

If making a blanket, alternate this blossom with plain squares or granny squares for breathability and a balanced composition.

Want a reversible look? Use mirror-color placement and flatter joins so the back side is nearly as neat as the front for blankets or scarves.

I also like adding a simple crocheted border in a contrasting color to frame the motif β€” try 2 rounds of sc followed by a decorative picot round for a finished edge.

Finally, play with placement of eye-catching colors: moving the Gold or Indigo to inner rounds will pull the eye to the center, while placing them on outer rounds makes the motif pop from a distance.

Common Mistakes & How to Fix Them

βœ— Not checking tension before starting can give you a square that is too large or too small; make a 10cm gauge swatch (20 sc x 22 rows or 20 dc x 8 rows) and adjust your hook size accordingly. βœ— Skipping the instruction to lift two loops of the triples when working into previous triples will cause petals to sit incorrectly; always lift the specified loops to create the correct texture and placement. βœ— Missing chain counts in petal and puff rounds will distort the motif shape; count your chains and stitches at the end of each round and mark repeat boundaries with a stitch marker. βœ— Working puff and petal stitches too tightly will make the fabric stiff and bulky; keep a relaxed tension on these stitches so they sit soft and open when blocked. βœ— Failing to pass long chain loops behind petals (as instructed) will hide the decorative effect; follow the instruction to pass chains behind the petals for the intended look.

Cherry Blossom Pattern

Create a vibrant Cherry Blossom mandala square that bursts with color and texture. This pattern combines puff, petal and post stitches to build a layered floral motif you can use as a cushion panel, wall hanging, or a show-stopping granny square. Videos and step-by-step photos guide you through every round so you can follow along with confidence. Perfect for making a beautiful, tactile project to showcase your color choices.

Intermediate 5-7 Hours

Materials Needed for Cherry Blossom Pattern

β€” Main Fabric

  • 01
    Stylecraft Special DK (100g = 322 yds / 295 m) - DK weight (#3)
  • 02
    Stylecraft Batik DK (50g = 151 yds / 138 m) - contrast/batik color
  • 03
    Lipstick 1246 (Special) - 18 g (approx 53 m / 58 yds)
  • 04
    Fondant 1241 (Special) - 9 g (approx 27 m / 29 yds)
  • 05
    Cream 1005 (Special) - 16 g (approx 47 m / 52 yds)
  • 06
    Indigo 1914 (Batik) - 67 g (approx 198 m / 216 yds)
  • 07
    Powder Pink 1843 (Special) - 11 g (approx 32 m / 35 yds)
  • 08
    Apple 1852 (Special) - 12 g (approx 35 m / 39 yds)
  • 09
    Gold 1709 (Special) - 8 g (approx 24 m / 26 yds)
  • 10
    Approximate total yardage/metres = 450 g / 410 m (total yarn used for sample)

β€” Tools Required

  • 01
    Crochet hook size 3.5mm - 4.0mm (adjust depending on your tension)
  • 02
    Tapestry/yarn needle for weaving ends and sewing in ends
  • 03
    Scissors
  • 04
    Stitch markers (recommended for round starts)
  • 05
    Blocking pins and blocking mat for finishing to 33 x 33 cm
  • 06
    Measuring tape or ruler to check gauge
  • 07
    Optional: small crochet hook or needle for pulling loops when working puff/petal stitches

Progress Tracker

0% Complete

β€” Notes :

Info :

In all rounds the first stitch is replaced as follows: Sc = Ch1. Hdc = Ch2. Dc = Ch3. Tr = Ch4.

β€” Rounds 1 to 10 :

Round 1 :

1.- Lipstick a. 10sc in the MR b. Close with 1 ss in the first sc Total: 10 sc

Round 2 :

2.- Lipstick a. *1sc, ch2 b. Skip 1 st* c. Repeat ** 4 more times d. Close with 1 ss in the first sc Total: 5 sc, 5 ch2

Round 3 :

3.- Fondant a. *Work in the ch2 space R2a: 1sc, ch3, 3tr, ch3, 1sc (1 petal) b. Skip to the next space* c. Repeat ** 4 more times d. Close with 1 ss in the first sc Total: 15tr, 10sc, 10 ch3

Round 4 :

4.- Cream a. Work in the back loop. b. Work 16 sc and 8 ch1, lifting 2 loops of the triples of the previous round a. *1sc, 1sc, ch1* b. Close with 1 ss in the first sc Total: 16 sc, 8 ch1

Round 5 :

5.- Cream a. *Work in the ch1 space: 1hdc, ch1, 1hdc in same space b. Ch1* c. Repeat ** 7 more times d. Close with 1 ss in the first hdc Total: 16 hdc, 16 ch1

Round 6 :

6.- Gold a. *Work in the ch1 space R5a: 1puff4, ch4 b. Skip to the next space* c. Repeat ** 7 more times d. Close with 1 ss in the closing chain of the first puff Total: 8 puff4, 8 ch4

Round 7 :

7.- Fondant a. *Dc2tog in the ch1 space R5a to the right of the puff, ch1 b. Dc2tog in the same space to the left of the puff, ch3* c. Repeat ** 7 more times d. Close with 1 ss in the closing chain of the first dc2tog Total: 16 dc2tog, 8 ch3, 8ch1

Round 8 :

8.- Lipstick a. *1hdcfp in dc2tog R7a, ch1 b. Work in the ch1 space R7a. Close together the following stitches: 2tr, 1dtrfp in the puff R6a, 2tr c. Ch1, 1 hdcfp in the dc2tog R7b (1 petal) d. Ch3. Bring forward the 4 chains of R6a and work 1 sc e. Ch3* f. Repeat ** 7 more times g. Close with 1 ss in the first hdcfp Total: 8 dtrfp, 32 tr (8 1 dtrfp and 4 tr close together, 8 petals), 16 hdcfp, 8 sc, 16 ch3, 16 ch1

Round 9 :

9.- Indigo (Batik) a. *Work in the ch1 space R5b: 2dc, ch8* b. Repeat ** 7 more times c. Close with 1 ss in the first dc d. Pass the 8 chains behind the petals Total: 16 dc, 8 ch8

Round 10 :

10.- Indigo (Batik) a. *1dcfp in each dc R9a b. 3sc in ch1 space R8a, ch1 c. 1hdcfp in the the 5 stitches closed together R8b d. Ch1, 3sc in ch1 space R8c* e. Repeat ** 7 more times f. Close with 1 ss in the first sc Total: 16 dcfp, 8hdcfp, 48 sc, 16 ch1

Assembly Instructions

  • Block the finished square to the stated completed size (33 x 33 cm / 13" x 13") using pins and steam or wet blocking to open the petals and puffs.
  • Weave in all ends on the wrong side neatly and trim close to the fabric to avoid bulk on the front side.
  • If joining multiple squares, arrange motifs with matching colors and join with your preferred join-as-you-go or slip stitch/seam method, aligning petals and chains for a continuous pattern.
  • Pin and sew any raised petals or textured areas down lightly if they catch or do not sit flat after blocking.
  • Press lightly with steam (do not press directly on yarn) to set the shape and highlight the layered petals.

Important Notes

  • πŸ’‘Use a 3.5mm to 4mm hook depending on your tension to match the gauge and achieve the intended finished size.
  • πŸ’‘Maintain a relaxed tension when working puff and petal stitches to keep them soft and open rather than tight and bulky.
  • πŸ’‘Count stitches at the end of each round and use a stitch marker at the beginning of every round to track repeats accurately.
  • πŸ’‘Pass long chain loops behind the petals where instructed to create the correct decorative effect and maintain petal definition.
  • πŸ’‘Block your finished square to size to open the petals and unify the texture for an even finished appearance.

This Cherry Blossom mandala was designed to bring a bright floral touch to your home with layered petals and textured pops of color. The pattern mixes puff, petal and post stitches for a rich tactile experience that looks beautiful when blocked. Make it as a cushion front, wall piece, or combine multiples for a stunning blanket. 🧢🌸✨

You ask,

we answer.

FAQs

What size will the finished piece be?

The finished square measures approximately 33 x 33 cm (13" x 13") after blocking when using the recommended DK yarn and hook size.

Can I use a different yarn weight for this pattern?

Yes, you can substitute yarn weights, but your finished size will change. If you use a thicker yarn use a larger hook and expect a larger motif; for smaller, use thinner yarn and a smaller hook and check the gauge before starting.

Do I need prior experience to make this pattern?

This pattern is rated intermediate and assumes familiarity with US stitch names, working in the round, and stitches like puff, dc2tog and front/back post variations. Video support is provided to help with the special stitches.

How long does this project typically take to complete?

Most crocheters finish a single square in about 5-7 hours, depending on experience and speed; blocking and finishing time is additional.