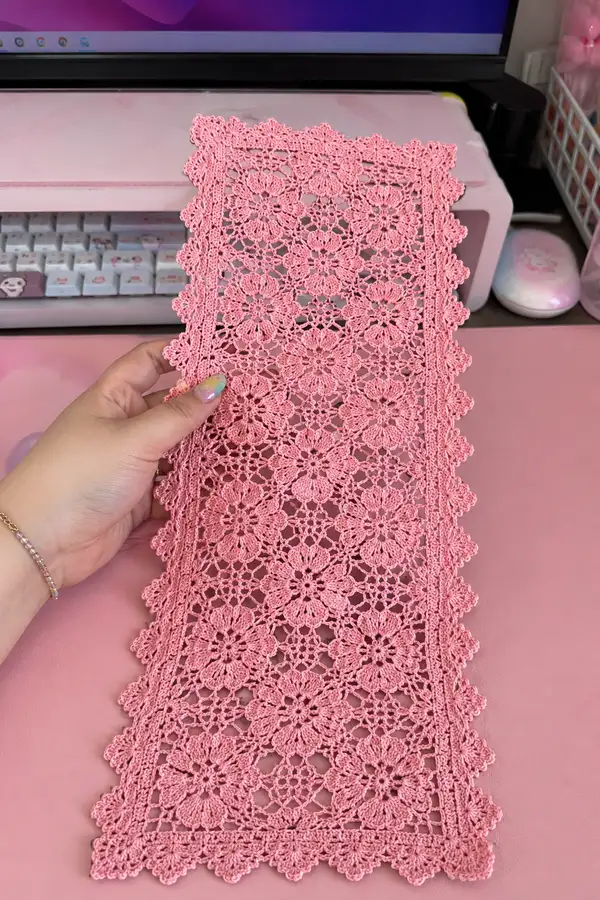
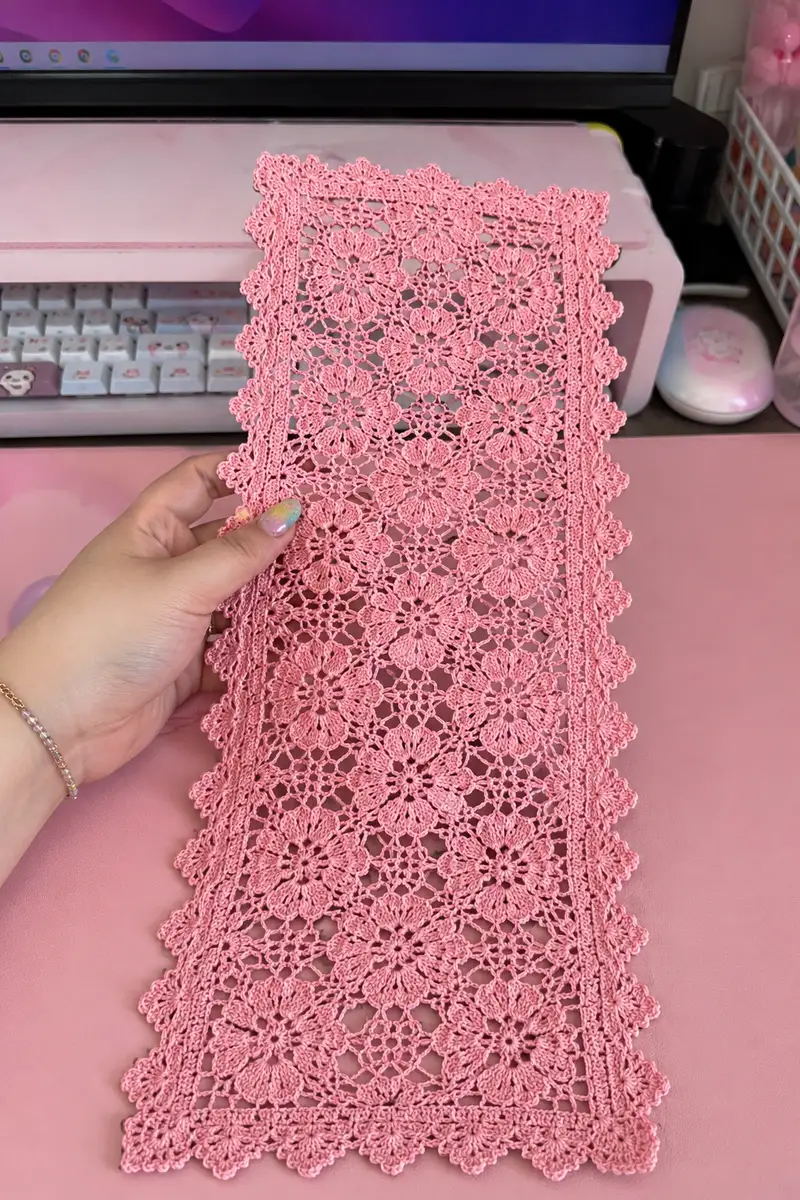
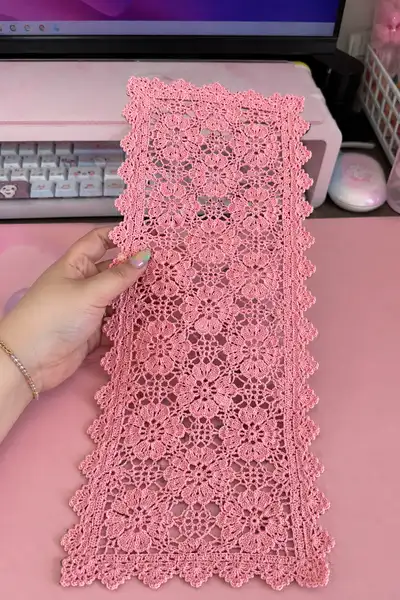
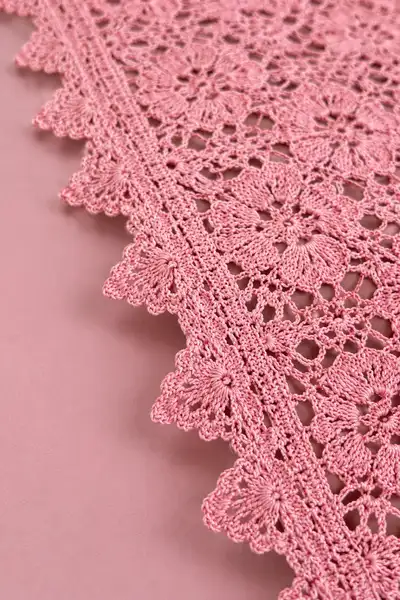
A delicate cherry blossom pink lace table runner crocheted in fine cotton thread with floral motif repeats and a scalloped picot border. This elegant runner features stacked flower motifs joined in a vertical column, narrow side bands, and a detailed scalloped edge that creates a refined, vintage-inspired look. Perfect for dresser tops, a narrow table, or as a decorative centerpiece for special occasions.
Progress Tracker
0% Complete
— Notes & Gauge :
Info :
Gauge is measured for motif: one completed 12-petal motif across the widest point measures approximately 3.25" (8.2 cm) when worked in Size 10 cotton with a 1.75 mm hook and lightly blocked. Use a smaller hook to tighten fabric or larger to increase motif size. The runner pictured comprises 3 motifs across and 12 motifs long (36 motifs total) plus border rows. You may scale the runner by adding or subtracting motif columns and rows.
Info :
Work motifs with a consistent tension. Join motifs as you go to avoid multiple sewing steps later. For best results: block each motif or the entire runner after finishing and before final edging to make joins crisp.
— Motif (make multiple identical floral motifs) :
Round 1 :
Ch 6, sl st into first ch to form a loop. Ch 3 (counts as dc), work 11 dc into loop, sl st to top of ch3 to join (12 dc) (12)
Round 2 :
Ch 5 (counts as ch3 + ch2 space), *sc in next dc, ch5; rep from * around, ending with sc in last dc, sl st to first sc to join — creates 12 ch-5 loop spaces for petals (12 ch-5 spaces)
Info :
Keep a stitch marker at the first loop to track rounds. These chain-loop spaces will be used to build petals in later rounds. Do not fasten off.
Round 3 :
Into each ch-5 space: (sc, ch3, 7 dc, ch3, sc) — sl st to next sc to move to the following ch-5 space. Repeat around for 12 petals; sl st to first sc to join. Each petal has 7 dc so total dc this round = 7 x 12 = 84 dc plus 12 sc at petal bases (total stitch count equivalent: 96 stitches when counting sc+dc as individual stitches) (96)
Info :
If you prefer fuller petals, you may substitute 9 dc instead of 7 dc (this increases petal fullness and overall motif diameter). Maintain the count and symmetry by keeping the same number of petals (12).
Round 4 :
Ch 3, *sk next petal body, into next ch-3 space at petal tip work: (picot: ch3, sl st into top of last dc) then ch4, sl st into top of next petal tip to create connecting arches; rep from * around. End sl st to top of ch3 to join (12 picot arches) (12)
Round 5 :
Ch 1, sc into same st, *ch5, sc into base between petals (the sc between petals that joins petals on round 3), ch5, sc into top of next petal base; rep from * around to create small chain-lace loops between petals; sl st to first sc to join (24 small ch-5 loops formed between petals) (24)
Info :
This round builds the delicate open lace between petals. Keep chains loose and even so subsequent shells sit nicely on top.
Round 6 :
Working into each ch-5 loop from Round 5: (ch3, 3 dc, ch3, sl st into center ch space) to form a small fan. Repeat around into each ch-5 loop; sl st to top of first ch3 to join. You will make 24 small fans (each fan counts as 3 dc) (72 dc total across fans + joining sl sts) (24 fans)
Round 7 :
Ch 1, sc in same st, *ch7, sc in next fan top, ch7, sc in next fan top; rep from * across to create taller arches (24 ch-7 loops) — sl st to first sc to join (24)
Info :
These tall chain-arches will be used as the connector grid between motifs later. Keep loop height consistent. Use your fingers to hold loops open gently while stitching the next round.
Round 8 :
Into each ch-7 loop: (sc, ch5, sc) then sl st into sc at base to move to the next loop; repeat for all 24 loops giving 24 ch-5 decorative connectors. Sl st to first sc to join (24)
Round 9 :
Ch 3, *2 dc into ch-5 connector (worked around the chain), ch2, 2 dc into same connector (forming a 2-2 shell), ch3, sl st into next connector sc; rep from * around to create a ring of shells between petal clusters. You should create 24 shells (each shell made of 4 dc) (96 dc total) (24 shells)
Round 10 :
Ch 1, sc in same stitch, *ch9, sc into center area between shells (this locates a longer mesh chain), rep from * around to create 24 ch-9 mesh loops. Sl st to first sc to join (24)
Info :
At this stage the motif is developing an open lattice around the petal ring. The ch-9 loops will accept a decorative shell on the next round to broaden the motif for easier joining to adjacent motifs.
Round 11 :
Into each ch-9 loop: work (sc, ch3, 9 dc, ch3, sc) making a broad shell/petal extension; repeat for all 24 loops then sl st to first sc to join. Each extended shell uses 9 dc so total dc this round = 9 x 24 = 216 dc plus 48 sc (264 total stitch-equivalent) (24 extended shells)
Round 12 :
Ch 1, sc in same st; *ch4, slip stitch into the space at the tip of the adjacent petal extension to form a small join-loop, ch4, sc in next base; rep around. You will create 24 ch-4 join-loops (24)
Info :
These ch-4 join-loops are used to line up motifs for join-as-you-go or chain-join later. Keep them consistent. If you plan to sew motifs together instead, leave the join-loops and sew through their bases for a hidden seam.
Round 13 :
Ch 3, *into each ch-4 loop work (2 dc, ch2, 2 dc) as a mini shell; sl st to next sc between loops; rep around — 24 mini shells (96 dc total) (24)
Round 14 :
Ch 1, sc in same st, *ch6, sc in center between mini shells; rep around to create 24 ch-6 mesh loops; sl st to first sc to join (24)
Info :
If you plan to make the runner wider or narrower, note how many motifs wide you wish to make. Store motif orientation consistently so the scalloped edges will align when joined.
Round 15 :
Into each ch-6 loop work: (sc, ch3, 5 dc, ch3, sc) creating a secondary petal shell; repeat around for 24 of these (5 dc x 24 = 120 dc plus 48 sc = 168 stitch-equivalent) (24)
Round 16 :
Ch 1, sc in same st, *ch3, picot (ch3 sl st into top of last dc) at top of each secondary petal, ch3, sc into next base; rep around to create 24 picoted peaks; sl st to first sc to join (24 picots)
Round 17 :
Ch 1, sc into same st, *[sc in next sc, ch5, sk1, sc in next sc] three times across the top of motif edge to create a decorative edging row; rep across entire motif (72 sc across this repeat row) — sl st to join (72)
Info :
Count stitch clusters across an edge to ensure motifs will align when joining. If your motif edge stitch count differs by more than 2 stitches from others, tighten or loosen tension to match.
Round 18 :
Ch 2, hdc evenly around the outer edge placing 1 hdc in each sc and 2 hdc in shell hollows to stabilize edges; sl st to join then fasten off and weave tail under multiple stitches. Final motif diameter after blocking approx 3.25" (8.2 cm) (edge hdc count variable per motif; approximately 120-132 hdc depending on shell transitions)
Info :
Block each motif flat immediately after finishing to set shape and open the lace. Use rust-proof pins and allow to dry completely before joining. For join-as-you-go, do not fasten off in Round 18 but continue to join as described in the next section.
— Joining Motifs (join-as-you-go recommended) :
Round 19 :
Info: Arrange motifs in final orientation on a flat surface before joining. This runner is constructed with motifs in vertical columns (3 across) joined side-to-side first, then joined at row seams to make a long panel. For join-as-you-go: when working Round 18 on a new motif, work sl st or sc into the corresponding ch-4 or ch-6 loop on the adjacent finished motif to secure them together.
Round 20 :
Begin joining long edges: Work each outer edge join by placing motifs side-by-side and, while completing the outer hdc round (Round 18), replace the sl st into ch-space with sc through the adjacent motif’s edge sc so the seams interlock. For every matched loop, work sc join instead of hdc; continue around completing the edge. Repeat for each pair of neighboring motifs along the column. After joining first column, make second column etc. (joins per motif edge = 2-6 depending on motif count) (variable)
Info :
Joining tips: Hold the two motif edges together with pins to maintain alignment while you insert hook through both motifs. Keep joins consistent and avoid pulling tight. The runner pictured uses joins at the ch-4 and ch-6 connector loops; this keeps petal orientation coherent.
Round 21 :
Once columns are joined into panels of desired length, join columns together by using the same method but aligning petal tips and connector loops. Work a neat whipstitch or sc join if you prefer invisible joins; otherwise, continue join-as-you-go with slip stitches for a subtle external seam (joins across full runner = number of adjacent motif edges joined across columns) (variable)
Info :
If you prefer sewn joins, leave long tails and sew motif sides using a yarn needle with matching thread, using small whip or mattress stitches through ch loops and foundation scs for strength. Sewn joins can be tightened for a firmer panel; join-as-you-go yields a more flexible lace fabric.
— Central Panel & Alignment Rounds :
Round 22 :
Info: After motifs are all joined into a rectangle (3 motifs across x desired number of rows), work a stabilization round around the entire perimeter to even the edge before starting decorative border. Using main thread, attach at any corner seam with a sl st into an outermost stitch to begin a 1-round sc border.
Round 23 :
Ch 1, sc evenly around entire perimeter placing 1 sc in each outer motif edge st and 3 sc across each corner gap (count variable; aim for even distribution). Sl st to first sc to join. This round evens out join irregularities and provides a solid base for the scalloped edging (approx total sc around runner = 480-560 depending on motif count) (variable)
Info :
Keep the tension of this stabilization round uniform and slightly snug to give the edge structure. Count sc across one short and long side so you can repeat shell patterns symmetrically in the edging rounds.
Round 24 :
Ch 2, hdc in each sc around for two rounds to build a narrow band: Round 24 and 25 both hdc in each st (this creates a firm band for shell edging). Sl st to join at end of each round. (approx hdc count same as previous sc count) (variable)
Info :
Do two rounds of hdc to stabilize. If you prefer a taller border, add an additional hdc round before the shell edge.
Round 25 :
Repeat Round 24: 1 hdc in each st around, sl st to join (approx same hdc count) (variable)
Round 26 :
Ch 3, *skip 2 hdc, in next hdc work (5 dc shell), sk 2 hdc, ch 3, sc in next hdc; rep from * around. This establishes the first shell scallops around the entire runner perimeter. You will form one shell every 3-5 stitches depending on prior counts; typical runner will have ~48-60 shells around long sides and fewer around short sides (shell count variable based on motif count) (variable)
Info :
Keep shells centered across the edge. If shells bunch or stretch, adjust spacing by adding or removing a small number of hdc between shells to distribute them evenly along the side.
Round 27 :
Ch 1, sc into the top of shell center, *ch3, (picot: ch3 sl st into top of last dc) at shell tip, ch3, sc into next shell center; rep across, sl st to first sc to join. This creates the decorative picot scallop peaks across all shells (shells will each have a picot tip). (shell count variable) (variable)
Info :
Make picots consistent: ch3 and sl st into top of last dc of the shell, ensuring same orientation across all shells. If you prefer smaller picots, use ch2.
Round 28 :
Work 1 sc around the entire runner into each picot base and between shells to secure them; sl st to join. This locks picots and shells. (variable)
Round 29 :
Ch 2, hdc evenly around to clean and flatten edge; sl st to join. Fasten off and weave ends. This is an optional finishing stabilization round if shells feel loose. (variable)
Info :
At this point you may continue with an ornate edging on both long edges mirroring the scallops depicted in the photos. The photos show a double-row shell edging with small flower-petals formed from clusters; instructions below create a similar decorative edge.
— Decorative Double-Row Scalloped Edge (long sides) :
Round 30 :
Attach thread at midpoint of any shell on a long side. Ch 1, sc into shell top, *ch2, (5 dc shell in next shell top), ch2, sc into next shell top; rep along the long side until you reach a corner. This creates the second row of shells set between the first row of shells. (shell count per long side approx 16-22 depending on motif layout) (variable)
Round 31 :
Ch 1, *into each new shell work (sc, ch3, 7 tr cluster, ch3, sc) to form taller pointed petals; rep across long side and sl st to join at corner. These tall petals give the pointed scallop peaks seen in the photos. Each tall petal uses 7 tr each (calculated per petal) (variable)
Info :
If your thread is very fine, substitute 5 tr instead of 7 to avoid an overly bulky edge. Consistency across each petal is more important than absolute size.
Round 32 :
Ch 1, sc around each tall petal base and place 1 single crochet in the valley between petals to define scallops; sc evenly then sl st to join. Fasten off for the long side and weave in ends. Repeat for opposite long side. (variable)
Info :
Check symmetry: count number of tall petals on each long side and adjust if necessary before completing final corner joins so both sides mirror each other. If you need an extra petal in the last space, reduce one ch between the last shells to add it.
— Corner Treatment (work at each of the four corners) :
Round 33 :
Info: Corners in the runner pictured have a layered triangular scallop constructed over three mini rounds. Start by identifying the outermost corner shell and working 3 connected shells with joined picots to form a decorative corner fan.
Round 34 :
At the corner shell top: ch 1, sc, ch3, (5 dc shell), ch3, sc into same corner to create a broad fan; then work sc into next long-side shell to anchor. On the adjoining short side, mirror the same fan so the corner has an overlapping pair of fans. (fan counts variable: 1 primary fan per corner + 2 anchoring shells) (variable)
Round 35 :
Ch 1, into the fan peaks work picots between fan lobes using (ch3, sl st into top of last dc) and anchor to adjacent motif edge with sc. Repeat for all four corners. This yields an ornate triangular corner that mirrors the photo's look. Fasten off and weave ends. (variable)
Info :
When joining two long-side shells into a corner, make sure your fan sits symmetrically across the corner by testing its placement with pins before committing stitches. Adjust chain spacing as needed to prevent fan rotation.
— Final Blocking & Finishing :
Round 36 :
Info: After completing the border, soak the entire runner in lukewarm water with a small amount of mild detergent or fabric softener. Gently squeeze out excess water without wringing and lay flat on a blocking mat. Pin each scallop and petal tip to stretch and shape the scalloped border evenly. Allow to dry completely — 12-24 hours depending on humidity.
Round 37 :
Info: Weave in all ends securely using a tapestry needle. Trim close to work after weaving at least 2" of thread under multiple stitches. If desired, apply a light spray starch while blocking to keep the runner crisp, or use a low steam iron with a pressing cloth to set shape after it is nearly dry.
Round 38 :
Info: Final check: ensure all motifs are lying flat and that the scalloped edges mirror on both sides. If any scallop is uneven, re-pin and re-steam lightly to set. Your runner is now finished and ready to display.
Info :
Pattern Variations: To make a wider runner, add another motif column across (working motifs 4 across instead of 3). To make a longer runner, simply add more motif rows. Adjust border shell counts proportionally to keep scallops evenly spaced around the larger perimeter.
Completing this cherry blossom lace table runner gives such a satisfying mix of delicate detail and structured repetition. Each floral motif becomes a little blossom, and joining them row after row transforms individual pieces into an elegant heirloom runner. Blocking is the final magic — it opens the lace and lets the scalloped edge sing. 🧶💗 Whether displayed for special occasions or everyday charm, this runner adds a handcrafted dash of beauty to any table. Enjoy each stitch and the restful rhythm of lace-making! 🌸