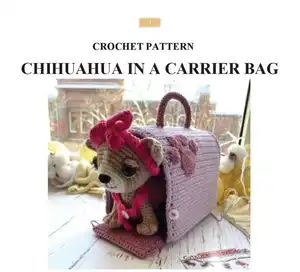
Make an adorable chihuahua amigurumi that fits inside a sweet crochet carrier bag. This pattern walks you through each small piece — head, body, legs, ears, dress, headband, and the bag — with clear step-by-step instructions. Youll learn jacquard colorwork, bobble stitches, and how to build a sturdy cardboard-backed bag for display or play. Perfect for a thoughtful handmade gift or a charming addition to your amigurumi collection.
Progress Tracker
0% Complete
— Tail :
Round 1 :
With beige yarn. Chain 10. Start in the third chain from the hook: 9sl st. Leave a long tail for sewing.
— Legs (make 4) :
Round 1 :
With light pink yarn. 6sc in MR
Info :
Place row marker here.
Round 3 :
Change color to beige. (1sc, inc) *6 (18)
Round 4 :
(1sc, 4-dc Bobble st) *4, 10sc (18)
Round 8-11 :
8sc (4 rounds)
Info :
Stuff the legs with fiberfill.
Round 12 :
(3sc, inc) *2 (10)
Round 13-15 :
10sc (3 rounds)
Info :
Fasten off, cut the yarn, weave in the ends.
— Body :
Round 1 :
With beige yarn. 6sc in MR
Info :
Place row marker here.
Round 3 :
(1sc, inc) *6 (18)
Round 4 :
(2sc, inc) *6 (24)
Round 5 :
(3sc, inc) *6 (30)
Round 6 :
(4sc, inc) *6 (36)
Round 7-10 :
36sc (4 rounds)
Round 11 :
9sc, (dec, 1sc) *6, 9sc (30)
Round 12-15 :
30sc (4 rounds)
Round 16 :
(3sc, dec) *6 (24)
Round 18 :
(3sc, inc) *6 (30)
Round 19-21 :
30sc (3 rounds)
Round 22 :
(3sc, dec) *6 (24)
Round 24 :
(2sc, dec) *6 (18)
Round 25 :
(1sc, dec) *6 (12)
Info :
Stuff the body with fiberfill.
Info :
Fasten off, cut the yarn, weave in the ends.
— Head :
Round 1 :
With white yarn. 6sc in MR
Info :
Place row marker here.
Round 3 :
3inc, 3sc, 3inc, 3sc (18)
Round 4 :
3inc, 6sc, 3inc, 6sc (24)
Round 6 :
Change color to beige. Attention! Crochet in jacquard technique from Rnd 6 to 9. Add white yarn (these stitches are highlighted in red) 3sc, inc, 2sc, inc, 4sc, inc, (3sc, inc) *3 (30)
Round 7 :
(4sc, inc) *2, 2sc, 2sc inc, (4sc, inc) *3 (36)
Round 8 :
(5sc, inc) *2, 2sc, 3sc inc, (5sc, inc) *3 (42)
Round 9 :
(6sc, inc) *2, 2sc, 4sc inc, (6sc, inc) *3 (48)
Round 10-16 :
Continue with Beige yarn. 48sc (7 rounds)
Info :
Insert the eyes between rounds 8-9 at a distance of 12-14 sc.
Round 17 :
(6sc, dec) *6 (42)
Round 18 :
(5sc, dec) *6 (36)
Round 19 :
(4sc, dec) *6 (30)
Round 20 :
(3sc, dec) *6 (24)
Round 21 :
(2sc, dec) *6 (18)
Round 22 :
(1sc, dec) *6 (12)
Info :
Stuff the head with fiberfill.
Info :
Fasten off, cut the yarn, weave in the ends.
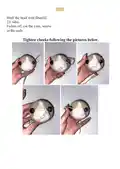
Info :
Tighten cheeks following the pictures below.
— Ears (make 2) :
Info :
Crochet 2 pieces in beige and 2 pieces in light pink color. Work in rows
Round 1 :
Ch8. Start from the second chain on the hook: 7sc, turn (7)
Round 2 :
ch1, dec, 5sc (6)
Round 3 :
ch1, dec, 4sc (5)
Round 4 :
ch1, dec, 3sc (4)
Round 5 :
ch1, dec, 2sc (3)
Round 6 :
ch1, dec, 1sc (2)
Info :
Cut the yarn on the light pink pieces. Cut the light pink yarn, weave in ends. Do not cut the Beige yarn.
Info :
Place beige and pink pieces wrong sides together, with beige yarn crochet though both pieces: 7sc along one side, inc in the corner, 7sc along other side. Leave a long tail for sewing.
— Eyelids (make 2) :
Round 1 :
With beige yarn. 5sc in MR do not close the circle. Leave a long tail for sewing.
— Eyes and lashes :
Info :
Sew the Eyelashes to the eyelids. Embroider whites of the eyes with a white thread. Sew the eyelids over the eyes.
— Face finishing & Assembly of head/body :
Info :
Sew the ears to the head.
Info :
Embroider the nose and mouth with black yarn.
Info :
Sew the head to the body.
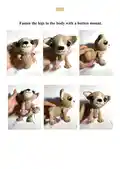
— Legs attachment :
Info :
Fasten the legs to the body with a button mount.
— Tail attachment :
Info :
Sew the tail to the body.
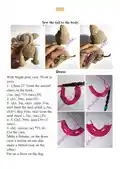
— Dress :
Round 1 :
With bright pink yarn. Work in rows. Chain 27. From the second chain on the hook: (1sc, inc) *13, turn (39)
Round 2 :
ch1, 39sc, turn (39)
Round 3 :
ch1, 5sc, ch10 (skip 10sc, start from the next stitch ), 9sc, ch10 ( skip 10sc, start from the next stitch ), 5sc , turn (39)
Round 4-5 :
Ch2, 39dc, turn (39) (2 rows)
Round 5 :
ch2, (dc-inc, sc) *19, dc
Info :
Cut the yarn. Make a fastener on the dress (sew a button on one side, make a button loop on the other). Put on a dress on the dog.
— Headband :
Info :
With bright pink yarn. Chain 90. Start in the third chain from the hook: 88dc. Cut the yarn. Weave in ends. Put a headband on the dog's head. Tie a bow and fix it.
— Carrier Bag Recommendations :
Infos :
Depending on choosen yarn and crochet density, the size of the piece may differ. Cut the base of thick cardboard to the size of the resulting pieces. All pieces are attached along the outer border. Wrap all cardboard elements with adhesive tape.
— Door :
Round 1 :
Crochet 2 pieces in gray-pink color. Work in rows. Chain 19. Start from the second chain on the hook: 18sc, turn (18)
Round 2-7 :
ch1, 18sc, turn (6 rows). Do not cut second piece continue crocheting both pieces together.
Info :
Cut a rectangle from the cardboard and put it between the two pieces. Wrap the cardboard paper with tape. Apply the gray-pink part and crochet with gray-pink yarn: 16sc through both pieces, inc in the corner, 7sc through both pieces, inc in the corner, 16sc through both pieces, inc in the corner, 7sc through both pieces, inc in the corner.
Info :
Fasten off, cut the yarn, weave in the ends.
— Roof :
Round 1 :
Crochet 2 pieces in lilac color. Work in rows. Chain 35. Start from the second chain on the hook: 34sc, turn (34)
Round 2-72 :
ch1, 34sc, turn (71 rows).
Info :
Continue crocheting from one lilac piece. Cut a rectangle from the cardboard and place in-between the two lilac pieces. Wrap the cardboard paper with tape.
Info :
Crochet both pieces together: 72sc through both pieces, inc in the corner, 32sc through both pieces, inc in the corner, 72sc through both pieces, inc in the corner, 32sc through both pieces, inc in the corner.
Info :
Fasten off, cut the yarn, weave in the ends. Do not bend the part!
— Base :
Round 1 :
Crochet 2 pieces in gray-pink color. Work in rows. Chain 21. Start from the second chain on the hook: 20sc, turn (20)
Round 2-34 :
ch1, 20sc, turn (33 row). Continue crocheting from the second gray-pink piece.
Info :
Cut a rectangle from the cardboard and put it between the two gray-pink pieces. Wrap the cardboard paper with tape.
Info :
Crochet both pieces together: 18sc through both pieces, inc in the corner, 32sc through both pieces, inc in the corner, 18sc through both pieces, inc in the corner, 32sc through both pieces, inc in the corner.
Info :
Fasten off, cut the yarn, weave in the ends.
— Back Wall :
Round 1 :
Crochet 2 pieces in gray-pink color. Work in rows. Chain 19. Start from the second chain on the hook: 18sc, turn (18)
Round 2-24 :
ch1, 18sc, turn (23rows).
Round 25 :
ch1, dec, 14sc, dec, turn (16)
Round 26 :
ch1, dec, 12sc, dec, turn (14)
Round 27 :
ch1, dec, 10sc, dec, turn (12)
Round 28 :
ch1, dec, 8sc, dec, turn (10)
Info :
Continue crocheting from second piece. Cut a rectangle from the cardboard and put it between the parts. Wrap the cardboard paper with tape.
Info :
Crochet both pieces together : 68sc through both pieces, inc in the corner, 16sc through both pieces, inc in the corner.
Info :
Fasten off, cut the yarn, weave in the ends.
— Assembly :
Info :
Attach the pieces to the bottom in a circle. Attach the Roof to the base with lilac yarn by crocheting reverse 34sc. Do not cut the yarn.
Info :
Continue crocheting. Attach the Door to the bottom with lilac yarn by crocheting reverse 18sc. Do not cut the yarn.
Info :
Continue crocheting. Attach the back wall to the bottom with lilac yarn by crocheting reverse 20sc. Do not cut the yarn.
Info :
Continue crocheting. Attach the back wall to the Roof with lilac yarn by crocheting in a circle reverse 70sc. Cut the yarn.
— Handle :
Round 1 :
With gray-pink yarn. 6sc in MR
Info :
Place row marker here.
Round 2-30 :
6sc (29 rounds)
Info :
Leave a long tail for sewing. Sew the handle to the carrier bag.
— Application in the form of a dog's footprint :
Round 1 :
With gray-pink yarn. (make 4) 6sc in MR
Info :
Leave a long tail for sewing.
Round 1 :
With gray-pink yarn. (make 1) 6sc in MR
Round 3 :
(1sc, inc) *6 (18)
Round 4 :
(2sc, inc) *6 (24)
Info :
Leave a long tail for sewing. Sew the application to the bag.
Info :
Sew buttons on each side of the main fabric of the bag. Make loops on each side of the Door of the bag. (See the photo below)
Info :
Congrats your Chihuahua in a carrier bag is ready!!!
This charming Chihuahua-in-a-carrier pattern brings together a tiny toy and a pretty bag for the perfect gift or keepsake. The detailed instructions guide you through colorwork, bobble stitches, and crafting sturdy cardboard-backed bag panels for a professional finish. Enjoy personalizing colors, buttons, and accessories to make a truly unique handmade treasure. 🧶✨💕