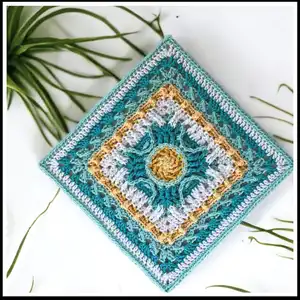
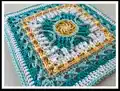
Create a vibrant, textured 11" x 11" square perfect for blankets, throws, or standalone decor. This intermediate pattern guides you through 17 detailed rounds with unique post stitches, cable stitches, and decorative corners. Youll enjoy layering colors and textures using worsted weight cotton yarn to achieve a professional, polished square. Ideal for building a memorable legacy blanket or adding a handmade accent to your home.
Progress Tracker
0% Complete
— General Info :
Info :
Hook/Finished Size: 11" x 11", 4.5 mm hook. Crochet Terms: US terminology throughout. Skill Level: Intermediate.
Infos :
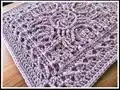
Additional Items Needed: Stitch markers and darning needle. Yarn: I Love This Cotton (Worsted Weight), 100% cotton and Loops & Threads Cr me Cotton (Worsted Weight), 100% for alternate colorway.
— Stitches Used :
Infos :
double magic circle; standing stitch; ch (Chain); invisible join; st(s) (Stitch/stitches); sp (Space); sc (Single crochet); FPsc (Front post single crochet); BPsc (Back post single crochet); hdc (Half double crochet); FPhdc (Front post half double crochet); BPhdc (Back post half double crochet); shallow FPhdc (shallow front post half double crochet); dc (Double crochet); FPdc (Front post double crochet); 2FPdc-cluster (2 front post double crochet cluster); long dc (Long double crochet); dc2tog (Double crochet 2 together); dc3tog (Double crochet 3 together); FPtr (Front post treble crochet); BL (Back loop); cable st; 3LP of sc, hdc, dc, tr (use of third loop in indicated stitches).
— Symbol Guide & Special Instructions :
Infos :
ASTERISKS: * to repeat instructions after a single asterisk as directed. PARENTHESES: ( ) indicates a group of sts that are worked together in or around the same st. BRACKETS: [ ] repeat instructions within brackets as directed. COUNT TOTALS: Total chain spaces are included in the st count; corner chain spaces are not included in the total. Instructions for ALL rounds start with a standing stitch and end with an invisible join to 2nd st of rnd, and fasten off. If not changing colors, you can opt to finish the previous rnd with a slip stitch join and use the appropriate "ch" or "chainless starting stitch" to begin the next round. Keep in mind that if you choose the slip stitch end, the "ch" or "chainless starting stitch" will replace the first standing st of the round.
— Rounds :
Round 1 :
In a double magic circle, ch 3 (counts as 1st dc of rnd), 7 dc; cut yarn, invisible join to 1st true dc of rnd. Counts: 8 dc (8 total)
Round 2 :
Starting in any dc, *hdc in dc; FPdc around dc immediately before hdc just worked; repeat from * around; cut yarn, invisible join. Counts: 8 hdc, 8 FPdc (16 total)
Round 3 :
Starting in any hdc, *hdc in hdc AND FPdc, FPdc around FPdc immediately before hdc just worked; repeat from * around; cut yarn, invisible join. Counts: 16 hdc, 8 FPdc (24 total)
Round 4 :
NOTE: After completing BPsc, the next st may be partially hidden. Starting in 1st hdc of any group of 2 hdc • *shallow BPsc around st, (2 sc) in NEXT st; repeat from * around; cut yarn, invisible join. Counts: 24 sc, 12 BPsc (36 total)
Round 5 :
Note: Work in 3LP of all sts in this rnd. Starting in 1st sc of any (2 sc) group, * dc in 2 sc (place st marker around post of both dc-marker #1, #2), ch 2; use NEXT 7 sts to work dc, hdc, 3 sc, hdc, dc; ch 2; repeat from * around; cut yarn, invisible join. Counts: 12 sc, 8 hdc, 16 dc, 8-ch 2 sp (52 total)
Round 6 :
Starting in ch-2 sp before marker #1, * (3 hdc) place a st marker in 1st hdc – marker #3; BPhdc around NEXT 2 dc; (3 hdc) in NEXT ch-2 sp, place st marker in 3rd hdc – marker #4); • [ch 1, sk st; 2FPdc-cluster around NEXT st] 3 times; ch 1, sk dc; repeat from * around; cut yarn, invisible join. Counts: 24 hdc, 12 2FPdc-cluster, 8 BPhdc, 16 ch-1 sp (60 total)
Round 7 :
Starting in marked st #3 of rnd 6, • *hdc in hdc-do not remove marker; sc in NEXT 6 sts; hdc in NEXT hdc-do not remove marker; • ch 1, sk ch-1 sp; dc in NEXT 2FPdc-cluster; ch 1, sk ch-1 sp; (2 dc, ch 2 as a corner, 2 dc) in NEXT 2FPdc-cluster; ch 1, sk ch-1 sp; dc in NEXT 2FPdc-cluster; ch 1, sk ch-1 sp; repeat from * around; cut yarn, invisible join. Counts: 24 sc, 8 hdc, 24 dc, 16 ch-1 sp, 4 ch-2 corner sp (72 total/18 per side)
Round 8 :
Starting in ch-2 corner sp before marked st #3 of rnd 6, * (2 hdc, ch 2, 2 hdc) in ch-2 corner sp, sk NEXT 2 dc; (2 hdc) in NEXT ch-1 sp; • sk dc, (2 hdc) in NEXT ch-1 sp, ch 1; • FPsc around NEXT worked and marked hdc of rnd 6 (marker #3), remove marker, ch 1; • FPsc around NEXT 2 worked and marked dc of rnd 5 (marker #1 and #2), remove markers, ch 1; • FPsc around worked and marked hdc of rnd 6 (marker #4), remove marker, ch 1; • sk NEXT (hdc, 6 sc, hdc) of rnd 7; (2 hdc) in NEXT ch-1 sp; sk dc, (2 hdc) in NEXT ch-1 sp, sk NEXT 2 dc; repeat from * around; cut yarn, invisible join. Counts: 48 hdc, 16 FPsc, 16 ch-1 sp, 4 ch-2 corner sp (80 total/20 per side)
Round 9 :
Starting in any ch-2 corner sp, • * (2 hdc, ch 2, 2 hdc) in ch-2 corner sp; ch 1, sk NEXT 2 hdc; FPtr around NEXT 2 dc of rnd 7 corner; • hdc between (2 hdc) directly behind FPtr and NEXT (2 hdc); ch 1, sk NEXT 2 hdc; hdc between skipped (2 hdc) and NEXT (2 hdc), ch 2; • dc2tog, working in 1st and 2nd UNworked sc of rnd 7, ch 1; dc3tog, working in NEXT 3 sc, ch 1; dc2tog, working in NEXT sc and hdc of rnd 7; • ch 2, sk NEXT 2 hdc of rnd 8; hdc between previous (2 hdc) and NEXT 2 (hdc); ch 1, sk NEXT 2 hdc; hdc in between skipped (2 hdc) and NEXT (2 hdc); • FPtr around NEXT 2 dc of rnd 7 corner, ch 1, sk NEXT 2 hdc; repeat from * around; cut yarn, invisible join. Counts: 32 hdc, 16 FPtr, 8 dc2tog, 4 dc3tog, 24 ch-1 sp, 8 ch-2 sp, 4 ch-2 corner sp (100 total/25 per side)
Round 10 :
Starting in any ch-2 corner sp, * (2 hdc, ch 2, 2 hdc) in ch-2 corner sp; hdc in NEXT 2 hdc, sk ch-1 sp; shallow FPhdc around NEXT 2 FPtr, sk hdc; hdc in NEXT ch-1 sp; • FPhdc around NEXT hdc, hdc in NEXT ch-2 sp; FPhdc around NEXT dc2tog, hdc in NEXT ch-1 sp; FPhdc around NEXT dc3tog, hdc in NEXT ch-1 sp; FPhdc around NEXT dc2tog; hdc in NEXT ch-2 sp; FPhdc around NEXT hdc; hdc in NEXT ch-1 sp, sk hdc; • shallow FPhdc around NEXT 2 FPtr; sk ch-1 sp, hdc in NEXT 2 sts; repeat from * around; cut yarn, invisible join. Counts: 56 hdc, 16 shallow FPhdc, 20 FPhdc, 4 ch-2 corner sp (92 total/23 per side)
Round 11 :
NOTE: In this rnd, be careful not to make your sts too tight. Starting in any ch-2 corner sp, * (sc, ch 2, sc) in ch-2 corner sp; [ch 1, sk st, sc in NEXT st] 11 times, ch 1; repeat from * around; cut yarn, invisible join. Counts: 52 sc, 48 ch-1 sp, 4 ch-2 corner sp (100 total/25 per side)
Round 12 :
Starting in any ch-2 corner sp, * (sc, ch 2, sc) in ch-2 corner sp; [2FPdc-cluster around NEXT sc, ch 1; sc in NEXT ch-1 sp, sc and ch-1 sp] 6 times; • 2FPdc-cluster around NEXT sc, ch 1; repeat from * around; cut yarn, invisible join. Counts: 80 sc, 28 2FPdc-cluster, 28 ch-1 sp, 4 ch-2 corner sp (136 total/34 per side)
Round 13 :
Start in any ch-2 corner sp, * (sc, ch 2, sc) in ch-2 corner sp; working in BL and skipping all ch-1 sps, sc across in each st to NEXT ch-2 corner sp; repeat from * around; cut yarn, invisible join. Counts: 8 sc, 108 BLsc, 4-ch 2 corner sp (116 total/29 per side)
Round 14 :
Starting in any ch-2 corner sp, * (2 dc, ch 2, 2 dc) in ch-2 corner sp; ch 1, sk NEXT sc; [cable st] 7 times, ch 1; repeat from * around; cut yarn, invisible join. Counts: 16 dc, 28 cable st, 8 ch-1 sp, 4-ch 2 corner sp (52 total/13 per side)
Round 15 :
Starting in any ch-2 corner sp, * (2 dc, ch 2, 2 dc) in ch-2 corner sp; ch 1, sk NEXT 2 dc; (2 dc) in NEXT ch-1 sp; sk cable st, [(4 dc) between NEXT 2 cable sts] 6 times; sk cable st, (2 dc) in NEXT ch-1 sp; ch 1, sk NEXT 2 dc; repeat from * around; cut yarn, invisible join. Counts: 128 dc, 8 ch-1 sp, 4 ch-2 corner sp (136 total/34 per side)
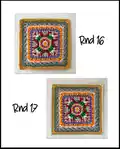
Round 16 :
Starting in any ch-2 corner sp, * (2 dc, ch 2, 2 dc) in ch-2 corner sp; dc in NEXT 2 dc and ch-1 sp; dc in NEXT 13 dc; dc2tog in NEXT 2 dc; dc in NEXT 13 dc; dc in NEXT ch-1 sp and 2 dc; repeat from * around; cut yarn, invisible join. Counts: 144 dc, 4 dc2tog, 4 ch-2 corner sp (148 total/37 per side)
Round 17 :
Note: If after rnd 16, your square is running small, replace the sc with hdc. Starting in any ch-2 corner sp, * (sc, ch 2, sc) in ch-2 corner sp; sc across in each st to NEXT ch-2 corner sp; repeat from * around; cut yarn, invisible join and weave in ALL yarn ends. Counts: 156 sc, 4 ch-2 corner sp (156 total/39 per side)
Info :
Blocking is recommended to reach final shape and size. You can either wet block or steam block, but be careful when steam blocking acrylic yarn. Weave in all ends after finishing rnd 17 and before blocking.
Marley Mae Square is a colorful, textured statement square perfect for heirloom blankets and cozy gift projects. The mix of post stitches, clusters, and cable details creates a beautiful sculpted surface that pops in worsted cotton. Make a single square or a whole collection to build a vibrant blanket that will be cherished for years. 🧶✨