🧢 Beautiful ✨ Detailed πŸ’ Adorable

Christmas Bells Pattern

Christmas Bells Pattern
4.4β˜… Rating
5-7 Hours Time Needed
1.9K Made This
βœ‚οΈ

Intermediate Level

Ideal for those with basic crochet experience, featuring slightly more advanced stitches and techniques to expand your skills.

⏱️

Weekend Treat

Takes 5-7 hours, making it an enjoyable project to finish over a couple of days.

🏑

Cozy Accent

A warm touch for your space that transforms ordinary corners into inviting nooks filled with handmade charm.

About This Christmas Bells Pattern

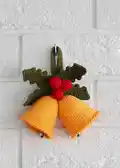
This pattern teaches you how to crochet a pair of festive bells with leaves and berries for a classic Christmas decoration. It includes stitch-by-stitch rounds, a crab (reverse) stitch edge, and instructions to add tiny tambourine jingle bells. The pieces are crocheted in continuous spirals and assembled to create a polished ornament.

Christmas Bells Pattern crochet pattern - detailed view of completed project

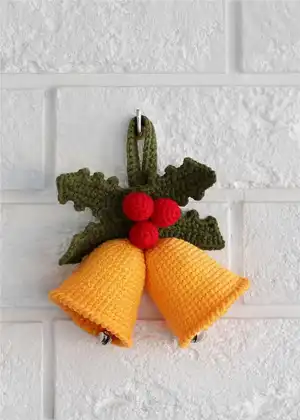
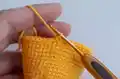
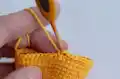
Clear materials and tool lists are included along with helpful photos for tricky steps. The finished decoration measures approximately 4.7 x 5.1 inches with the hanging loop when made with the specified yarn and hook.

Why You'll Love This Christmas Bells Pattern

I absolutely love this pattern because it balances simplicity with festive detail, giving you a beautiful ornament without overwhelming complexity. I enjoy the tiny finishing touches like the crab stitch edge and the little jingle inside each bell that make it feel special. I find the leaves and berries add a classic look that pairs well with many holiday styles. I also love that you can customize colors and sizes easily, creating unique gifts or decorations for your home.

Christmas Bells Pattern step 1 - construction progress Christmas Bells Pattern step 2 - assembly progress Christmas Bells Pattern step 3 - details and accessories Christmas Bells Pattern step 4 - final assembly and finishing

Switch Things Up

I love how simple it is to customize this pattern by changing yarn color; try metallic or sparkly yarn for a glitzy holiday finish.

For a rustic look, switch to a natural-colored cotton or linen blend and use wooden beads instead of tambourines.

To make mini versions for gifts or garlands, use thinner yarn and a smaller hook to scale the bells down into tiny charms.

If you want a chunkier ornament, use a bulkier yarn and a larger hook for a more substantial, cozy bell.

I sometimes add embroidery or a tiny bow to the top of the leaves to personalize each piece for the recipient.

Try different berry counts or cluster shapes β€” three berries is classic, but two or five can give a fresh layout.

You can attach a loop of ribbon instead of a crocheted loop if you want a softer hanging option or quicker finish.

I recommend swapping the jingle bell for a wooden bead or button if you prefer a silent decoration.

For an outdoor-friendly decoration, use acrylic or weather-resistant yarn and seal any wooden components.

I often make a set of three different sizes in the same colorway to hang as a layered mobile on the tree.

To create a matching gift tag, crochet a small flat bell shape and stitch a name or year onto it with contrasting yarn.

Don't be afraid to mix yarn brands β€” just swatch first to match gauge if you want consistent sizing across multiple ornaments.

Common Mistakes & How to Fix Them

βœ— Crocheting too loosely will make the stuffing show through the fabric; maintain a tighter tension and use the recommended hook to prevent gaps. βœ— Skipping the crab (reverse) stitch edge will give an unfinished look; work the final row in crab stitch to create a neat, decorative rim. βœ— Not securing the tambourine/jingle well inside the bell can cause it to fall out; tie the bell language securely and double-knot before hiding the tails inside. βœ— Forgetting to leave long tails on leaves and berries makes assembly harder; always leave a long tail for sewing and hiding threads during assembly.

Christmas Bells Pattern

Create a charming set of crocheted Christmas bells to decorate your home or give as a handmade gift. This pattern guides you through making two bells, a set of leaves, three berries, and a hanging loop with clear step-by-step rounds and assembly photos. You will learn a reverse (crab) stitch edge and how to attach small jingle bells for a festive finish. Perfect for holiday decor, tree ornaments, or a seasonal door hanger.

Intermediate 5-7 Hours

Materials Needed for Christmas Bells Pattern

β€” Main Fabric

  • 01
    DK weight yarn - Yarn Art Jeans (55% cotton/45% acrylic; 50 g/160 m)
  • 02
    Yarn Art Jeans No. 35 (yellow) - bells
  • 03
    Yarn Art Jeans No. 82 (dark green) - leaves, loop
  • 04
    Yarn Art Jeans No. 90 (red) - berries
  • 05
    Small amounts of contrasting yarn for stitch markers or details as needed

β€” Tools Required

  • 01
    Crochet hook size 2.25 mm
  • 02
    Smaller crochet hook (for pulling thread through eye of bell for bell language)
  • 03
    Stuffing material (fiberfill / polyester)
  • 04
    Tapestry needle
  • 05
    Scissors
  • 06
    Stitch marker (a scrap of contrasting yarn)
  • 07
    Tambourine / small jingle bells (2 pieces)
  • 08
    Sewing needle for assembly

Progress Tracker

0% Complete

β€” BELLS (make 2) :

Info :

Yarn - YarnArt Jeans No. 03 (yellow)

Round 1 :

6 into MR

Round 2 :

6 inc (12)

Round 3 :

(1 sc, inc)*6 (18)

Round 4 :

(2 sc, inc)*6 (24)

Round 5 :

(3 sc, inc)*6 (30)

Round 6-7 :

30 sc (2 rounds)

Round 8 :

(4 sc, inc)*6 (36)

Round 9-14 :

36 sc (6 rounds)

Round 15 :

(5 sc, inc)*6 (42)

Round 16-19 :

42 sc (4 rounds)

Info :

* Crochet the next row with Crab (Reverse) stitch

Round 20 :

42 sc (Crab stitch), 1 sl st

Info :

Break yarn. Pull tightly. Hide the tail inside.

β€” BELL LANGUAGE :

Info :

Chain 16 with blue yarn. Using a smaller hook, pull the thread into the eye of the bell to grab and pull the thread.

Info :

Start working in the second chain from hook 15 sc. Break yarn.

Info :

We attach the finished language to the bell. Tie all the threads.

Info :

Tie both bells together.

β€” LEAF (make 4) :

Info :

Yarn - YarnArt Jeans No. 82 (dark green)

Instruction :

Chain 15, crochet to the chain foundation. Start working in the second chain from hook - 13 sc, 3 sc in 1 stitch.

Info :

Continue crocheting on the other side of the chain foundation. – 12 sc, 3 sc in 1 stitch.

Round 2 :

(3 sc, chain 3, 1 sc in the previous stitch)*4, 3 sc, chain 3, 1 sc in the previous stitch, (3 sc, chain 3, 1 sc in the previous stitch)*4, 2 sc, 2 sl st.

Info :

Break yarn, leaving a long tail for sewing.

Info :

* Iron the part with steam if it is uneven. To do this, put a damp cloth on top of a crochet garment and steam it off for a few seconds.

β€” BERRIES (make 3) :

Info :

Yarn - YarnArt Jeans No. 90 (red)

Round 1 :

6 into MR

Round 2 :

6 inc (12)

Round 3-6 :

12 sc (4 rounds)

Info :

Complete stuffing with fiberfill.

Info :

Tighten the hole using a tapestry needle.

β€” ASSEMBLY :

Step 1 :

Sew four leaves together.

Step 2 :

Using a needle, remove all the threads from the bell to the back of the sheet and tie them together.

Step 3 :

Sew the berries to the center of the leaves.

Step 4 :

Attach the bells to the leaves by tying the bell threads to the leaf assembly and hiding knots at the back.

Info :

Tie all the threads securely and hide ends inside the leaves and bells for a neat finish.

β€” LOOP :

Info :

Yarn - YarnArt Jeans No. 82 (dark green)

Round 1 :

Chain 41, turn and continue crocheting on the other side of the chain.

Round 2 :

40 sc, 1 cp, turn

Round 3 :

40 sc

Info :

Cut off the long end of the thread. Use a needle to connect the ends. With the remaining piece of thread, sew the loop to the back of the leaves, thereby hiding all the protruding threads.

Info :

Final assembly: arrange leaves, attach loop to back, position bells and berries on top, and secure all pieces with hidden stitches.

Info :

Congratulation! You did it great! Thank you for purchasing my pattern. I hope that you liked the pattern and enjoyed crocheting.

Assembly Instructions

  • Sew four leaves together at their centers to form the base for the berries and bells.
  • Using a needle, bring all threads from each bell to the back of the leaf sheet and tie them together securely to anchor the bells.
  • Sew the three berries to the top-center of the leaf assembly, spacing them evenly to form a cluster.
  • Cut the loop ends, connect and sew the loop to the back of the leaves, hiding all protruding threads for a neat finish.

Important Notes

  • πŸ’‘Make sure you crochet tight enough; otherwise, the stuffing will show through the holes.
  • πŸ’‘Crochet the pieces in continuous spirals without turning chains to avoid visible seams.
  • πŸ’‘Use a damp cloth and steam to iron uneven parts of the leaves for a flat, professional look.
  • πŸ’‘Leave long tails on decorative pieces to make sewing and assembly much easier and cleaner.

This festive Christmas bells pattern brings a touch of handmade charm to your holiday dΓ©cor, perfect for gift-giving or tree trimming. 🧢 Create bright bells, crisp leaves, and sweet little berries that jingle with tiny tambourines inside. ✨ Hang them on doors, branches, or package bows to spread seasonal cheer. πŸŽ„

You ask,

we answer.

FAQs

What size will the finished piece be?

The finished decoration measures approximately 4.7 x 5.1 inches with a loop when made with the recommended yarn and hook size.

Can I use different yarn weights for this pattern?

Yes, you can use different yarn weights, but the final size will change; choose a suitable hook for your yarn and expect a different finished scale.

Do I need prior crochet experience for this pattern?

This pattern is rated intermediate, so familiarity with single crochet, increases, decreases, and working in continuous spirals is recommended.

How do I attach the small jingle bells securely?

Make the bell language chain, pull the thread through the eye of the jingle bell, secure with several stitches, tie tightly and hide the tail inside the bell before final assembly.