🧢 Beautiful ✨ Detailed πŸ’ Adorable

Christmas Minion Amigurumi Pattern

Christmas Minion Amigurumi Pattern
4.5β˜… Rating
5-7 Hours Time Needed
2.3K Made This
βœ‚οΈ

Intermediate Level

Ideal for those with basic crochet experience, featuring slightly more advanced stitches and techniques to expand your skills.

⏱️

Weekend Treat

Takes 5-7 hours, making it an enjoyable project to finish over a couple of days.

🧸

Cute Companion

An adorable friend to cherish, handcrafted with love to bring comfort and joy for years to come.

About This Christmas Minion Amigurumi Pattern

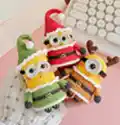
This pattern creates three tiny Christmas-themed minions β€” Bob, Kevin, and Stuart β€” each with their own hat and outfit details. The design uses sport-weight yarn and small hooks for tight stitches and neat shaping. Youll learn to work in the round with BLO/FLO rounds, make tiny accessories like glasses and horns, and assemble small parts for polished results. Perfect for gifting or holiday displays.

Christmas Minion Amigurumi Pattern crochet pattern - detailed view of completed project

Clear round-by-round instructions are provided for every piece including body, arms, legs, hats, glasses and horns. Techniques include magic ring, increases, decreases, BLO/FLO, and simple sewing and placement guidance.

Why You'll Love This Christmas Minion Amigurumi Pattern

I absolutely love this pattern because it turns simple stitches into whimsical holiday characters with tons of personality. I enjoy the mix of colorwork and small-detail construction that makes each minion unique and rewarding to finish. The pattern balances straightforward shaping with tiny accessories, so each finished piece feels like a little handmade gift. I also love how customizable the hats and colors are β€” you can make an entire festive set in different palettes. Working on these little amigurumi always brightens my craft time and makes great presents.

Christmas Minion Amigurumi Pattern step 1 - construction progress Christmas Minion Amigurumi Pattern step 2 - assembly progress Christmas Minion Amigurumi Pattern step 3 - details and accessories Christmas Minion Amigurumi Pattern step 4 - final assembly and finishing

Switch Things Up

I love to change colors to give each minion a different holiday outfit, like red, green, or copper tones for variety.

I sometimes use a slightly thicker yarn and larger hook to make chunky, huggable versions that are great as stocking stuffers.

I also experiment with tiny embroidered mouths and eyebrows to vary expressions and add character to each minion.

I like adding felt accessories such as small scarves, tiny buttons or a mini present to the hands for extra charm.

I sometimes swap safety eyes for embroidered eyes for a fully handmade, child-safe version suitable for babies.

I occasionally add a loop at the top of the hat to turn the minion into a Christmas tree ornament.

I find using metallic or sparkly yarn for hat trims gives a subtle festive shimmer without changing the core pattern.

I sometimes replace the horns with small pom-poms or bells for playful variations on Stuart.

I recommend trying tonal gradients (ombre yarns) for hats to create a more dynamic, modern look.

I often gift these as a set with different color schemes, and I encourage you to mix and match trims, eye sizes, and tiny accessories to make each piece your own.

Common Mistakes & How to Fix Them

βœ— Skipping stitch markers during rounds with many increases can cause miscounted stitches; place a marker at the start of every round and move it each round to stay accurate. βœ— Not stuffing as you go can make finishing and shaping difficult; stuff gradually and firmly, adding small amounts at a time to achieve smooth consistent shape. βœ— Switching colors without securing tails causes loose ends and visible gaps; weave in or whipstitch color joins and leave long tails for sewing if needed. βœ— Forgetting to work in BLO or FLO as instructed will change garment placement; carefully follow BLO/FLO instructions and check photos to ensure correct collar and shirt placement.

Christmas Minion Amigurumi Pattern

Make a pair (or trio) of festive minion amigurumi perfect for holiday gifts and decorations. This pattern guides you through crocheting Bob, Kevin, and Stuart with detailed rounds and assembly tips. Youll use color changes, BLO/FLO techniques, and small accessory pieces to create charming holiday outfits. Enjoy a rewarding small-project with plenty of creative customization opportunities.

Intermediate 5-7 Hours

Materials Needed for Christmas Minion Amigurumi Pattern

β€” Main Fabric

  • 01
    Sport weight yarn (recommended 1.5-2mm strand thickness) - Yellow for body (amount as needed per minion)
  • 02
    Sport weight yarn - Minion shirt colors: red, green, brown (small amounts for each outfit)
  • 03
    Sport weight yarn - Accent colors: black, white, gray for glasses and trims
  • 04
    Black yarn or black embroidery thread for facial details and straps
  • 05
    Fiberfill for stuffing each minion
  • 06
    Safety eyes black size 8-10mm (pattern used 8mm eyes)

β€” Tools Required

  • 01
    Crochet hook size 2.0mm 62.5mm (use size to obtain gauge)
  • 02
    Yarn needle for sewing and weaving ends
  • 03
    Scissors
  • 04
    Stitch markers
  • 05
    Polyester stuffing (fiberfill)
  • 06
    Glue (for attaching eyes to glasses if desired)
  • 07
    Optional: small pins for positioning pieces during assembly

Progress Tracker

0% Complete

β€” Bob's Body :

Round 1 :

7sc in MR (7)

Round 2 :

7 -inc (14)

Round 3 :

(sc, inc) * 7 (21)

Round 4 :

(inc, 2sc) * 7 (28)

Round 5 :

(3sc, inc) * 7 (35)

Round 6-14 :

(9 rnds) 35sc (35)

Info :

Switch to red yarn

Round 15 :

BLO (4sc, inc) * 7 (42)

Round 16-17 :

(2 rnds) 42sc (42)

Info :

Switch to black yarn

Round 18-19 :

(2 rnds) 42sc (42)

Info :

Switch to red yarn

Round 20 :

BLO 42sc (42)

Round 21 :

42sc (42)

Round 22 :

(4sc, dec) * 7 (35)

Round 23 :

(3sc, dec) * 7 (28)

Info :

Stuff the body tight with fiberfill

Round 24 :

(2sc, dec) * 7 (21)

Round 25 :

(sc, dec) * 7 (14)

Round 26 :

7 -dec (7)

Info :

Cut the yarn. Invisible fasten off. Thread a needle with your yarn tail and close the ramaining gap.

β€” Kevin's Body :

Round 1 :

7sc in MR (7)

Round 2 :

7 -inc (14)

Round 3 :

(sc, inc) * 7 (21)

Round 4 :

(inc, 2sc) * 7 (28)

Round 5 :

(3sc, inc) * 7 (35)

Round 6-21 :

(16 rnds) 35sc (35)

Info :

Switch to green yarn

Round 22 :

BLO (4sc, inc) * 7 (42)

Round 23-24 :

(2 rnds) 42sc (42)

Info :

Switch to black yarn

Round 25-26 :

(2 rnds) 42sc (42)

Info :

Switch to green yarn

Round 27 :

BLO 42sc (42)

Round 28 :

42sc (42)

Round 29 :

(4sc, dec) * 7 (35)

Round 30 :

(3sc, dec) * 7 (28)

Info :

Stuff the body tight with fiberfill

Round 31 :

(2sc, dec) * 7 (21)

Round 32 :

(sc, dec) * 7 (14)

Round 33 :

7 -dec (7)

Info :

Cut the yarn. Invisible fasten off. Thread a needle with your yarn tail and close the ramaining gap.

β€” Stuart's Body :

Round 1 :

7sc in MR (7)

Round 2 :

7 -inc (14)

Round 3 :

(sc, inc) * 7 (21)

Round 4 :

(inc, 2sc) * 7 (28)

Round 5 :

(3sc, inc) * 7 (35)

Round 6-17 :

(12 rnds) 35sc (35)

Info :

Switch to brown yarn

Round 18 :

BLO (4sc, inc) * 7 (42)

Round 19-20 :

(2 rnds) 42sc (42)

Info :

Switch to black yarn

Round 21-22 :

(2 rnds) 42sc (42)

Info :

Switch to brown yarn

Round 23 :

BLO 42sc (42)

Round 24 :

42sc (42)

Round 25 :

(4sc, dec) * 7 (35)

Round 26 :

(3sc, dec) * 7 (28)

Info :

Stuff the body tight with fiberfill

Round 27 :

(2sc, dec) * 7 (21)

Round 28 :

(sc, dec) * 7 (14)

Round 29 :

7 -dec (7)

Info :

Cut the yarn. Invisible fasten off. Thread a needle with your yarn tail and close the ramaining gap.

β€” Arms :

Info :

With black and minion shirt's yarn (make two)

Round 1 :

start with black 4sc in MR (4)

Round 2 :

4 -inc (8)

Info :

Switch color

Round 3-8 :

(6 rnds) 8sc (8)

Info :

Cut the yarn. Leave a long tail. Thread a needle with your yarn tail and sew to the body at the round you switch to minion shirt's color yarn.

β€” Legs :

Info :

With black and minion shirt's yarn.

Round 1 :

start with black 7sc in MR (7)

Round 2 :

inc, 6sc (8)

Info :

Switch color

Round 3-4 :

8sc (8)

Info :

Cut the yarn. Leave a long tail. Thread a needle with your yarn tail and sew the legs to bottom of the body.

β€” Bob's and Kevin's Glasses :

Info :

With white and gray.

Round 1 :

start with white 7sc in MR (7)

Round 2 :

7 -inc (14)

Info :

Switch to gray

Round 3 :

FLO 14sc, slst(14)

Info :

Cut the yarn. Leave a long tail. Thread a needle with your yarn tail and sew the glasses to the body. Place the eyes on glasses and use glue to stick them to the body.

β€” Stuart's Glasses :

Info :

With white and gray.

Round 1 :

start with white 7sc in MR (7)

Round 2 :

7 -inc (14)

Round 3 :

(sc, inc) * 7 (21)

Info :

Switch to gray

Round 4 :

FLO 21sc, slst (21)

Round 5 :

Info

Info :

Black trap for Bob and Kevin glasses: Start with black yarn, ch32, 31 -slst on chain. Cut the yarn. Leave a long tail. Thread a needle with your yarn tail and sew it to the body of minion.

Info :

Black trap for Stuart glasses: Start with black yarn, ch37, 36sc on chain. Cut the yarn. Leave a long tail. Thread a needle with your yarn tail and sew it to the body of minion.

β€” Piece of shirt :

Info :

With minion shirt's yarn Insert your hook to FLO stitches of the second BLO round on the body,

Round 1 :

ch1, (5sc, inc) * 7, slst (49)

Round 2-3 :

(2 rnds) ch1, 49sc, slst (49)

Info :

Switch to white yarn

Round 4 :

49sc, slst (49)

Info :

Cut the yarn. Invisible fasten off. Hide your yarn tail.

β€” Collar :

Info :

With white yarn Insert your hook to FLO stitches of the first BLO round on the body, (ch 3, slst to the next stitch) * end round

Info :

Cut the yarn. Invisible fasten off. Hide your yarn tail.

β€” Bob's and Kevin's hat :

Info :

With minion shirt's yarn

Round 1 :

4sc in MR (4)

Round 2-4 :

(3 rnds) 4sc (4)

Round 5 :

3sc, inc (5)

Round 6-8 :

(3 rnds) 5sc (5)

Round 9 :

4sc, inc (6)

Round 10-12 :

(3 rnds) 6sc (6)

Round 13 :

(sc, inc) * 3 (9)

Round 14 :

9sc (9)

Round 15 :

(2sc, inc) * 3 (12)

Round 16-17 :

(2 rnds) 12sc (12)

Round 18 :

(sc, inc) * 6 (18)

Round 19 :

18sc (18)

Round 20 :

(2sc, inc) * 6 (24)

Round 21 :

24sc (24)

Round 22 :

(3sc, inc) * 6 (30)

Round 23 :

(4sc, inc) * 6 (36)

Round 24 :

2sc, inc, (5sc, inc) * 5, 3sc (42)

Round 25 :

42sc (42)

Info :

Switch to white yarn

Round 26 :

42sc (42)

Round 27 :

(Ch 3, slst to the next stitch) * end round

Info :

Cut the yarn. Invisible fasten off. Hide your yarn tail.

β€” Stuart's horn :

Info :

With dark brown yarn. Make two.

Big piece - Round 1 :

6sc in MR (6)

Big piece - Round 2 :

(2sc, inc) * 2 (8)

Big piece - Round 3 :

8sc (8)

Big piece - Round 4 :

2sc, 2-dec, 2sc (6)

Big piece - Round 5 :

2sc, dec, 2sc (5)

Big piece - Round 6-7 :

(2 rnds) 5sc (5)

Big piece - Round 8 :

3sc, dec, slst (4)

Info :

Cut the yarn. Leave a long tail for sewing.

Small piece - Round 1 :

4sc in MR (4)

Small piece - Round 2-3 :

(2 rnds) 4sc (4)

Info :

Cut the yarn. Leave a long tail. Thread a needle with your yarn tail. Sew small piece to big piece spanning rounds 5&6.

Info :

Sew the horn to the top of minion spanning rounds 4&5

Assembly Instructions

  • Sew arms to the body at the round where you switch to the minion shirt color yarn; use the long tail left and a yarn needle to whipstitch securely and evenly on both sides.
  • Position and sew the legs to the bottom center of the body, spacing them evenly and using the long tails to anchor firmly so the minion stands upright.
  • Attach glasses to the face by sewing through the body at the placement shown in photos, then glue the safety eyes onto the glasses (or sew eyes in place) for a secure hold.
  • Sew hats and collars into the BLO/FLO rounds indicated: insert hooks into specified loops, align the collar with first BLO round and shirt piece to second BLO round, and sew them flat with matching yarn tails.
  • Assemble Stuart's horns by sewing the small piece to the big piece spanning rounds 5 & 6, then sew the completed horn pair to the top of the head spanning rounds 4 & 5.
  • Weave in all tails and hide ends inside the body, then check symmetry and adjust placements by unpicking small stitches if necessary before final securing.

Important Notes

  • πŸ’‘Use stitch markers to mark the start of each round to keep count and maintain consistent shaping.
  • πŸ’‘Work with a small hook and tight tension for neat stitches and to avoid stuffing showing through.
  • πŸ’‘Stuff parts firmly but gradually to avoid lumps and shape distortions; overstuffing can distort the body shape.
  • πŸ’‘When switching colors, carry or secure yarn tails neatly and leave long tails for sewing small pieces in place.

Bring festive cheer to your crochet with these tiny Christmas Minions β€” perfect for gifts, tree ornaments, or a cute holiday display. Add your own color tweaks or tiny accessories to make each minion unique and heartwarming. Happy crocheting and may your holidays be filled with handmade joy! πŸ§ΆπŸŽ„

You ask,

we answer.

FAQs

What size will the finished piece be?

The finished minion measures approximately 8-12 cm tall depending on your yarn tension and hook size; using the recommended sport yarn and 2.0mm hook yields a small palm-sized amigurumi.

Can I use different yarn weights for this pattern?

Yes, you can use different yarn weights but this will affect size; choose an appropriate hook for your yarn and expect the piece to be larger with bulkier yarn or smaller with thinner yarn.

Do I need prior crochet experience for this pattern?

This pattern is rated intermediate; you should be comfortable working in the round, using increases and decreases, and performing BLO/FLO rounds for best results.

How long does this project typically take to complete?

Most crocheters complete a single minion in about 5-7 hours when making a full set with accessories, though time will vary based on experience and speed.

What tools are essential for assembly?

A yarn needle, stitch markers, small scissors, and glue (for adhering eyes to glasses if desired) are essential for neat assembly and finishing.