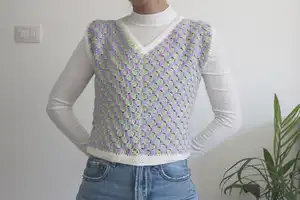
Make a stylish v-neck vest using the corner-to-corner (c2c) crochet technique. This pattern walks you through front panels and a full back panel with charts and row-by-row instructions so you can follow along easily. Youll work alternating colors for a checkerboard look and finish with a neat ribbed edge for a polished garment. Perfect for customizing color, length, and edging to make the vest your own.
Progress Tracker
0% Complete
— Materials :
Info :
Yarn: About 1000y (900m) of a DK weight (3) yarn like Paintbox Yarns Simply DK (15% more for each size over S/M). Divide the yardage in half for each color if using two colors. If using 1 color for the back, you'll need 3/4ths of the yardage in one color and 1/4th in the other. A small amount of a 3rd color for ribbing/edging is optional.
— Gauge and Sizing :
Info :
C2c gauge: A square sample of c2c, 9x9 clusters will be 5in (13cm) wide/tall
Info :
Sizing Finished bust measurement: S/M-36in (91cm) L/XL-42in (105cm) 2XL/3XL - 56in (142cm)
Info :
When pattern differs for different sizes, instructions are written for smallest with larger in parenthesis.
— Overview :
Info :
This pattern is made using the corner to corner stitch (c2c) to diagonally make a series of 3 double crochet clusters or "blocks." The c2c stitch does not lend itself well to written instructions so there is a video tutorial which you can find HERE which will demonstrate both the c2c stitch and how to change color every row (which is normally a challenge in c2c crochet).
Info :
If you are already familiar with the c2c stitch, you'll find the chart pattern below where each c2c block is represented by a single square. The pattern is also written out row by row indicating how many blocks are in each row. The pattern is made in three pieces. Two front pieces which are seamed along the middle, and a large back piece seamed along the sides and shoulders. You may work ribbing along the raw edges of your work after seaming.
— How to Read C2C Graphs :
Info :
Here, I have a sample chart as well as its corresponding row instructions. This is to demonstrate working "up" or "down" on c2c graphs. The colorwork for this vest is actually less complicated than this sample, fortunately :) but still, the example helps demonstrate how written c2c instructions work.
Info :
Row 1: Up - 1W Row 2: Down - 2W Row 3: 1W, 1P, 1W Row 4: 1W, 2P, 1W Row 5: 1W, 1P, 1G, 1P, 1W Row 6: 1W, 1P, 2G, 1P, 1W Row 7: 2W, 1G, 1B, 1G, 2W Row 8: 3W, 2B, 3W
Info :
C2c double crochet blocks are indicated by a number (# of blocks) and a color (W=white, P=purple and so on).
Info :
In my c2c graphs, odd number rows will be "Up" rows and even numbered rows will be "Down" rows.
Info :
"Up" instructions are reading the graph left to right, low to high. "Down" instructions are the reverse, reading the graph from right to left, high to low.
— Short hand instructions :
Info :
Front panel (make 2)
Info :
Alternating colors each row, increase in c2c until you're piece has 16 (18, 20) blocks along one side. On the next row, decrease at the end of the row by slip stitching into the last ch3 space, ch1, and slip stitch back along the 3dcs of the block you just made(underarm corner).
Info :
For the S/M size only: Decrease at the end of the next row. Then, increase at the end of odd numbered rows and decrease at the end of even numbered rows until you have 11 blocks above the underarm corner. Then, decrease at the end of each row until 11 blocks remain in the row. Fasten off.
Info :
For the L/XL size only: Then, work 18 blocks. Decrease at the beginning of row 21 and increase at the end of row 21. Then, continue, increasing at the end of odd numbered rows and decreasing at the end of even numbered rows until you have 13 blocks above the underarm corner. Then, decrease at the end of each row until 11 blocks remain in the row. Fasten off.
Info :
For the 2X/3X size only: Then, continue increasing at the end of each row until the long side of your work has 27 blocks. Then, increase at the end of odd numbered rows and decrease at the end of even numbered rows until you have 15 blocks above the underarm corner. Then, decrease at the end of each row until 12 blocks remain in the row. Fasten off.
Info :
Repeat the front panel instructions for the 2nd panel, starting with the opposite color from the first panel. Then, complete the back panel in one piece with double the number of blocks along the bottom edge and the same number of sleeve/side seam blocks along the vertical edge.
— Front Panel Charts :
Info :
S/M Front Panel - ignore white squares (refer to the chart for the block layout)
Info :
L/XL Front Panel - ignore white squares (refer to the chart for the block layout)
Info :
2X/3X Front Panel - ignore white squares (refer to the chart for the block layout)
— Row by row instructions :
Info :
Front panel only. Make 2. On 2nd panel, start with the opposite color that you started with on the first panel. Instructions for each size are written: S/M (L/XL, 2X/3X). Instructions are for all sizes if the size isn't indicated.
Row 1 :
(Up) 1 block in color A
Row 2 :
(Down) 2 blocks in color B
Row 3 :
3 blocks in color A
Row 4 :
4 blocks in color B
Row 5 :
5 blocks in color A
Row 6 :
6 blocks in color B
Row 7 :
7 blocks in color A
Row 8 :
8 blocks in color B
Row 9 :
9 blocks in color A
Row 10 :
10 blocks in color B
Row 11 :
11 blocks in color A
Row 12 :
12 blocks in color B
Row 13 :
13 blocks in color A
Row 14 :
14 blocks in color B
Row 15 :
15 blocks in color A
Row 16 :
16 blocks in color B
Row 17 :
16 (17,17) blocks in color A *first decrease at end of row for S/M
Row 18 :
15 (18, 18) blocks in color B
Row 19 :
15 (18 ,19) blocks in color A *first decrease at end of row for L/XL
Row 20 :
15 (18, 20) blocks in color B
Row 21 :
15 (18, 20) blocks in color A *first decrease at end of row for 2/3X
Row 22 :
15 (18, 20) blocks in color B
Row 23 :
15 (18, 21) blocks in color A
Row 24 :
15 (18, 22) blocks in color B
Row 25 :
15 (18, 23) blocks in color A
Row 26 :
15 (18, 24) blocks in color B
Row 27 :
15 (18, 25) blocks in color A
Row 28 :
15 (18, 25) blocks in color B
Row 29 :
15 (18, 25) blocks in color A
Row 30 :
14 (18, 25) blocks in color B
Row 31 :
13 (18, 25) blocks in color A
Row 32 :
12 (18, 25) blocks in color B
Row 33 :
11 (18, 25) blocks in color A
Row 34 :
Large-3XL only Row 34: (17, 25) blocks in color B
Row 35 :
Row 35: (16, 25) blocks in color A
Row 36 :
Row 36: (15, 25) blocks in color B
Row 37 :
Row 37: (14, 25) blocks in color A
Row 38 :
Row 38: (13, 24) blocks in color B
Row 39 :
Row 39: (12, 23) blocks in color A
Row 40 :
Row 40: (11, 23) blocks in color B
Row 41 :
2X/3X only Row 41: 21 blocks in color A
Row 42 :
Row 42: 20 blocks in color B
Row 43 :
Row 43: 19 blocks in color A
Row 44 :
Row 44: 18 blocks in color B
Row 45 :
Row 45: 17 blocks in color A
Row 46 :
Row 46: 16 blocks in color B
Row 47 :
Row 47: 15 blocks in color A
Row 48 :
Row 48: 14 blocks in color B
Row 49 :
Row 49: 13 blocks in color A
Row 50 :
Row 50: 12 blocks in color B
— Back Panel :
Info :
Double the number of horizontal blocks from the front panel. Underarm seam and arm hole block count remains the same. Continue decreasing to the other side (no v-neck).
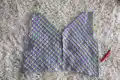
— Seaming :
Info :
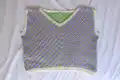
Seam the two front panels together up the middle, leaving the final rows unseamed for the V-neck opening.
Info :
Seam back panel to front panels up the sides and along the shoulders.
— Finishing off the raw edges :
Info :
Attach a new yarn at one shoulder. Heading towards the center point of the V neck, work 1dc, 1hdc, 1sc along the first block. Sl st into the next ch3 space. Again work 1dc, 1hdc, 1sc, and sl st into next ch 3 sp to level off the scalloped edge of the V neck. Continue, 1dc, 1hdc, 1sc, 1 sl st into the ch 3 space along the raw edge.
Info :
When you reach the center two blocks and begin working up the opposite side, work 1sc, 1hdc, 1dc and slip stitch. *1sc, 1hdc, 1dc, sl st* to even out the c2c edge on the other side.
— Adding Ribbing :
Info :
Add ribbing of your choice along the bottom edge, sleeve openings and neckline. While adding stitches along the c2c edges, alternate 3sts and 2sts along the edge of each c2c block. On the bottom edge, work 2sts for each block for a more sinched in look.
Info :
I worked "camel stitch" by working half double crochet into the "back bar" of the stitch in the round.
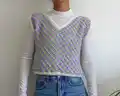
— Extra Photos And Video Tutorial :
Info :
Click the thumbnail above for a video tutorial
— Thank You :
Info :
I hope you enjoyed it as much as I enjoyed making it for you all. Before you ask, yes, you can sell any items you craft using this pattern! I also encourage you to contact me anytime with questions.
This Corner to Corner Vest Pattern is a joyful way to explore c2c crochet and color swapping while making a wearable V-neck vest. Personalize the colors and edging to create a modern, comfortable piece youll love to wear or gift. The included charts, row-by-row instructions, and finishing tips make assembly straightforward even when working multiple sizes. 🧶✨