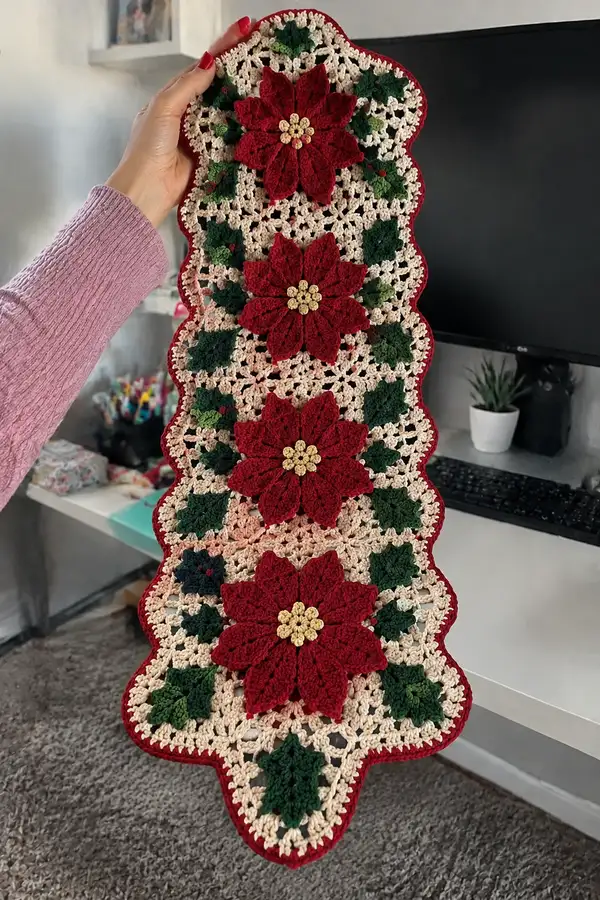
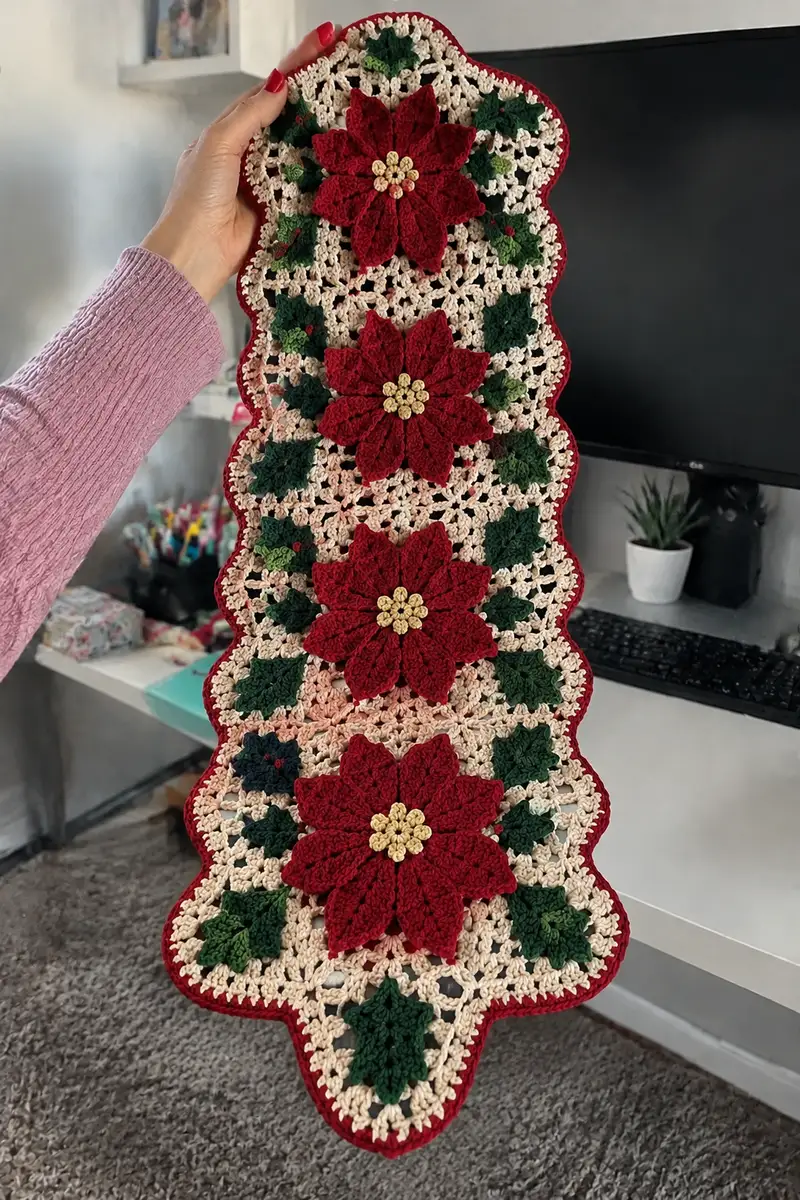
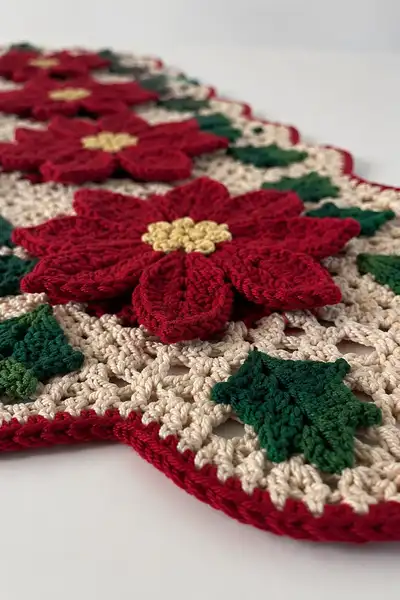
A festive crochet table runner featuring four bold red poinsettia blooms, clustered golden centers and deep green holly leaves on a lacy cream background. The runner has a scalloped red border and join-as-you-go construction for a polished, vintage-inspired effect. This pattern gives modular instructions so you can create, join and finish each motif for a beautiful holiday centerpiece.
Progress Tracker
0% Complete
— Main Background Panel (Make 4 identical rectangular modules) :
Round 1 :
With cream yarn, make a magic ring. Ch 1, work 8 sc into ring. Pull ring closed. (8)
Round 2 :
Inc in every stitch around (2 sc in each st). (16)
Round 3 :
(1 sc, inc) x 8. (24)
Round 4 :
(2 sc, inc) x 8. (32)
Round 5 :
(3 sc, inc) x 8. (40)
Info :
Check tension: panel will be worked into an open lacy grid from the next round. Keep stitches even and do not pull too tight; you want a slightly flexible, not stiff, fabric.
Round 6 :
Ch 3 (counts as dc), *skip 1 st, dc in next st, ch 1, skip 1 st* repeat around, join with sl st to top of ch-3. This forms a separated dc/ch mesh. (40 dc positions, 40 ch-1 spaces)
Round 7 :
Join in any ch-1 space. Ch 1, (sc, ch 2, sc) in same ch-1, *skip next dc, (sc, ch2, sc) in next ch-1* repeat around. Join with sl st to first sc. This creates an openwork ring. (40 sc clusters)
Round 8 :
Work in ch-2 spaces: Join, ch 3 (counts as dc), 2 dc in same ch-2, ch 2, 3 dc in same ch-2 (shell made). *In next ch-2 space make shell (3 dc, ch2, 3 dc)* Repeat around; join. (40 dc shells grouped in 10 shell points)
Info :
From round 6 onward, you can switch to a slightly smaller hook to keep the lace neat. If you change hooks, keep the change consistent across all four panels.
Round 9 :
Ch 1, sc in each dc of the shells and in shell peaks to create a mesh row: across each 3-dc group work 3 sc (1 in each dc), sc in ch-2 space, rep around. (approx 120 sc)
Round 10 :
Ch 3, *ch 1, skip next sc, dc in next sc* repeat around to keep the lattice effect. Join. (approx 40 dc and 40 ch-1)
Round 11 :
Ch 1, (sc, ch 2, sc) in each ch-1 space to rebuild open squares. Join. (40 clusters)
Round 12 :
Shell round: into each ch-2 space work (3 dc, ch2, 3 dc). Join. This returns the lacy shell texture. (10 shell points per panel)
Info :
These shell and spacer rounds build the open lattice that shows behind the poinsettia. Keep your counting consistent: note how many cluster points you have and write it down to match when making the other panels.
Round 13 :
Ch 1, sc evenly around working 2 sc in corner or wide areas to maintain a flat panel. Aim for even spacing: approx 160 sc around entire module. (160)
Round 14 :
Ch 3, *ch 1, skip 1 sc, dc in next sc* to maintain open grid. Join. (approx 40 dc)
Round 15 :
Ch 1, (sc, ch2, sc) in each ch-1 created last round, join. (approx 40 clusters)
Round 16 :
Shell round in each ch-2: (3 dc, ch2, 3 dc) in each, join. (10 shell points)
Info :
Work panels until you reach a height that comfortably fits a large flower in the center and room for leaves above and below. Each panel as written creates a tall oval area; you can stop here or repeat rounds 13-16 one more time if you prefer a larger module.
Round 17 :
Ch 1, sc evenly around to create a uniform surface for sewing the flowers. Work 2 sc in any ch-2 shell corners to keep edges flat. (approx 160 sc)
Round 18 :
Finish off with a neat round of sc around the entire module to prepare for join-as-you-go: ch 1, sc in each st. Fasten off and leave long tail for joining when instructed. (160)
Info :
Make 4 identical modules. Block each module flat before attaching flowers — blocking evens out the lace and makes joining easier. Use pins and a light steam or wet-block according to yarn label.
— Poinsettia Flower (Make 4 full flowers: layered petals) :
Round 1 :
With gold yarn for center, make mr. Ch 1, work 6 sc into ring, pull tight. (6)
Round 2 :
Inc in each st - 2 sc in each stitch around. (12)
Round 3 :
(1 sc, inc) x 6. (18)
Round 4 :
Sl st into next st; change to red yarn in last pull through to begin first petal round. Ch 1. (This round is foundation to attach petals.)
Info :
Start red yarn for petals. This central gold disk will sit slightly cupped; make sure center rounds are tight. Leave tail for sewing or weave in later.
Round 5 :
First petal foundation: *ch 6, skip 1 st, sl st into next st* around to make 6 loops. Join with sl st to first ch. (6 loops)
Round 6 :
Work petals on loops: In each ch-6 loop work (sc, hdc, 4 dc, hdc, sc). Fasten off and weave tail. You now have 6 large petals that are slightly raised. (6 petals)
Info :
Lightly stuff each petal base with a small amount of scrap yarn or fiberfill if you want a puffier petal. The petals will be flattened slightly when layered by the next round.
Round 7 :
Change to red. Rejoin yarn behind the petals at the base between two petals: ch 1, sc around the base of each petal working 6 sc around each petal base to create a firm join. (approx 36 sc)
Round 8 :
Second petal layer foundation: *in the space between petals (or at ch 1 spaces) ch 8, sl st back into same join* Repeat around to create 6 larger loops offset between the first layer petals. Join. (6 loops)
Round 9 :
Work larger petals on these loops: (sc, hdc, 6 dc, hdc, sc) in each ch-8. Fasten off and leave a tail for assembly. (6 petals)
Info :
The second layer petals should be slightly larger and sit between the lower petals. When assembling, offset them so the petals form an 12-point visual effect (6 front visible and 6 tucked beneath).
Round 10 :
Optional decorative ridge: Rejoin red at outer edge and work 1 sc in each top of petal stitches to create a neat edge and slight cupping. (approx 120 sc depending on petal size)
Round 11 :
Make a third, smaller petal set for additional fullness (optional): *ch 5, sl st* into 6 places between the larger petals, then work (sc, 3 dc, sc) in each ch-5. Fasten off. (6 small petals)
Info :
If you prefer a flatter flower, skip round 11. For the pictured 3D effect, work all three petal layers and lightly shape petals with your fingers while damp blocking/pressing.
Round 12 :
Assemble center: With gold yarn, sew the little crocheted 6-stitch disk from rounds 1-3 onto the center of the petal assembly. Use the long tail to sew through center of petals making sure disk sits snugly. Fasten off securely.
Round 13 :
Finishing petals: Use a small bit of embroidery with matching red yarn to add veins if desired: 6 evenly spaced straight stitches from base to tip on each large petal. This step is optional but adds realism.
Info :
Make 4 full poinsettia flowers. Block and press the petals gently flat if you want a more uniform look before attaching to background modules. Keep tails long for sewing.
— Poinsettia Petal Detail (alternate method for deeper petals) :
Round 1 :
For each deep petal alternate, work a 12-stitch elongated petal: ch 8, sc in 2nd ch from hook and next 3 chs, hdc in next 2 chs, dc in last 2 chs; continue along opposite side of chain with (dc, hdc, scs). Sl st to base. Repeat to make 6. (12 sts per petal)
Round 2 :
Edge the petal with sc in each st around to give slope and thickness. Fasten off. Assemble as in main flower. (varies)
Info :
Use this method if you want thicker, more sculpted petals as pictured; these petals will stand away from the background and cast a small shadow for dramatic effect.
— Flower Center (Make 4 clusters of tiny gold buds) :
Round 1 :
With gold yarn, mr, ch 1, 6 sc into ring. (6)
Round 2 :
Inc in each st (2 sc in each st). (12)
Round 3 :
Ch 1, *sl st in next st, ch 4, sl st in same st* repeat in every other stitch to create 6 chain loops. Fasten off leaving tail for sewing. (6 loops)
Round 4 :
Use the long tail to sew the gold cluster onto the red flower center, folding the cluster slightly so that the loops sit as tiny puffed pistils. Secure firmly with several passes of yarn. Fasten off. (assembly)
Info :
Alternatively, you can use very small gold beads or French knots embroidered with metallic thread for centers if you prefer a bit of sparkle.
— Holly Leaves (Make 12-16 small leaves) :
Round 1 :
With dark green yarn, ch 8. In 2nd ch from hook sc, hdc, dc, tr, hdc, sc across the chain, then continue on the opposite chain side to mirror: sc, hdc. Sl st to first st. (approx 14 sts per leaf)
Round 2 :
Ch 1, work 1 sc in each st around the leaf, increasing by working 2 sc in the tip st to keep shape flat. (approx 16 sc)
Round 3 :
Shape the spiny holly edge: *sc in next 2 sts, (ch 3, sl st in next st) to form point* repeat around to create 6 small spikes per leaf. Fasten off and weave tail. (6 points)
Info :
Vary leaf sizes slightly by starting with ch 7 (smaller) or ch 10 (larger). Use lighter green for small accents layered on top of dark green leaves for the color variation shown in the photo.
Round 4 :
Optional: Embroider a central vein with lighter green yarn using back stitch from base to tip to add dimension. Fasten off. (decoration)
— Berry Accent (Make small red berries for leaf clusters) :
Round 1 :
With tiny amount of red yarn, mr, 6 sc into ring, pull tight. Fasten off leaving tail for sewing. (6)
Info :
Sew berries in clusters of 2-3 on top of leaf groupings. Alternatively, use small red beads for bright, reflective berries.
— Join-as-you-go and Layout :
Info :
Layout: Arrange 4 background modules vertically with equal spacing. Each module will have one poinsettia centered, two leaf clusters above and below, and small decorative leaves filling corners so the overall runner resembles the photo: large flower at center of each module and holly leaves between modules.
Round 1 :
Positioning: Place your first module flat. With a long tail from the final sc round of module 1, align module 2 along the long edge so shell points match. Use mattress stitch or sl st join-as-you-go: insert hook through edge st of module 1 and module 2 and sl st through both to connect, working one sl st per sc to create an invisible seam across the full edge. Continue until modules 1 and 2 are joined. (joining)
Round 2 :
Continue joining module 2 to module 3 and module 3 to 4 the same way. Keep joins flat by not pulling yarn tight; the seam should be secure but flexible. Fasten off and weave tails. (joining)
Info :
Use pins to match shell points evenly before joining. If you prefer a more 'stitched' look, use a running stitch with yarn and whipstitch the edges together from the wrong side for a neater front appearance.
Round 3 :
Sew flowers: Position a poinsettia centrally on each module. Pin in place so petals do not overlap into neighboring modules. Using long tails from each flower, sew the small gold center first through the background panel and back through several times to anchor. Then sew the petal bases down around the base using whip stitch or ladder stitch, catching the underlying sc row only (approx 6-8 sewing passes per petal base). Fasten off. (assembly)
Round 4 :
Attach leaves: Arrange 3-4 leaves around each flower: two directly above and one to each side near shell points to mirror printed design. Sew each leaf down at the base with 4-6 small stitches so the leaves sit slightly lifted but secure. Add berry clusters with 2-3 stitches at leaf junctions. (assembly)
Info :
Use a fine needle and small, neat stitches so joins are hidden in the lace holes of the background. Pin every piece before sewing to ensure symmetry and balance across all four modules.
— Scalloped Border and Final Edging :
Round 1 :
With red yarn and smaller hook (3.0mm recommended), join at any outer edge st. Ch 1, sc evenly around entire runner edge working 2 sc in wide shell corners to maintain flatness. Keep around counts even; resulting count may be approx 420 sc around full runner. (approx 420)
Round 2 :
Ch 3, *skip next sc, 5 dc in next sc (scallop made), skip next sc, sl st in next sc* repeat around to create scallops. Adjust spacing so scallops finish evenly at ends. (approx 70 scallops)
Info :
Work scallops so they align with major shell points in the background modules — this creates the decorative curved outline pictured. If you find a gap or a mismatch, add an extra sl st or sc in that area to correct spacing.
Round 3 :
Optional deep ridge: Work 1 round of sc in BLO around the scallops to create a stronger ridge that frames the runner for a more finished appearance. Fasten off and weave in ends. (finishing)
Round 4 :
Optional rope edge: Join red and work crab stitch (reverse sc) around edge for a twisted rope finish. This gives the edge a subtle raised look. (detail)
Info :
Block the entire runner flat after joining and trimming ends. Pin scallops to visible shape and steam or wet block according to yarn type. This final blocking sets shapes of petals and leaves and flattens joins so the runner lies perfectly on the table.
— Additional Decorative Options :
Info :
You can add metallic thread for sparkle by stitching a thin metallic yarn through the golden center or at the edge of petals. Small glass or plastic beads may be sewn at berry points for shine. Use care when attaching small embellishments if the runner will be used around children.
Info :
To scale the runner longer, make additional background modules and join vertically. To shorten, use three modules instead of four. The modular design is flexible and forgiving for size adjustments.
Info :
Throughout the pattern, keep a notepad with counts for each round and motif; this helps maintain symmetry and makes replicating identical motifs easier.
This beautiful poinsettia and holly table runner is a holiday heirloom in the making — each petal and leaf is carefully crafted to bring festive charm to your table. The layered flowers and lacy background create a warm, vintage-inspired centerpiece that you can be proud to display. Blocking and a neat scalloped edge finish the runner with professional polish. 🧶🌟 Spread some handmade holiday cheer and enjoy the compliments that follow! 🎄