🧢 Beautiful ✨ Detailed πŸ’ Adorable

Christmas Pudding Amigurumi Pattern

Christmas Pudding Amigurumi Pattern
4.2β˜… Rating
2-3 Hours Time Needed
2.4K Made This
βœ‚οΈ

Intermediate Level

Ideal for those with basic crochet experience, featuring slightly more advanced stitches and techniques to expand your skills.

⏱️

Bite-Sized Project

Finishes in 2-4 hoursβ€”perfect for an afternoon of creative relaxation.

🎁

Tiny Treasure

Small, sweet, and gift-worthy creations that fit perfectly in the palm of your hand with detailed charm.

About This Christmas Pudding Amigurumi Pattern

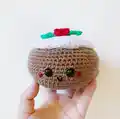
This pattern creates an adorable crochet Christmas Pudding with a squishy body, white icing, green leaves and little red berries. The finished pudding measures about 12cm across and is perfect as a stocking stuffer or holiday decoration. It uses simple amigurumi construction and detailed round-by-round instructions for accurate shaping.

Christmas Pudding Amigurumi Pattern crochet pattern - detailed view of completed project

Includes full materials, stitch abbreviations and assembly steps for sew-on leaves and berries. Ideal for an afternoon project with charming results to gift or display.

Why You'll Love This Christmas Pudding Amigurumi Pattern

I absolutely love this pattern because it captures so much holiday charm in a tiny, cuddly form. I enjoy how quickly the body works up into a cute, squishy shape that still has personality. The small added details like embroidered smiles, brads for berries and sewn-on leaves make each pudding feel handmade and special. I also love that it is approachable yet satisfying, giving you a finished piece in just a few hours.

Christmas Pudding Amigurumi Pattern step 1 - construction progress Christmas Pudding Amigurumi Pattern step 2 - assembly progress Christmas Pudding Amigurumi Pattern step 3 - details and accessories Christmas Pudding Amigurumi Pattern step 4 - final assembly and finishing

Switch Things Up

I love customizing this pattern by changing colors; try a darker brown or cream for different pudding looks.

I often make a tiny ornament version by using thinner yarn and a smaller hook to create a mini pudding for the tree.

I like to replace the brads with embroidered berries if giving to small children to avoid small parts.

For a chunkier, cuddlier pudding swap to bulky yarn and a larger hook for a plush version.

I sometimes add a small loop to the top of the icing to hang it as a decoration or gift tag.

I enjoy embroidering different facial expressions; moving the eyes or changing the mouth shape changes the whole personality.

Try adding metallic thread or a tiny bell to the leaves for a festive sparkle and sound.

I recommend experimenting with safety eyes or French knots for different eye styles and textures.

You can make a matching set in holiday colors, varying berry counts and leaf sizes for variety.

I also occasionally stuff with eco-friendly stuffing or add a small sachet of scented beads for a fragrant decoration.

Common Mistakes & How to Fix Them

βœ— Placing safety eyes too low will look odd and unbalanced; place eyes between rounds 14-15 and 3-4 stitches above the embroidered smile as instructed. βœ— Forgetting to stuff as you go results in lumps or a collapsed shape; stuff semi firmly during rounds 21-29 and add small amounts gradually while shaping. βœ— Skipping stitch counts during increases and decreases causes uneven shaping; count stitches at the end of each round to ensure accuracy. βœ— Not weaving in ends before final assembly makes finishing messy; weave in all ends after FO and before sewing the icing and decorations in place.

Christmas Pudding Amigurumi Pattern

Make a sweet, squishable Christmas Pudding amigurumi perfect for gifts and holiday decor. This pattern walks you through every round, with clear instructions for the body, icing, leaves and berries. Youll enjoy quick shaping and simple assembly to create a charming 12cm pudding. Suitable for crocheters who know basic stitches and want a festive, fast project.

Intermediate 2-3 Hours

Materials Needed for Christmas Pudding Amigurumi Pattern

β€” Main Fabric

  • 01
    Paintbox Yarns One Ball - Paper White (for icing) - one ball
  • 02
    Paintbox Yarns One Ball - Grass Green (for leaves) - one ball
  • 03
    Paintbox Yarns One Ball - Pillar Red (for berries) - one ball
  • 04
    Paintbox Yarns One Ball - Soft Fudge (for body) - one ball
  • 05
    Amigurumi eyes 9mm (2 pieces)
  • 06
    Red brads 5mm (2 pieces) for cheeks/berries
  • 07
    Polyester stuffing - small amount

β€” Tools Required

  • 01
    Crochet hook 3.25mm
  • 02
    Tapestry needle
  • 03
    Glue (for securing brads)
  • 04
    Scissors
  • 05
    Stitch markers (optional)
  • 06
    Pins for assembly (optional)

Progress Tracker

0% Complete

β€” Body :

Info :

Using Brown Yarn:

Round 1 :

MR 6

Round 2 :

inc around [12]

Round 3 :

(sc, inc) x6 [18]

Round 4 :

(sc 2, inc) x6 [24]

Round 5 :

(sc 3, inc) x6 [30]

Round 6 :

(sc 4, inc) x6 [36]

Round 7 :

(sc 5, inc) x6 [42]

Round 8 :

(sc 6, inc) x6 [48]

Round 9 :

(sc 7, inc) x6 [52]

Round 10 :

(sc 8, inc) x6 [60]

Round 11-20 :

sc around [10 rounds]

Info :

Embroider a smile on R13, add eyes between R14-15, 3-4 stitches above smile. Add red brads between R13-14 next to eyes. Secure with glue.

Round 21 :

(sc 8, dec) x6

Round 22 :

(sc 7, dec) x6 [52]

Round 23 :

(sc 6, dec) x6 [48]

Round 24 :

(sc 5, dec) x6 [42]

Round 25 :

(sc 4, dec) x6 [36]

Info :

Stuff semi firmly as you go

Round 26 :

(sc 3, dec) x6

Round 27 :

(sc 2, dec) x6

Round 28 :

(sc, dec) x6

Round 29 :

dec around

Info :

FO. Weave in all ends.

Info :

Squish the body by pressing the top and bottom so it is more of a tall pancake shape.

β€” Leaves :

Leaves (Make three or more) :

Using Green Yarn: ch 7, sl st in 2nd ch from hook through bb, (sl st through bb, ch 2, sl st in same bb), sl st in next 2 back bumps, ch 3, sl st in same bb, sl st in next bb, 3 sl st in next bb. working on other side of the ch: sl st in next 2 st, ch 3, sl st in current st, sl st in next, ch 2, sl st in same, sl st in last. FO leaving long tail for sewing.

β€” Berries :

Round 1 :

Using Red Yarn: MR 4

Info :

Clean FO and leave a long tail for sewing.

β€” Icing :

Info :

Using White Yarn:

Round 1 :

MR 6 [6]

Round 2 :

inc around [12]

Round 3 :

(sc, inc) x6 [18]

Round 4 :

(sc 2, inc) x6 [24]

Round 5 :

(sc 3, inc) x6 [30]

Round 6 :

(sc 4, inc) x6 [36]

Round 7 :

(sc 5, inc) x6 [42]

Round 8-9 :

sc, hdc in next 2 st, sc in next 3st, hdc, sc, hdc, sc, hdc in next 2 st, sc in next 2 st, hdc in next 3 st, sc in next 4 st, hdc in next 5 st, sc in next 6 st, hdc in 8 st, sc in last 2 st. [2 rounds]

Info :

FO leaving long tail for sewing.

β€” Assembly :

Info :

Sew Leaves onto the top of the icing, then the berries. Place Icing onto the top of the head (around R21-29). Weave in all ends. Please use picture for reference.

Info :

Congratulations! You did it :) Hope you enjoyed this pattern and have a wonderful Christmas!

Assembly Instructions

  • Sew leaves onto the top of the icing, arranging three or more leaves evenly and secure with small whipstitches.
  • Sew berries onto the icing between the leaves, using the long tails from the berries to stitch them securely and hide ends underneath.
  • Place the finished icing (with leaves and berries attached) onto the top of the body around rounds 21-29 and sew firmly around the edge.
  • Embroider the smile on round 13 and add the 9mm safety eyes between rounds 14-15, three to four stitches above the smile; secure brads with glue.
  • Weave in all ends after assembly and press the body top and bottom to squish into a tall pancake shape for the final look.

Important Notes

  • πŸ’‘Stuff the body semi firmly as you go, especially during rounds 21-29, to maintain an even shape and avoid lumps.
  • πŸ’‘Place safety eyes between rounds 14-15 and 3-4 stitches above the embroidered smile to achieve the correct facial placement.
  • πŸ’‘Weave in all ends after finishing each piece and before final assembly to create a clean, professional finish.
  • πŸ’‘Use the photos as reference for placement and orientation of the icing, leaves and berries during sewing and finishing.

This adorable Christmas Pudding amigurumi is a festive little project youll keep coming back to. Its small size and quick make make it perfect for last-minute gifts and stocking stuffers. Add it to your holiday decor or make a set for friends and family. πŸŽ„πŸ§Ά

You ask,

we answer.

FAQs

What size will the finished piece be?

The finished amigurumi measures about 12cm across when using the recommended yarn and 3.25mm hook.

Can I use different yarn weights for this pattern?

Yes, you can substitute yarn weights, but the final size and stitch tension will change; choose an appropriate hook for the yarn you select.

Do I need prior crochet experience for this pattern?

This pattern is intermediate, so basic amigurumi skills like working in the round, increases and decreases are recommended.

How long does this project typically take to complete?

Most crocheters finish this project in about 2-4 hours depending on experience and assembly time.