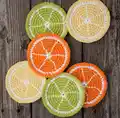
About This Citrus Slice Coasters Pattern
This pattern creates citrus slice coasters crocheted in concentric rounds with two contrasting colors to mimic fruit slices. You will work simple single crochet increases to form a flat disc, then finish by embroidering slice segments using a back stitch. The design is beginner-friendly and uses Lily Sugar'n Cream cotton for durability and absorbency.
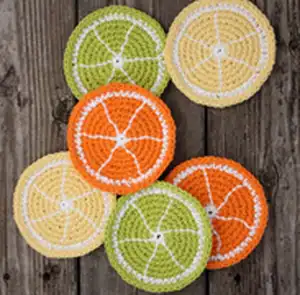
Perfect for quick makes and gift sets, each coaster measures approximately 4½" (11.5 cm) across. The pattern includes full round-by-round instructions and finishing tips to get neat embroidered segment lines.
Why You'll Love This Citrus Slice Coasters Pattern
I absolutely love this pattern because it turns a simple crochet disc into a cheerful, functional piece that brightens any table. I enjoy how quickly each coaster works up, letting you make a full set in just a few hours. The embroidered segment lines add a handcrafted, illustrative charm that feels satisfyingly professional. Making these is a relaxing way to practice consistent tension and simple increases while producing something useful and beautiful.
Switch Things Up
I love experimenting with color combinations; try pastel shades, neon brights, or ombre cakes to change the mood of these citrus coasters.
I sometimes swap Contrast B colors mid-round to create a two-tone rind effect for extra visual interest.
I recommend using a thicker cotton yarn and larger hook if you want chunkier, more absorbent coasters for heavier drinks.
I also make minis by using a lighter weight yarn and smaller hook to create keychain charms or tiny ornaments.
I often embroider different segment patterns—try thinner or thicker segment lines for varied looks, or add small seeds with french knots for a playful detail.
I sometimes add a non-slip felt or fabric backing glued or stitched on for added protection and durability on smooth surfaces.
I enjoy turning these into a coaster set by alternating three colors in a repeating order to create a coordinated set for gift-giving.
I sometimes stitch a contrasting edging around the final round for a crisp border that complements the embroidered lines.
I like to experiment with variegated yarns for the center rounds to give each coaster a unique, marbled look without extra effort.
I also use these motifs as appliques on bags, trivets, or table runners by making larger versions and stitching them together into a decorative panel.
Common Mistakes & How to Fix Them
✗ Not counting stitches at the end of each round leads to incorrect shaping; count your stitches every round and compare to the pattern counts.
✗ Changing colors without securing ends can cause loose joins and messy backs; carry the yarn neatly or weave in ends as you go to keep edges tidy.
✗ Pulling stitches too tight when embroidering will pucker the coaster fabric; keep the back stitch comfortably loose and even to maintain a flat coaster surface.
✗ Skipping the join with slip stitch at the end of rounds causes uneven round starts; always join as instructed to keep rounds aligned and neat.
✗ Using the wrong hook size will change coaster size and gauge; check your gauge and switch hook sizes to match the specified 16 sc and 17 rows = 4".