🧢 Beautiful ✨ Detailed πŸ’ Adorable

Citrus Slice Coasters Pattern

Citrus Slice Coasters Pattern
4.2β˜… Rating
2-3 Hours Time Needed
2.2K Made This
βœ‚οΈ

Intermediate Level

Ideal for those with basic crochet experience, featuring slightly more advanced stitches and techniques to expand your skills.

⏱️

Bite-Sized Project

Finishes in 2-4 hoursβ€”perfect for an afternoon of creative relaxation.

🏑

Cozy Accent

A warm touch for your space that transforms ordinary corners into inviting nooks filled with handmade charm.

About This Citrus Slice Coasters Pattern

This pattern creates charming citrus slice coasters (lemon, lime, orange, grapefruit) worked in cotton yarn for absorbency and durability. You will use front post stitches and working into stitches two rounds below to create the segmented fruit slices. The coasters finish at about 11 cm (4.5")β€”perfect as practical table accents or colorful gift sets.

Citrus Slice Coasters Pattern crochet pattern - detailed view of completed project

Clear step-by-step rounds guide you through color changes and textured stitch placement. Suitable for crocheters comfortable with basic stitches and eager to practice FPdc and BLO techniques.

Why You'll Love This Citrus Slice Coasters Pattern

I absolutely love this pattern because it turns simple crochet stitches into a playful, colorful coaster that brightens any table. I enjoy the rhythm of the front post work and the visual pop you get from the contrasting colors. It is satisfying to see the citrus segments form as you progress through the rounds. I also appreciate that the pattern uses cotton yarn for a durable, washable finished piece perfect for everyday use.

Citrus Slice Coasters Pattern step 1 - construction progress Citrus Slice Coasters Pattern step 2 - assembly progress Citrus Slice Coasters Pattern step 3 - details and accessories Citrus Slice Coasters Pattern step 4 - final assembly and finishing

Switch Things Up

I love customizing these coasters by swapping colors to match my kitchen or seasonal decorβ€”try pastel shades for spring or jewel tones for autumn.

You can make minis for keychains by using thinner yarn and a smaller hook, creating tiny citrus charms from the same stitch logic.

To make oversized placemats, use a bulkier cotton yarn and increase rounds proportionally while maintaining the segment pattern.

I often experiment with embroidery on top of the finished coaster for extra detail, like tiny seeds or script initials.

Swap the white segment outline for a contrasting darker color to create a stained-glass or mandala-like effect that changes the whole look.

Try alternating two main colors in the segments to create a striped fruit effectβ€”this gives a modern twist to the classic citrus slice.

I sometimes add a light layer of textile adhesive to the back for extra non-slip grip on smooth surfaces, testing carefully on a sample first.

For gifting, I package sets with a coordinating kitchen towel or mug and attach a small crocheted label with the color names used.

If you enjoy texture, mix in a round of surface crochet or slip-stitch rounds to add a raised border instead of the final single crochet rounds.

Don't be afraid to mix fibers: cotton gives absorbency, but a cotton-blend can soften the coaster and change the drape and finish, so always test before making a full set.

Common Mistakes & How to Fix Them

βœ— Changing colors mid-round incorrectly; always make the color change at the end of the round by dropping the first color and working the final slip stitch with the new color so all tails stay on the WS. βœ— Working into the wrong stitch when instructed to work into stitches two rounds below; be sure to target the posts of the indicated round and work in front of the ch-spaces as instructed to maintain proper segment placement. βœ— Leaving stitch marker in place when you need to remove it causes crowded stitches; remove the stitch marker when working in the marked stitch but do NOT remove it when the pattern instructs you to work around the marked stitch. βœ— Skipping counting after increases can create uneven coasters; count your stitches at the end of each round to confirm you have the correct totals as listed in the pattern. βœ— Pulling yarn too tight on FPdc and BLO stitches will distort texture; maintain even, relaxed tension especially when wrapping yarn and inserting the hook for post and back-loop work.

Citrus Slice Coasters Pattern

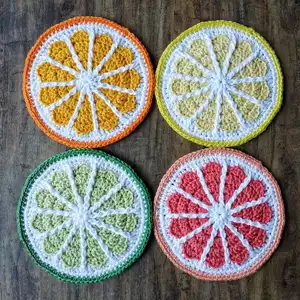
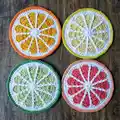
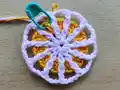
Create bright, summery crochet citrus slice coasters that add a handmade pop to your table. This pattern walks you through each round with clear instructions so you can make lemon, lime, orange, and grapefruit designs. Using cotton yarn for durability and easy care, these coasters are both decorative and functional. Perfect for gifting or refreshing your own home decor.

Intermediate 2-3 Hours

Materials Needed for Citrus Slice Coasters Pattern

β€” Main Fabric

  • 01
    Scheepjes Catona 50 (100% cotton), 125 m [137 yds]/50 g [1.8 oz], Color 106 Snow White - 1 skein for all coasters
  • 02
    Scheepjes Catona 10 (100% cotton), 25 m [27 yds]/10 g [0.35 oz], MC 403 Lemonade - 1 skein (Lemon coaster)
  • 03
    Scheepjes Catona 10 (100% cotton), 25 m [27 yds]/10 g [0.35 oz], MC 392 Lime Juice - 1 skein (Lime coaster)
  • 04
    Scheepjes Catona 10 (100% cotton), 25 m [27 yds]/10 g [0.35 oz], MC 208 Yellow Gold - 1 skein (Orange coaster)
  • 05
    Scheepjes Catona 10 (100% cotton), 25 m [27 yds]/10 g [0.35 oz], MC 252 Watermelon - 1 skein (Grapefruit coaster)
  • 06
    Scheepjes Catona 10 (100% cotton), 25 m [27 yds]/10 g [0.35 oz], CC 280 Lemon - 1 skein (Lemon contrast)
  • 07
    Scheepjes Catona 10 (100% cotton), 25 m [27 yds]/10 g [0.35 oz], CC 412 Forest Green - 1 skein (Lime contrast)
  • 08
    Scheepjes Catona 10 (100% cotton), 25 m [27 yds]/10 g [0.35 oz], CC 281 Tangerine - 1 skein (Orange contrast)
  • 09
    Scheepjes Catona 10 (100% cotton), 25 m [27 yds]/10 g [0.35 oz], CC 524 Apricot - 1 skein (Grapefruit contrast)

β€” Tools Required

  • 01
    3 mm (US Size D/3) crochet hook
  • 02
    Stitch marker
  • 03
    Yarn needle

Progress Tracker

0% Complete

β€” Instructions :

Info :

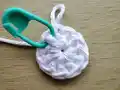
With White, ch 4, sl st to form a ring.

Round 1 :

(White) Ch 3 (counts as dc), dc in ring, place marker in st just made, 9 dc in ring, sl st in 3rd ch of beginning ch-3 sp to join. (11 dc)
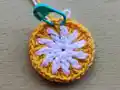
Round 2 :

(White) Ch 1 (doesn't count), FPdc around st at base of ch-1, ch 2, [FPdc around next st, ch 2] 10 times, with MC sl st in first FPdc to join. (11 FPdc, 11 ch-2 sps)

Round 3 :

(MC) Ch 1, working in front of ch-sps, 2 dc in marked st of Round 1, place marker in first dc just made, [ch 1, skip FPdc of Round 2, 2 dc in next st of Round 1] 10 times, with White sl st in the beginning ch-1 to join. (22 dc, 11 ch-1 sps)

Round 4 :

(White) Ch 1 (doesn't count), FPdc around st of same color of Round 2 below, ch 3, skip 2 sts of Round 3, [FPdc around next st of Round 2, ch 3, skip 2 sts of Round 3] 10 times, with MC sl st in first FPdc to join. (11 FPdc, 11 ch-3 sps)

Round 5 :

(MC) Ch 1, dc in marked st of Round 3, place marker in st just made, 2 dc in next dc of Round 3, [ch 1, skip FPdc of Round 4, dc in next dc of Round 3, 2 dc in next dc of Round 3] 10 times, with White sl st in the beginning ch-1 to join. (33 dc, 11 ch-1 sps)

Round 6 :

(White) Ch 1 (doesn't count), FPdc around st of same color of Round 4 below, ch 4, skip 3 sts of Round 5, [FPdc around next st of Round 4, ch 4, skip 3 sts of Round 5] 10 times, with MC sl st in first FPdc to join. (11 FPdc, 11 ch-4 sps)

Round 7 :

(MC) Ch 1, dc in marked st of Round 5, place marker in st just made, 2 dc in next dc of Round 5, dc in next dc of Round 5, [ch 1, skip FPdc of Round 6, dc in next dc of Round 5, 2 dc in next dc of Round 5, dc in next dc of Round 5] 10 times, with White sl st in the beginning ch-1 to join. (44 dc, 11 ch-1 sps)

Round 8 :

(White) Ch 1 (doesn't count), FPdc around st of same color of Round 6 below, ch 5, skip 4 sts of Round 7, [FPdc around next st of Round 6, ch 5, skip 4 sts of Round 7] 10 times, with MC sl st in first FPdc to join. (11 FPdc, 11 ch-5 sps)

Round 9 :

(MC) Ch 1, sc in marked st of Round 7, (hdc, dc) in next dc, (dc, hdc) in next dc, sc in next dc, [ch 1, skip FPdc of Round 8, sc in next dc of Round 7, (hdc, dc) in next dc, (dc, hdc) in next dc, sc in next dc] 10 times, with White sl st in the beginning ch-1 to join, fasten off MC. (22 sc, 22 hdc, 22 dc, 11 ch-1 sps)

Round 10 :

(White) Ch 1 (doesn't count), [FPdc around st of same color of Round 8 below, BLO-dc in next st of Round 9, BLO-hdc in next st, BLO-sc in each next 2 sts, BLO-hdc in next st, BLO-dc in next st] 11 times, sl st in first FPdc to join. (11 FPdc, 22 BLO-dc, 22 BLO-hdc, 22 BLO-sc)

Round 11 :

(White) Ch 1 (doesn't count), 2 sc in st at base of ch-1, sc in each next 10 sts, [2 sc in next st, sc in each next 10 sts] 6 times, sl st in first sc to join, fasten off White. (84 sc)

Round 12 :

(CC) Join CC in any st of Round 11; ch 1 (doesn't count), 2 sc in st at base of ch-1, sc in each next 11 sts, [2 sc in next st, sc in each next 11 sts] 6 times, sl st in first sc to join, fasten off CC. (91 sc)

Info :

Finishing: Weave in yarn ends. Block to measurements.

Assembly Instructions

  • Make color changes at the end of the round: work as indicated until the end of the round, drop the first color, work the last slip stitch with the second color to join the round, then continue the next round with the new color so all tails and carries stay on the wrong side.
  • From Round 4 to Round 9 work the stitches into stitches of the same color two rounds below; always insert in front of the chain-spaces of the previous round to create the layered segment effect.
  • Remove stitch marker when working in the marked stitch itself, but do NOT remove the marker if you are instructed to work around the marked stitch so you do not lose placement.
  • After finishing each coaster, weave in all yarn ends securely and block the coaster to the finished measurement (11 cm / 4.5") to flatten and even out stitches.

Important Notes

  • πŸ’‘Make color changes at the end of a round and carry tails on the wrong side for a clean finish.
  • πŸ’‘When working stitches into rounds below, always work in front of the chain-spaces to achieve the correct texture and placement.
  • πŸ’‘Use and move a stitch marker to mark important stitch positions, removing it only when the pattern tells you to work in that marked stitch.
  • πŸ’‘Block finished coasters to measurements to flatten and set stitch position for the neatest final look.

These bright Citrus Slice Coasters are a cheerful way to bring handmade color to your home and make lovely gifts. They combine textured post stitches and clever color work for a fun finishing touch to any table. Make a set in mixed citrus shades to brighten every season. πŸŠπŸ‹

You ask,

we answer.

FAQs

What size will the finished piece be?

The finished coaster measures approximately 11 cm (4.5") in diameter when using the recommended Catona cotton yarn and 3 mm hook.

Can I use different yarn weights for this pattern?

Yes, you can change yarn weight, but that will alter the finished size and gauge; choose an appropriate hook for your yarn and swatch to match the stated gauge where possible.

Do I need prior crochet experience for this pattern?

This pattern is rated intermediate because it uses front post double crochet (FPdc) and working into stitches two rounds below; a basic knowledge of common stitches and reading rounds is recommended.

How long does this project typically take to complete?

Most crocheters can complete a single coaster in 2-3 hours depending on experience, with larger sets taking proportionally longer.