🧢 Beautiful ✨ Detailed πŸ’ Adorable

Citrus Slice Coasters Pattern

Citrus Slice Coasters Pattern
4.5β˜… Rating
2-3 Hours Time Needed
2.0K Made This
βœ‚οΈ

Intermediate Level

Ideal for those with basic crochet experience, featuring slightly more advanced stitches and techniques to expand your skills.

⏱️

Bite-Sized Project

Finishes in 2-4 hoursβ€”perfect for an afternoon of creative relaxation.

🏑

Cozy Accent

A warm touch for your space that transforms ordinary corners into inviting nooks filled with handmade charm.

About This Citrus Slice Coasters Pattern

Create charming citrus slice coasters with this colorful crochet pattern that uses front-post stitches to form realistic segments. The design is compact and works up quickly, making it perfect for gifts or a bright addition to your kitchen. Youll learn color changes at round ends and how to work stitches into rounds below for a textured look.

Citrus Slice Coasters Pattern crochet pattern - detailed view of completed project

This pattern includes detailed rounds, stitch explanations, and a short materials list so you can start right away. Use the suggested cotton yarns for a crisp finished look that is easy to wash and use daily.

Why You'll Love This Citrus Slice Coasters Pattern

I absolutely love this pattern because it combines playful colorwork with simple shaping to create a delightful, functional accessory. I enjoy how the front-post stitches give the slices depth and realistic texture without complicated assembly. It is quick to make, so I can crochet several while watching a show and still finish a set in one afternoon. The pattern is versatile and makes great gifts β€” I often make a set in different colorways for friends.

Citrus Slice Coasters Pattern step 1 - construction progress Citrus Slice Coasters Pattern step 2 - assembly progress Citrus Slice Coasters Pattern step 3 - details and accessories Citrus Slice Coasters Pattern step 4 - final assembly and finishing

Switch Things Up

I love customizing these coasters by changing the color palette to match my kitchenβ€”try pastels for a soft vintage vibe or neon brights for a summer table.

I often experiment with different yarn weights and hooks; using a thicker cotton and larger hook makes chunky coasters while finer yarn yields delicate minis.

I sometimes add a thin layer of cork or felt to the underside for extra protection and a polished finish; glue or stitch it in place carefully around the edge.

I enjoy stitching embroidered details over the segments for a whimsical lookβ€”tiny seeds or sparkles can add personality.

You can vary the number of segments by adjusting the repeats in Rounds 2 and 3 for a more stylized fruit slice.

I like to mix and match main colors and contrasting colors across a set so each coaster feels unique but coordinated.

For a dishwasher-safe option, use mercerized cotton and block the pieces carefully to tighten the stitches before applying any backing.

I sometimes join coasters into a larger trivet by slip-stitching edges together in a contrasting color for a useful kitchen centerpiece.

Try combining two different colorways into a reversible coaster by working an extra decorative round in a second color on the back.

I recommend practicing the FPdc and BLO techniques on a scrap swatch before starting so your segments will be even and neat when you make the full coaster.

Common Mistakes & How to Fix Them

βœ— Skipping the color change technique at the end of rounds can leave loose tails on the right side; always drop the first color and finish the last sl st with the new color so tails and carries lie on the WS. βœ— Forgetting to work in front of the chain-spaces when specified will hide the segment detail; be sure to insert stitches in front of ch-sps for the correct raised look. βœ— Removing the stitch marker too early can cause you to lose the marked stitch position; remove the stitch marker only when instructed and do not remove it if working around the marked stitch. βœ— Not counting stitches after increasing rounds leads to mismatched segments and uneven edges; count your stitches at the end of each increase round to confirm the correct stitch count.

Citrus Slice Coasters Pattern

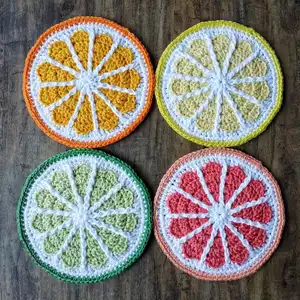
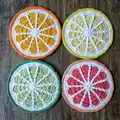
Make bright, fruity coasters inspired by citrus slices to brighten your table and protect surfaces. This pattern uses simple crochet stitches with fun front-post detailing to create realistic fruit segments. Youll enjoy quick rounds and playful colorwork as you craft a matching set for gifts or home use.

Intermediate 2-3 Hours

Materials Needed for Citrus Slice Coasters Pattern

β€” Main Fabric

  • 01
    Scheepjes Catona 50 (100% cotton), 125 m [137 yds]/50 g [1.8 oz], color 106 Snow White - 1 skein for all coasters
  • 02
    Scheepjes Catona 10 (100% cotton), 25 m [27 yds]/10 g [0.35 oz] - 1 skein of each color option
  • 03
    Lemon MC: 403 Lemonade - quantity: 1 skein Catona 10
  • 04
    Lemon CC: 280 Lemon - quantity: 1 skein Catona 10
  • 05
    Lime MC: 392 Lime Juice - quantity: 1 skein Catona 10
  • 06
    Lime CC: 412 Forest Green - quantity: 1 skein Catona 10
  • 07
    Orange MC: 208 Yellow Gold - quantity: 1 skein Catona 10
  • 08
    Orange CC: 281 Tangerine - quantity: 1 skein Catona 10
  • 09
    Grapefruit MC: 252 Watermelon - quantity: 1 skein Catona 10
  • 10
    Grapefruit CC: 524 Apricot - quantity: 1 skein Catona 10

β€” Tools Required

  • 01
    3 mm (US Size D/3) crochet hook
  • 02
    Stitch marker
  • 03
    Yarn needle

Progress Tracker

0% Complete

β€” Finished Measurements :

Info :

Finished measurements: 11 cm (4.5").

β€” Yarn :

Info :

Scheepjes Catona 50 (100% cotton, 125 m [137 yds]/50 g [1.8 oz]), color 106 Snow White, 1 skein for all coasters.

Info :

Scheepjes Catona 10 (100% cotton, 25 m [27 yds]/10 g [0.35 oz]), 1 skein of each: Lemon MC 403 Lemonade / CC 280 Lemon; Lime MC 392 Lime Juice / CC 412 Forest Green; Orange MC 208 Yellow Gold / CC 281 Tangerine; Grapefruit MC 252 Watermelon / CC 524 Apricot.

β€” Hook and Notions :

Info :

3 mm (US Size D/3) crochet hook. Stitch marker. Yarn needle.

β€” Gauge :

Info :

10 rounds in pattern = 10 cm (4").

β€” Pattern Notes :

Infos :

The color change is made at the end of the round: work as indicated until the end of the round, drop 1st color, work the last sl st with the 2nd color to join the round, continue the next round with the new color. Make sure all yarn tails and carries are on WS of work. From Round 4 to Round 9 the sts are worked in sts of the same color 2 rounds below. When working in sts of the same color 2 rounds below, always work in front of ch-sps of the previous round. Remove stitch maker when working in marked stitch, but do NOT remove if working around marked stitch.

β€” Stitches and Abbreviations :

Info :

BLO: back loop only: insert hook only in back loop of indicated st. CC: contrasting color. ch: chain. ch-sp: chain space. dc: double crochet. FPdc: front post double crochet: yarn over and insert hook from front to back to front around post of previous row, yarn over and pull up loop, [yarn over and pull through 2 loops] 2 times. hdc: half double crochet. MC: main color. sl st: slip stitch. sc: single crochet.

β€” Instructions :

Info :

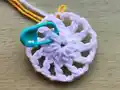
With White, ch 4, sl st to form a ring.

Round 1 :

Round 1 (White): Ch 3 (counts as dc), dc in ring, place marker in st just made, 9 dc in ring, sl st in 3rd ch of beginning ch-3 sp to join. (11 dc)

Round 2 :

Round 2 (White): Ch 1 (doesn't count), FPdc around st at base of ch-1, ch 2, [FPdc around next st, ch 2] 10 times, with MC sl st in first FPdc to join. (11 FPdc, 11 ch-2 sps)

Round 3 :

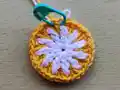
Round 3 (MC): Ch 1, working in front of ch-sps, 2 dc in marked st of Round 1, place marker in first dc just made, [ch 1, skip FPdc of Round 2, 2 dc in next st of Round 1] 10 times, with White sl st in the beginning ch-1 to join. (22 dc, 11 ch-1 sps)

Round 4 :

Round 4 (White): Ch 1 (doesn't count), FPdc around st of same color of Round 2 below, ch 3, skip 2 sts of Round 3, [FPdc around next st of Round 2, ch 3, skip 2 sts of Round 3] 10 times, with MC sl st in first FPdc to join. (11 FPdc, 11 ch-3 sps)

Round 5 :

Round 5 (MC): Ch 1, dc in marked st of Round 3, place marker in st just made, 2 dc in next dc of Round 3, [ch 1, skip FPdc of Round 4, dc in next dc of Round 3, 2 dc in next dc of Round 3] 10 times, with White sl st in the beginning ch-1 to join. (33 dc, 11 ch-1 sps)

Round 6 :

Round 6 (White): Ch 1 (doesn't count), FPdc around st of same color of Round 4 below, ch 4, skip 3 sts of Round 5, [FPdc around next st of Round 4, ch 4, skip 3 sts of Round 5] 10 times, with MC sl st in first FPdc to join. (11 FPdc, 11 ch-4 sps)

Round 7 :

Round 7 (MC): Ch 1, dc in marked st of Round 5, place marker in st just made, 2 dc in next dc of Round 5, dc in next dc of Round 5, [ch 1, skip FPdc of Round 6, dc in next dc of Round 5, 2 dc in next dc of Round 5, dc in next dc of Round 5] 10 times, with White sl st in the beginning ch-1 to join. (44 dc, 11 ch-1 sps)

Round 8 :

Round 8 (White): Ch 1 (doesn't count), FPdc around st of same color of Round 6 below, ch 5, skip 4 sts of Round 7, [FPdc around next st of Round 6, ch 5, skip 4 sts of Round 7] 10 times, with MC sl st in first FPdc to join. (11 FPdc, 11 ch-5 sps)

Round 9 :

Round 9 (MC): Ch 1, sc in marked st of Round 7, (hdc, dc) in next dc, (dc, hdc) in next dc, sc in next dc, [ch 1, skip FPdc of Round 8, sc in next dc of Round 7, (hdc, dc) in next dc, (dc, hdc) in next dc, sc in next dc] 10 times, with White sl st in the beginning ch-1 to join, fasten off MC. (22 sc, 22 hdc, 22 dc, 11 ch-1 sps)

Round 10 :

Round 10 (White): Ch 1 (doesn't count), [FPdc around st of same color of Round 8 below, BLO-dc in next st of Round 9, BLO-hdc in next st, BLO-sc in each next 2 sts, BLO-hdc in next st, BLO-dc in next st] 11 times, sl st in first FPdc to join. (11 FPdc, 22 BLO-dc, 22 BLO-hdc, 22 BLO-sc)

Round 11 :

Round 11 (White): Ch 1 (doesn't count), 2 sc in st at base of ch-1, sc in each next 10 sts, [2 sc in next st, sc in each next 10 sts] 6 times, sl st in first sc to join, fasten off White. (84 sc)

Round 12 :

Round 12 (CC): Join CC in any st of Round 11; ch 1 (doesn't count), 2 sc in st at base of ch-1, sc in each next 11 sts, [2 sc in next st, sc in each next 11 sts] 6 times, sl st in first sc to join, fasten off CC. (91 sc)

β€” Finishing :

Info :

Weave in yarn ends. Block to measurements.

Assembly Instructions

  • Weave in all yarn ends securely after finishing Round 12 to ensure no loose tails remain and trim excess.
  • Block each coaster to measurements (11 cm / 4.5") to flatten and even out stitches for a professional finish.
  • Follow the color change instructions: drop the 1st color at the end of the round and work the last sl st with the 2nd color to join so that all tails and carries remain on the wrong side.
  • Place and remove stitch marker as directed: remove the marker when working into the marked stitch, but do not remove it when working around the marked stitch to preserve round alignment.

Important Notes

  • πŸ’‘The color change is made at the end of the round; finish the last sl st with the new color so yarn tails lie on the WS.
  • πŸ’‘From Round 4 to Round 9 the stitches are worked into the stitches of the same color two rounds below; work these in front of the chain-spaces.
  • πŸ’‘Remove the stitch marker only when instructedβ€”do not remove it if you are instructed to work around the marked stitch.

These bright Citrus Slice Coasters bring a splash of color and handcrafted charm to any table. Theyre quick to make and perfect for gifting or refreshing your own home decor. Mix and match colorways to create a set that suits your style and brighten every coffee break. πŸ‹πŸŠπŸ§Ά

You ask,

we answer.

FAQs

What size will the finished piece be?

The finished coaster measures approximately 11 cm (4.5") in diameter when using the recommended yarn and 3 mm hook.

Can I use different yarn weights for this pattern?

Yes, you can use a different yarn weight, but the final size will change; adjust your hook accordingly and check gauge to achieve desired measurements.

Do I need prior crochet experience for this pattern?

This pattern is rated intermediate due to front-post stitches and working into rounds below, so basic knowledge of crochet stitches and reading rounds is recommended.

How long does this project typically take to complete?

Most crocheters finish a single coaster in 2-3 hours depending on experience and speed; making a set will take correspondingly longer.